
Blog / MyLead Guide
What Are Content Lockers in MyLead and How Do They Work?
This article is updated regularly
Last update:
05 December 2025
A content locker is a MyLead tool that blocks access to selected content on your website, blog, or app until the visitor completes an offer — installing an app, filling out a survey, or registering. MyLead provides four locker types: CPA Locker, Captcha Locker, File Locker, and Mobile Rewards. Each conversion generates commission for you as the publisher.
This guide walks you through creating every MyLead content locker, from desktop and mobile setup to website codes and conversion tracking. You will also see how Incent campaigns and the Offer API expand your monetization options.
What you'll learn from this article:
how the four MyLead locker types differ and when to use each,
how to create and customize a CPA Locker for desktop and mobile,
how to set up Captcha, File, and Mobile Rewards lockers step by step,
how to grab website codes and track conversions with sub parameters,
how Incent campaigns and the Offer API automate your offer selection.
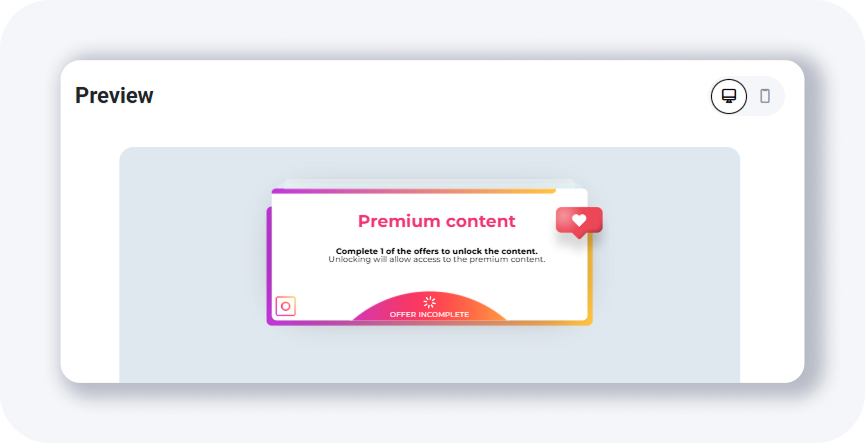
What is a content locker and how does it work?
A content locker monetizes your traffic by gating content behind a task. The visitor sees an overlay, completes a required offer — an app install, survey, or registration — and then unlocks the file, article, or page. You earn a commission for every completed conversion. MyLead handles offer matching, tracking, and payouts automatically.
MyLead is the affiliate network most often associated with content lockers, and the platform groups them under one panel. You pick a locker type, attach incentivized offers, and embed the generated code on your site. Every type shares the same block-complete-unlock logic, but differs in layout and use case — a classic lead magnet and content locker approach.
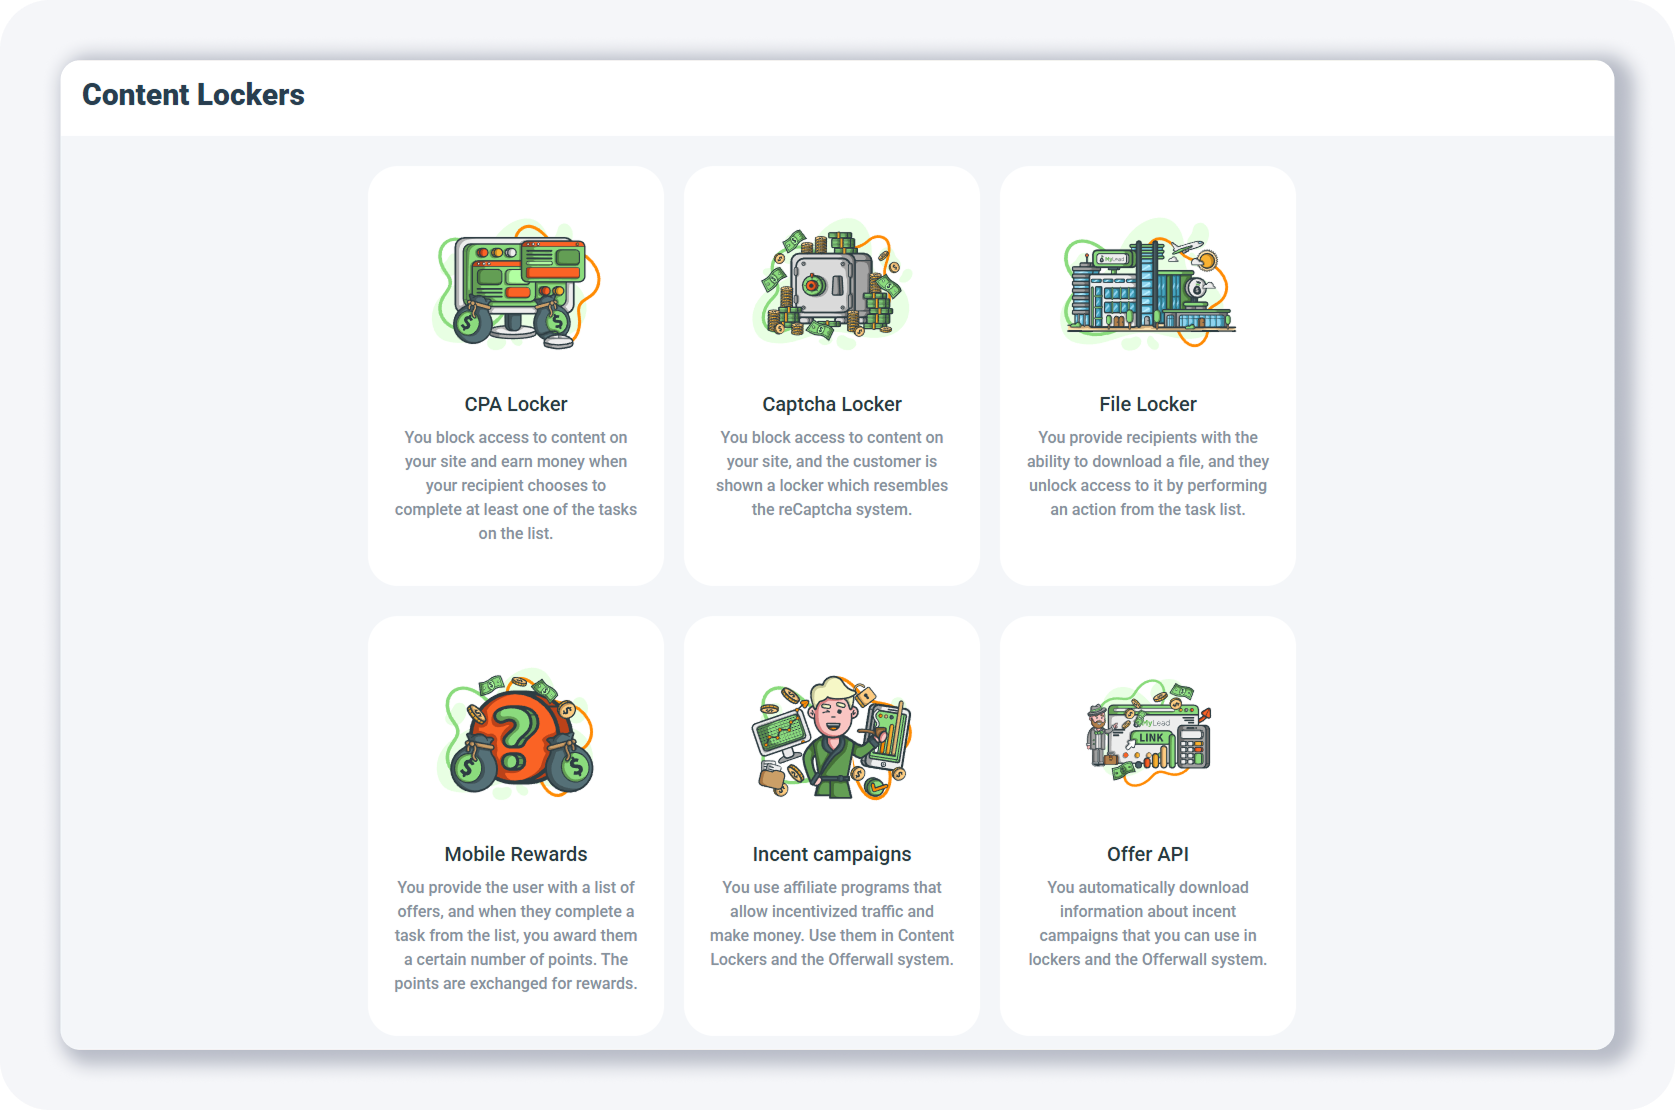
The Content Lockers panel offers six building blocks:
CPA Locker — blocks content until the visitor completes at least one task from the offer list.
Captcha Locker — shows a locker that resembles the reCAPTCHA security system.
File Locker — gates a file download behind a completed action.
Mobile Rewards — gives users a points-based reward system for completing offers.
Incent campaigns — incentivized offers you load into any locker.
Offer API — automatically downloads incent campaign data for lockers and the Offerwall.
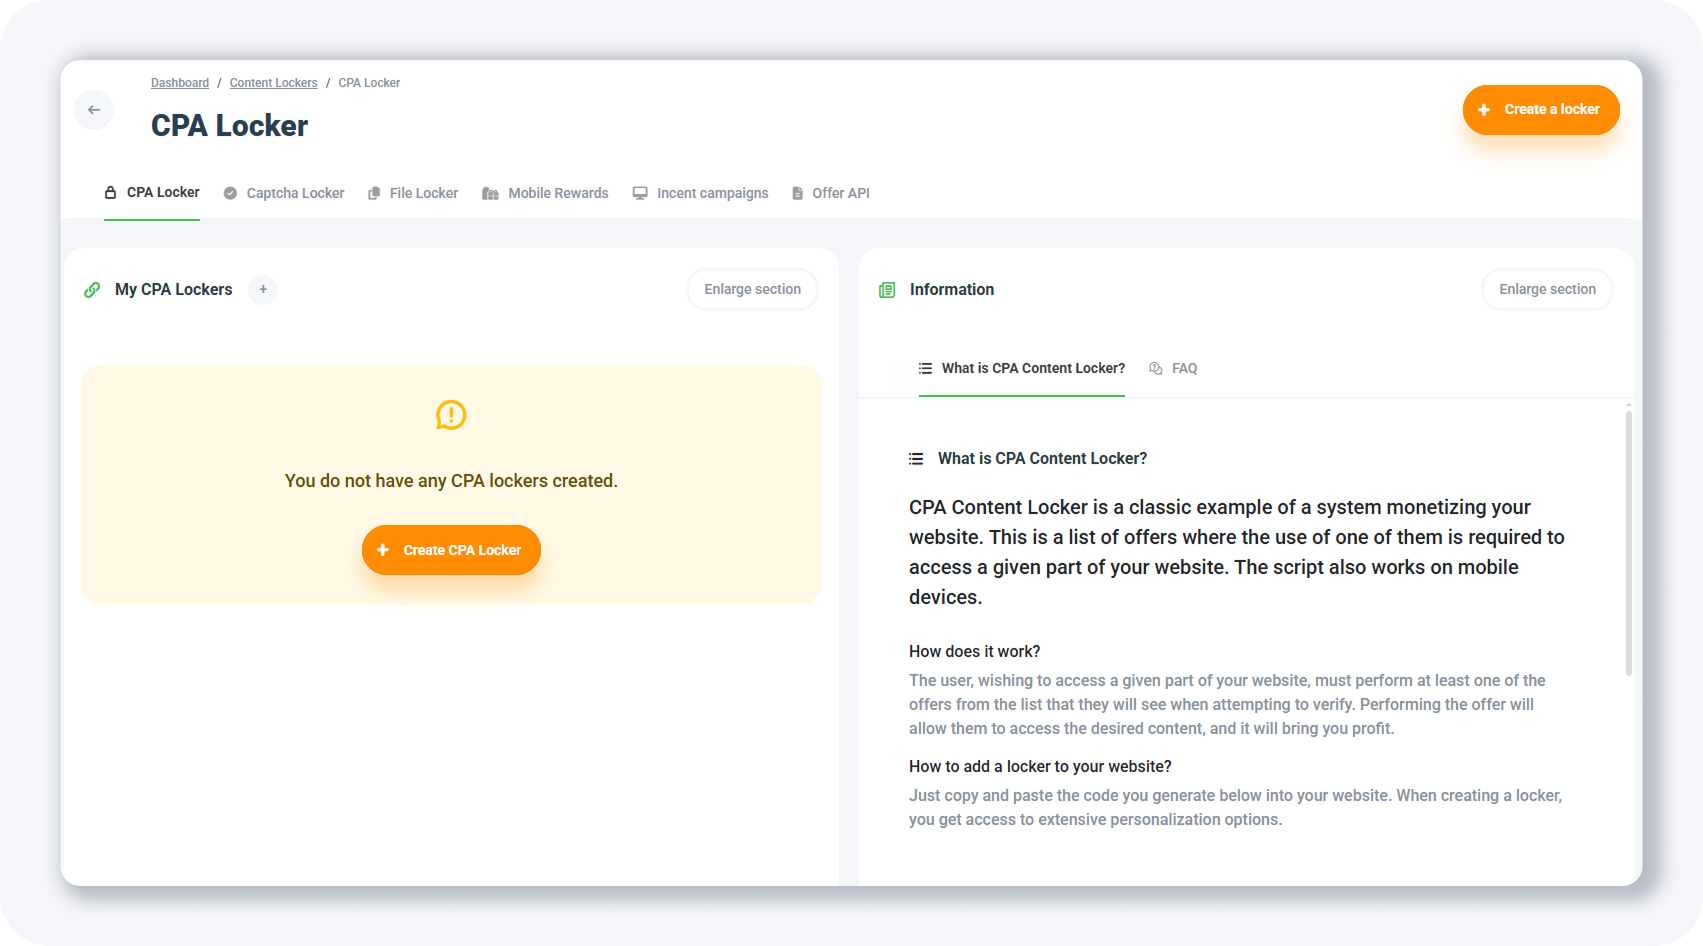
How do you create a CPA Locker?
A CPA Locker blocks a page or section until the visitor completes a set number of offers. To create one, open the Content Lockers page, click + Create CPA Locker, and fill out the Creating Locker form. You set the locker name, required conversions, loading method, unlock action, and access time before adding it to your site.
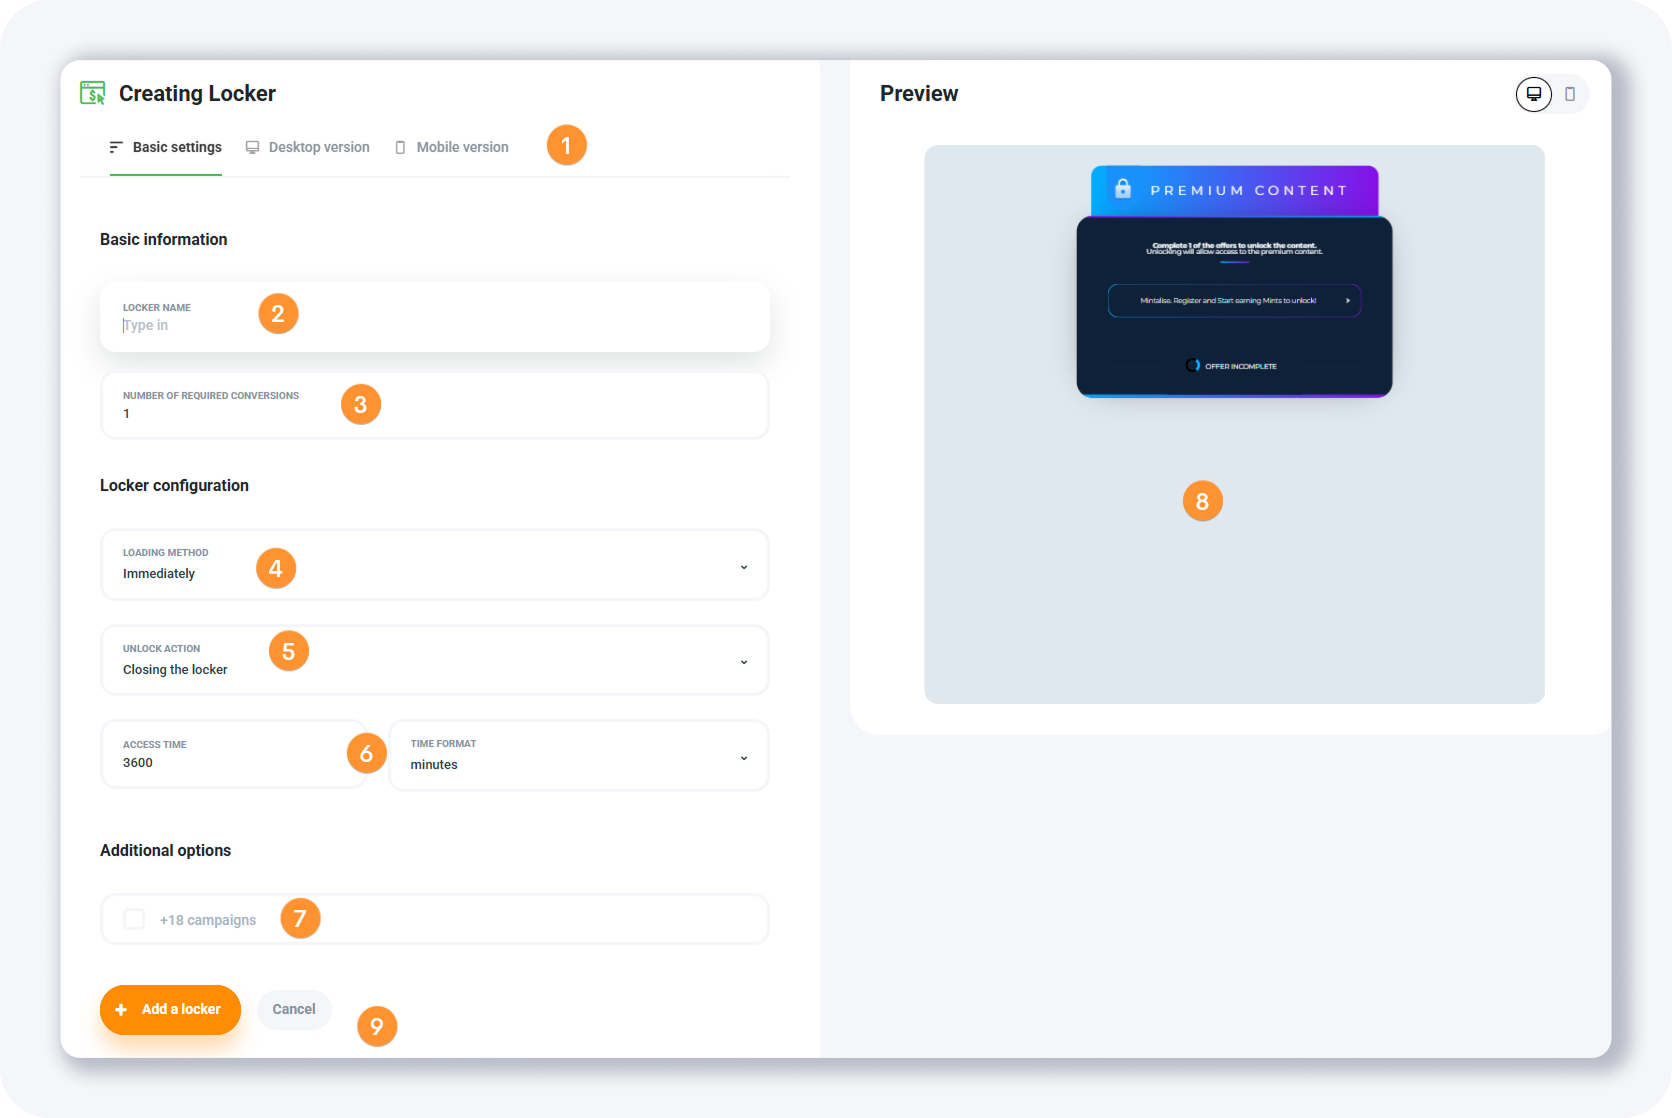
The Basic settings tab holds nine fields. Our step-by-step guide to installing Content Lockers covers the embedding side in more detail.
Settings tabs — adjust settings for desktop and mobile lockers; the first tab holds general settings.
Locker name — an internal name, visible only to you.
Number of required conversions — completed offers that unlock the content, for example 2 app installs instead of 1.
Loading method — when the locker appears: immediately, after a delay, or after a click on an element.
Unlock action — what happens after the conversions: hide the overlay or redirect to a URL, such as a thank-you or download page.
Access time & time format — how long the visitor keeps access; the default is 3600 minutes.
18+ campaigns — keep this off for mainstream traffic.
Preview — a live preview of your changes on the right side.
Action buttons — click + Add a locker when you are done.
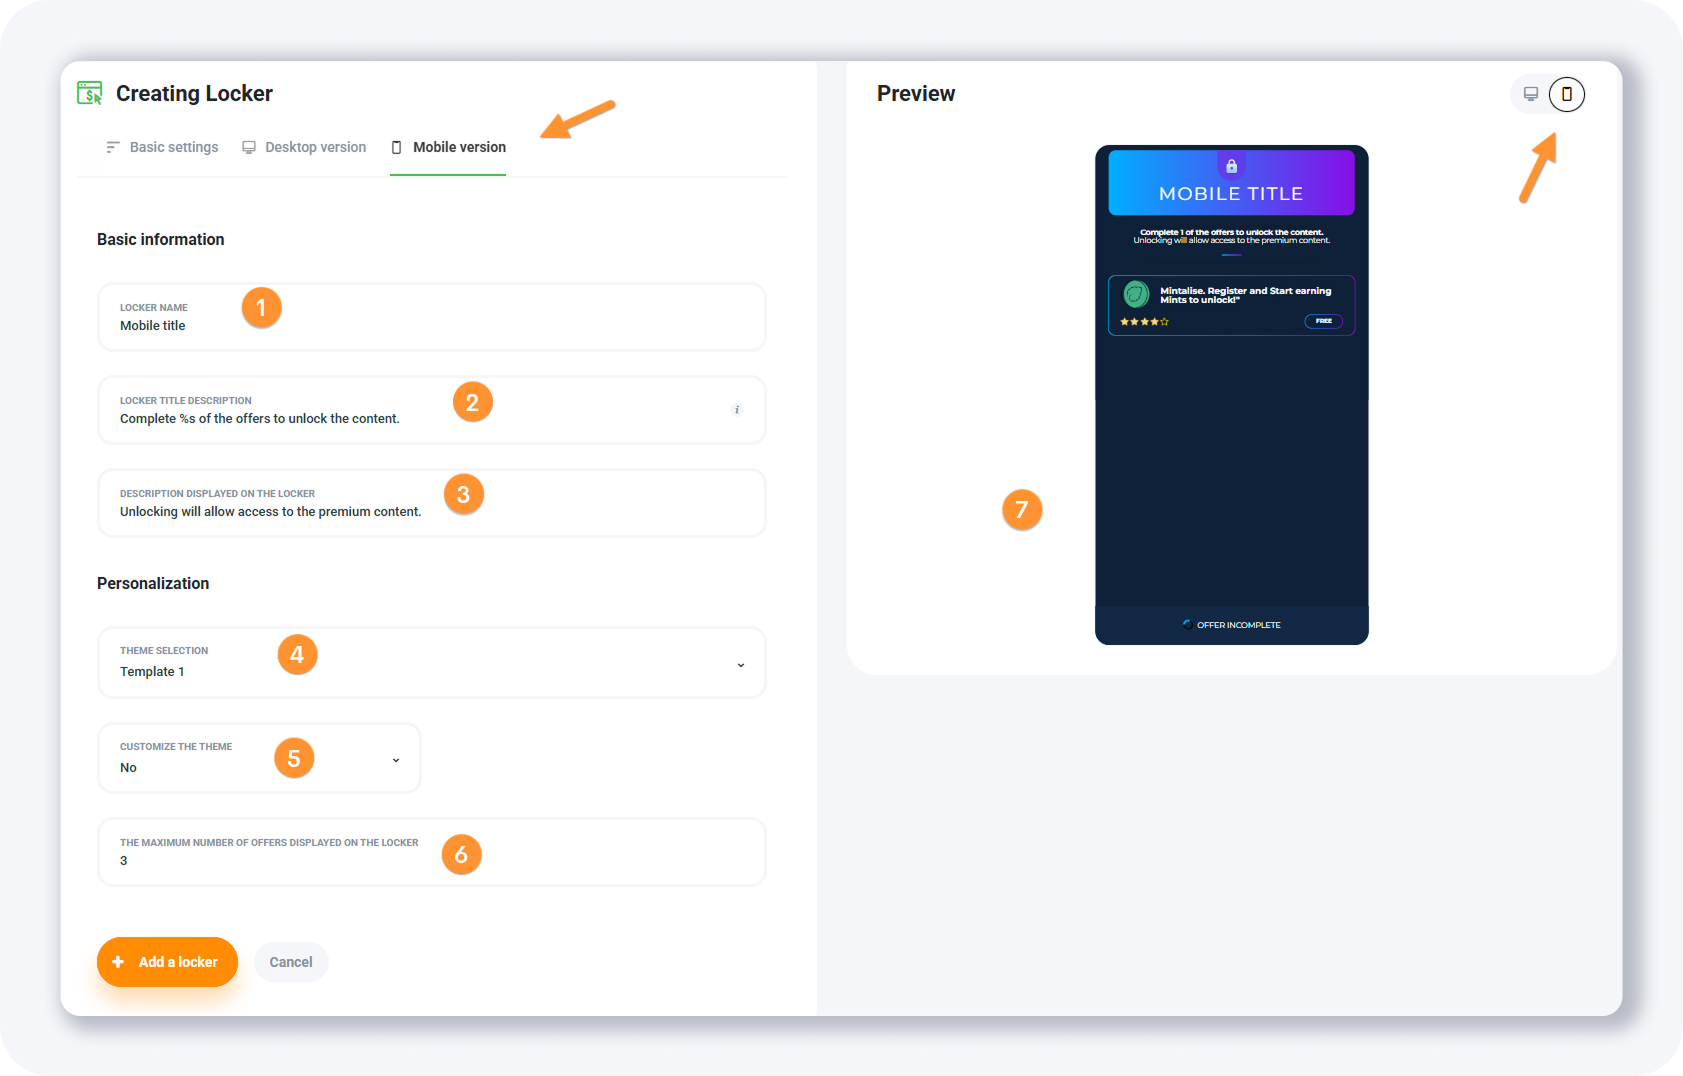
How do you customize the CPA Locker for desktop and mobile?
The Desktop version and Mobile version tabs control how your CPA Locker looks on each device. You edit the headline, instructions, on-locker description, theme, and the maximum number of offers shown. MyLead ships six premade themes — including an Instagram-style layout — and lets you customize colors when you need a closer match to your site.
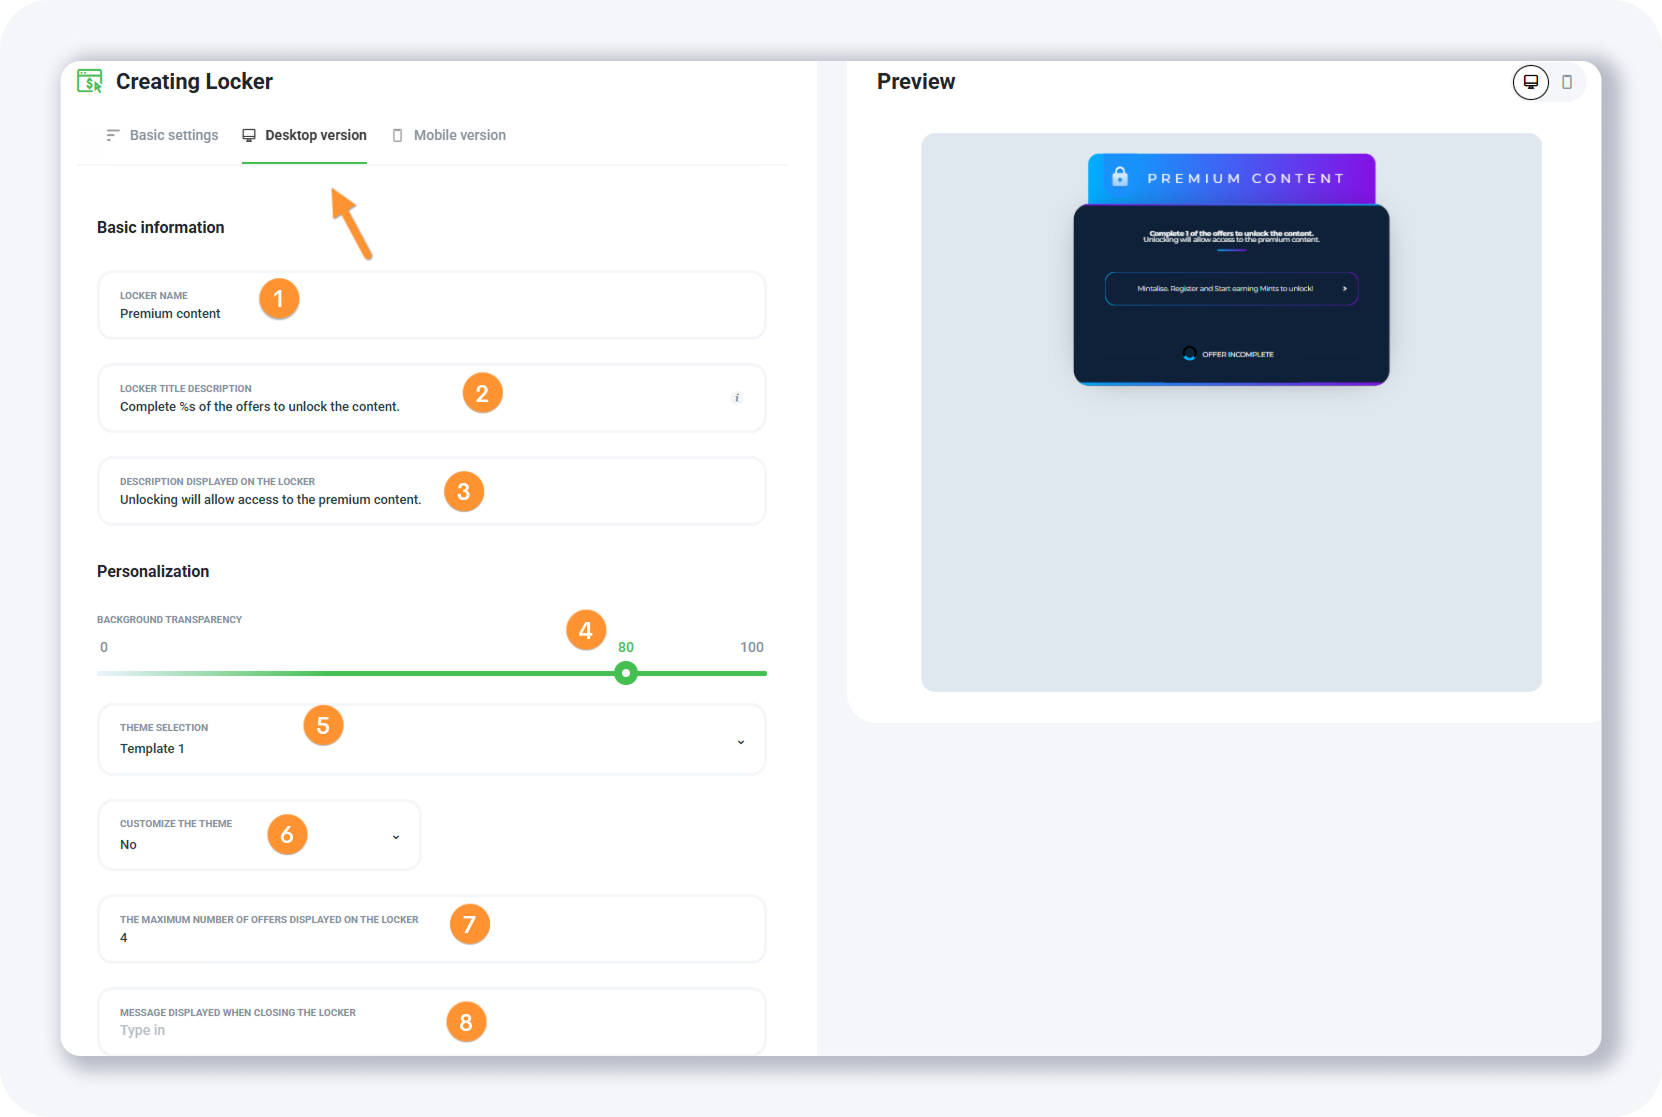
The Desktop version tab gives you eight fields:
Locker name — text displayed above the locker, such as Verification required.
Locker title description — instructions explaining what unlocks the content.
Description displayed on the locker — what happens once the actions are completed.
Background transparency — adjust transparency when the locker sits above your page.
Theme selection — six premade themes, including an Instagram-like option.
Customize the theme — pick YES to change background or text colors.
Maximum number of offers displayed — caps how many offers the visitor can choose from.
Message displayed when closing the locker — the text shown when the locker is closed.
The Mobile version tab mirrors the desktop one with six fields — locker name, locker title description, on-locker description, theme selection, customize the theme, and maximum number of offers displayed — minus background transparency. Turn on the mobile preview to check your changes before saving.
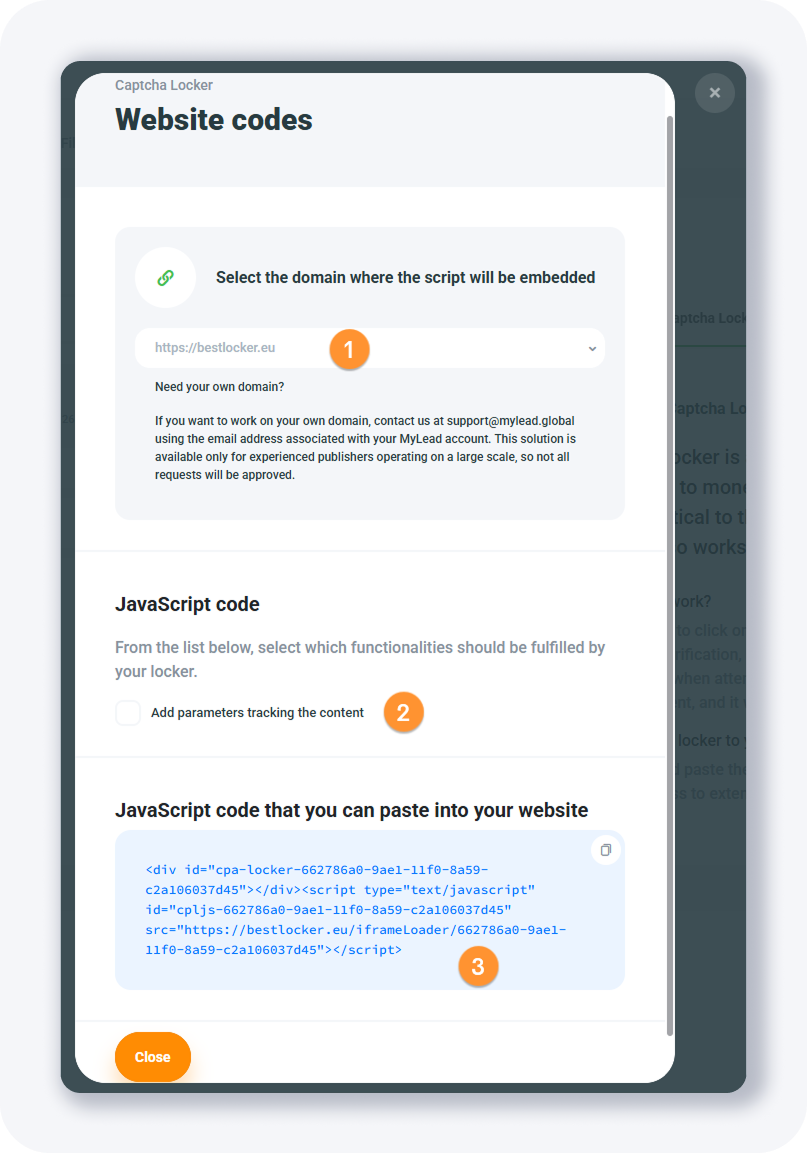
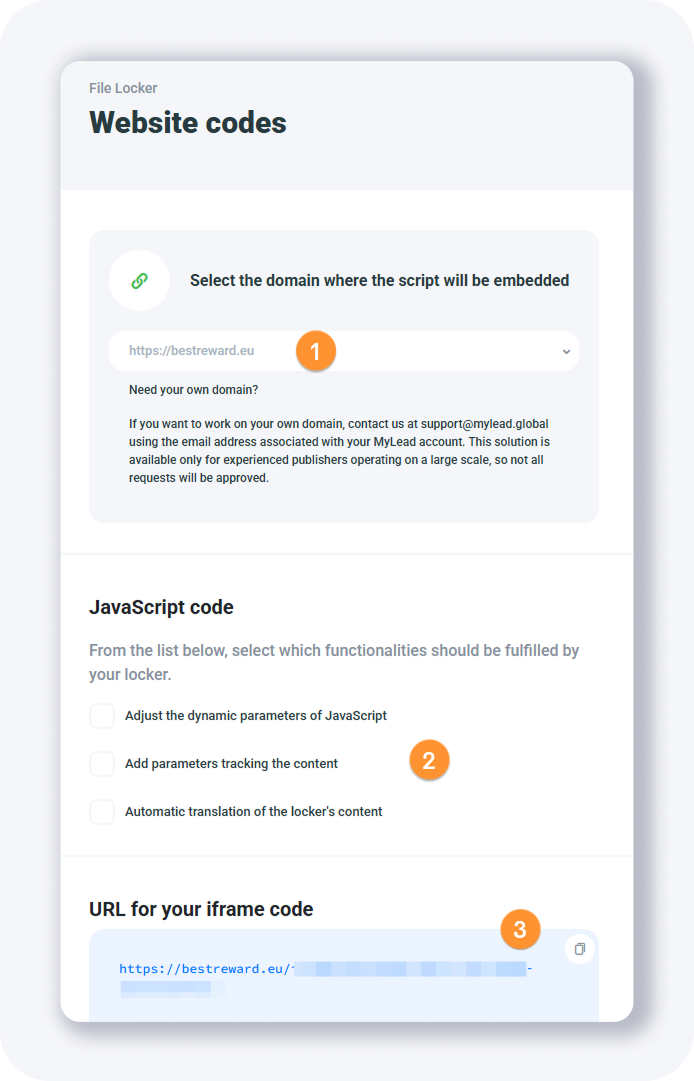
How do you get the website codes and track conversions?
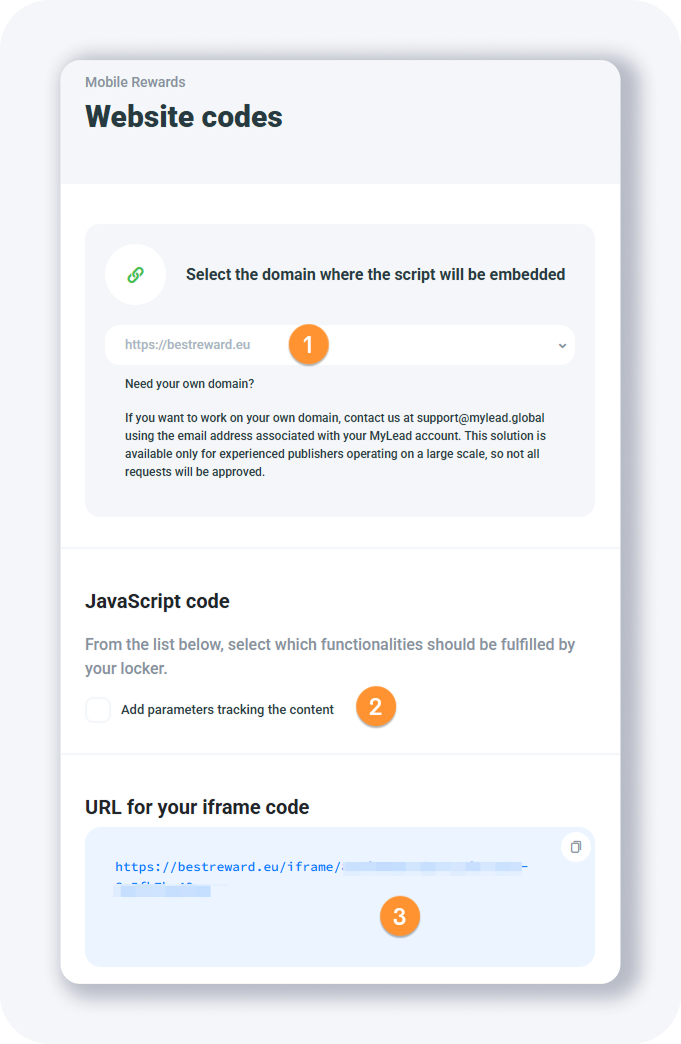
After you add a CPA Locker, it appears in your list with management buttons and live stats — profit, visits, and leads. The Website codes button opens a popup where you pick your domain and copy the JavaScript snippet, iframe URL, or sample embed code. You paste the script into your page's HEAD section to activate the locker.
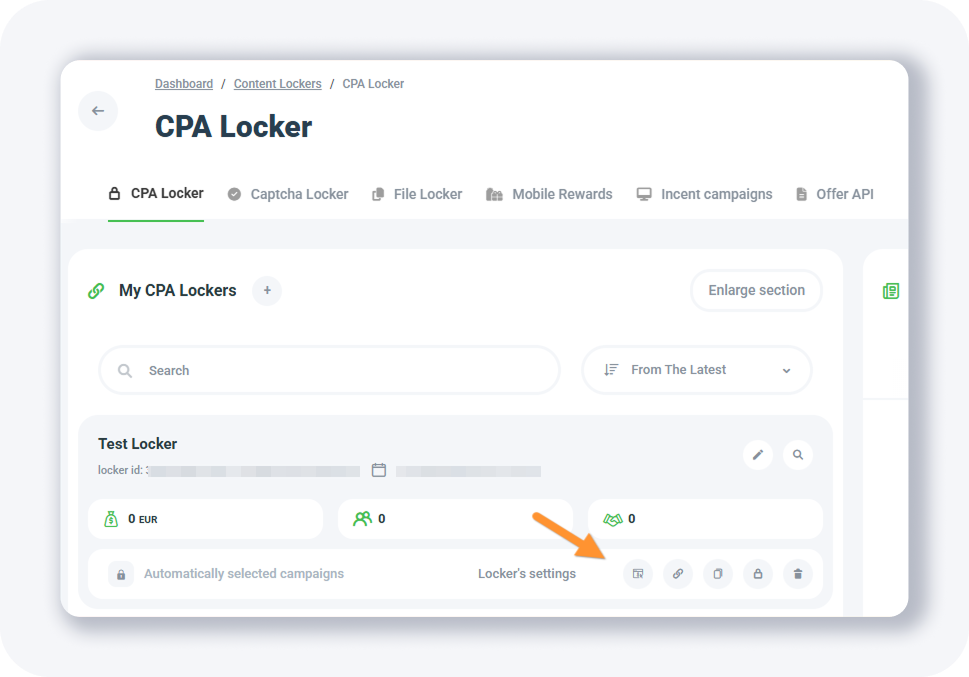
Each locker in the list carries five management buttons:
Available Campaigns — disable specific offers from showing in the locker.
Website codes — opens the popup with your locker URL and embed options.
Duplicate — clone the locker with the same settings.
Support for blocking an IP locker — show the locker only to your IP for testing.
Remove the locker — delete the locker.
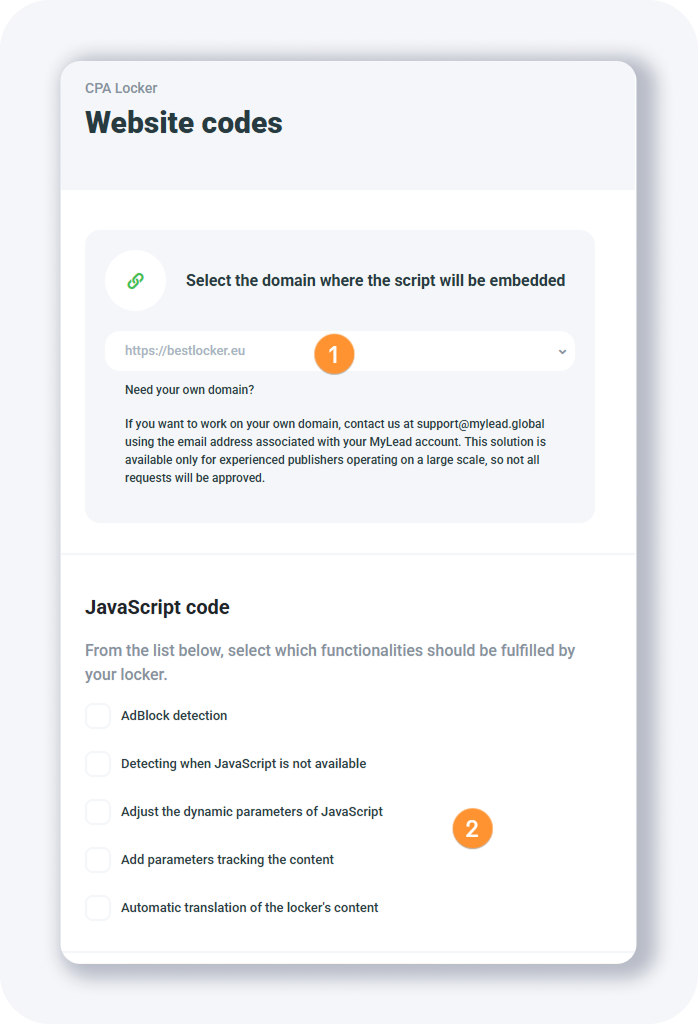
Under the JavaScript code section you control five options:
AdBlock detection — adds code so the locker works for visitors using AdBlock.
Detecting when JavaScript is not available — a fallback for visitors without JavaScript.
Adjust the dynamic parameters of JavaScript — pass a custom title and description via URL.
Add parameters tracking the content — pass your tracker's click_id through ml_sub1, ml_sub2, ml_sub3, ml_sub4, ml_sub5 to track revenue and conversions.
Automatic translation of the locker's content — auto-translates the locker into the visitor's language to lift conversions.
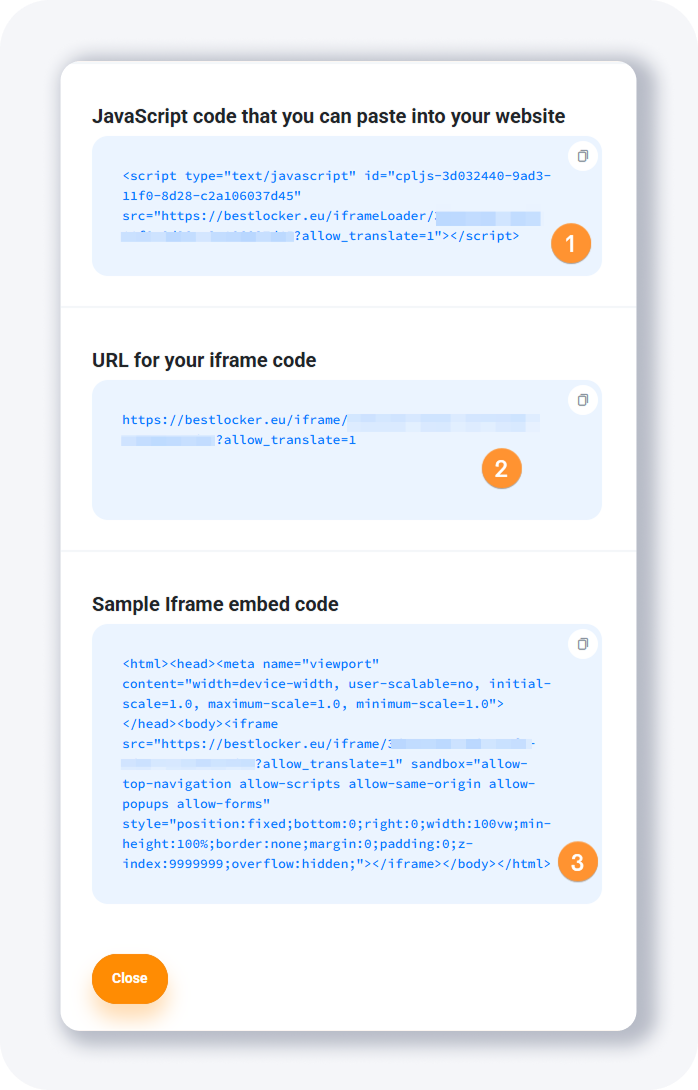
The popup then shows three fields:
JavaScript code — paste this into the HEAD of your website.
URL for your iframe code — use as the iframe src, open directly as an offer page, or preview the locker.
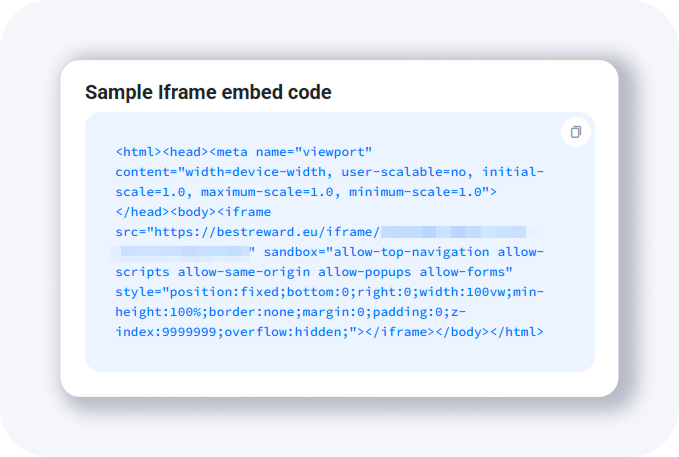
Sample Iframe embed code — paste into an empty HTML file to see the locker.
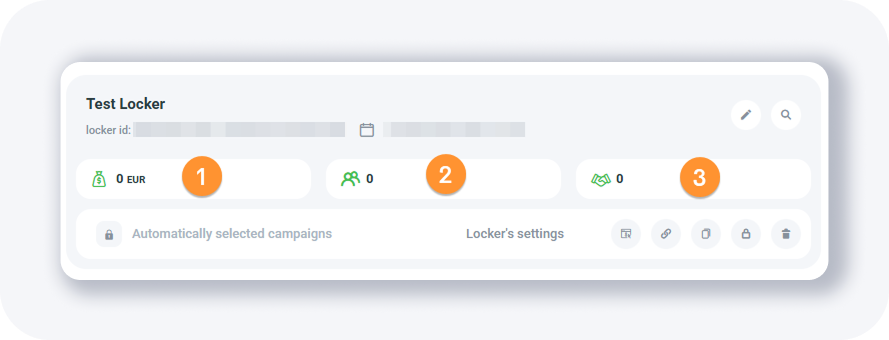
The three icons below the locker name show the profit generated, the number of visits, and the number of leads. You can also add your MyLead locker as an offer to a tracker for deeper optimization.
TIP: keep 18+ campaigns turned off if you plan to send mainstream traffic to your locker.
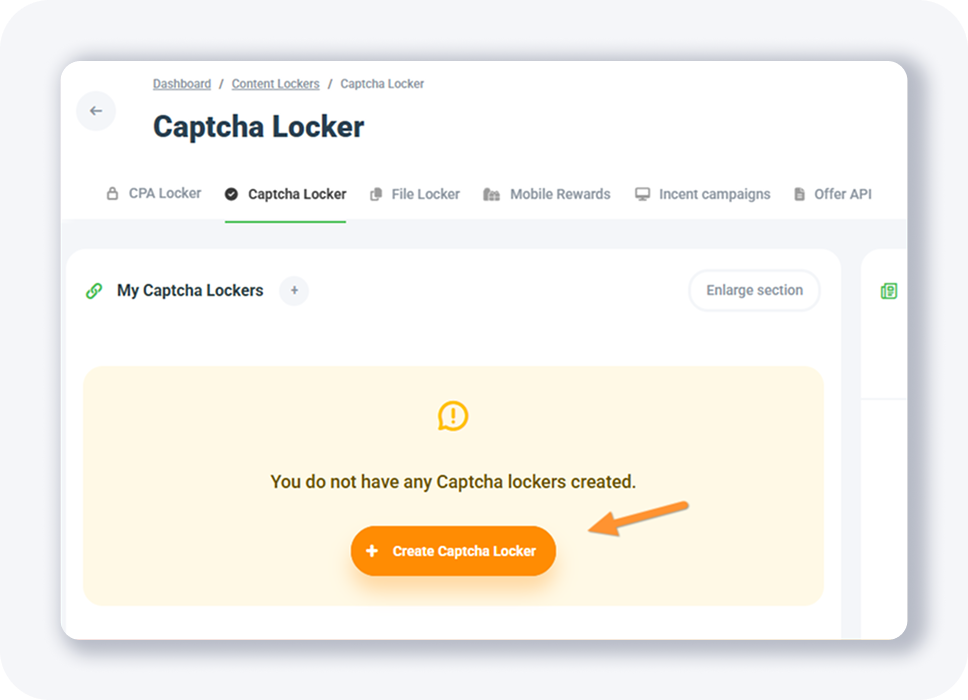
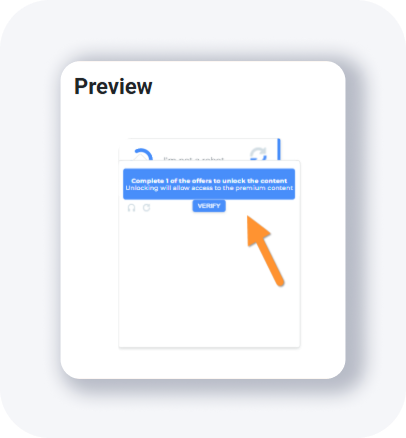
What is a Captcha Locker and how do you create one?
A Captcha Locker monetizes your content with an overlay that looks like the familiar reCAPTCHA anti-bot widget. The visitor clicks the checkbox, completes a required offer, and unlocks the page. It is simpler than the CPA Locker: open the Captcha Locker tab, click + Create Captcha Locker, name it, pick a light or dark theme, and set the unlock action and access time.
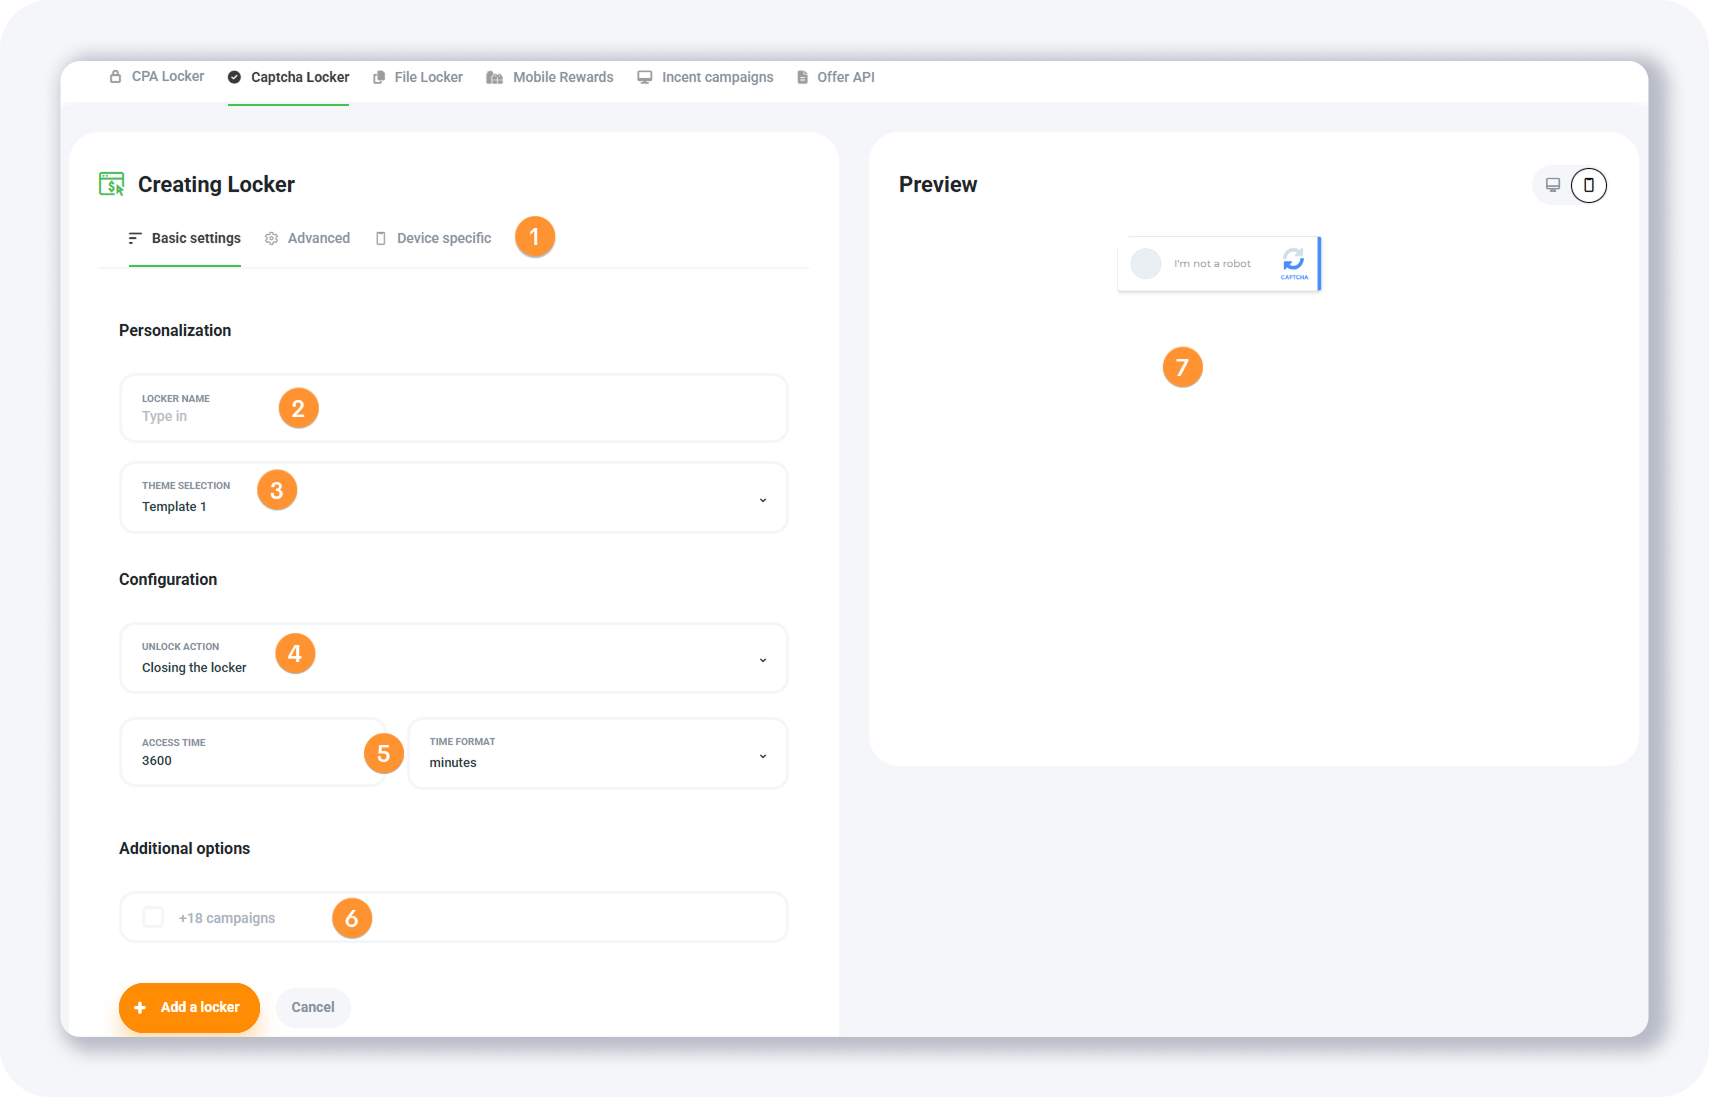
The Basic settings tab holds seven fields. The full walkthrough lives in our guide on how to configure lockers on MyLead.
Settings tabs — three tabs: Basic settings, Advanced, and Device specific.
Locker name — visible only to you.
Theme selection — two themes, light and dark.
Unlock action — close the locker or redirect the visitor to another URL.
Access time & time format — how long access lasts; the default is 3600 minutes.
+18 Campaigns — keep off for mainstream traffic.
Preview panel — a live preview on the right side.
The Advanced tab adds three controls: Number of required conversions, Maximum number of offers displayed, and Minimum number of offers displayed.
How do you set the Captcha Locker device texts and codes?
The Device specific tab holds four fields that set the popup title and description separately for desktop and mobile. These texts tell the visitor what to do and what happens after they pass the check. Once added, the Captcha Locker appears in your list with the same profit, visits, and leads stats and the same management buttons as the CPA Locker.
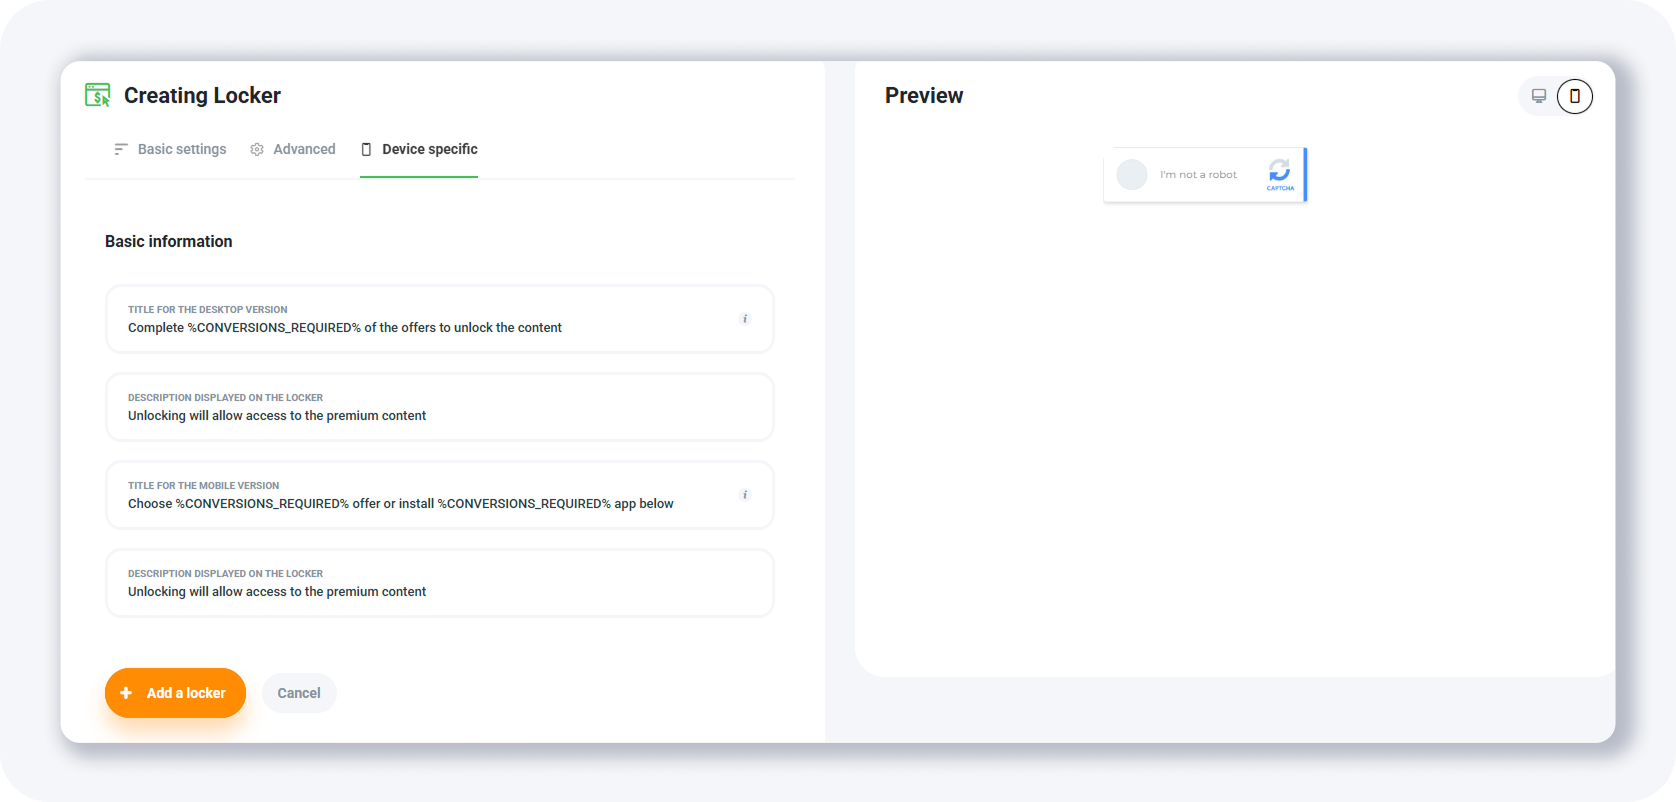
Title for the desktop version — the instruction shown at the top of the desktop popup.
Description displayed on the locker (desktop) — explains what happens after the desktop visitor passes the check.
Title for the mobile version — the instruction shown at the top of the mobile popup.
Description displayed on the locker (mobile) — explains what happens after the mobile visitor passes the check.
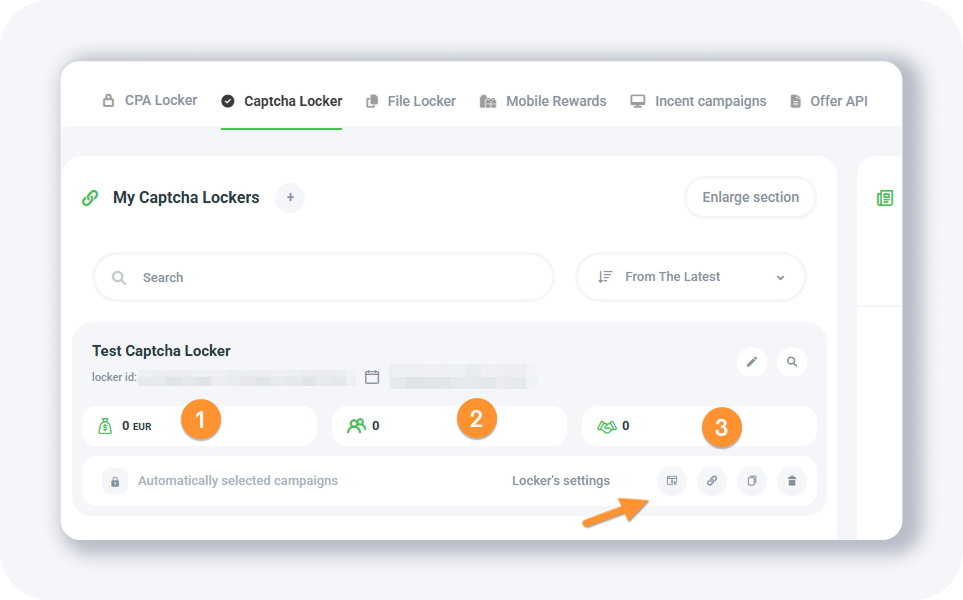
The list view shows profit, visits, and leads, plus the Available Campaigns, Website codes, Duplicate, and Remove the locker buttons.
The Captcha Locker Website codes popup mirrors the CPA one with fewer fields. The key option is Add parameters tracking the content, which passes ml_sub1 to ml_sub5 tokens to your tracker. To record those conversions, set up a postback first.
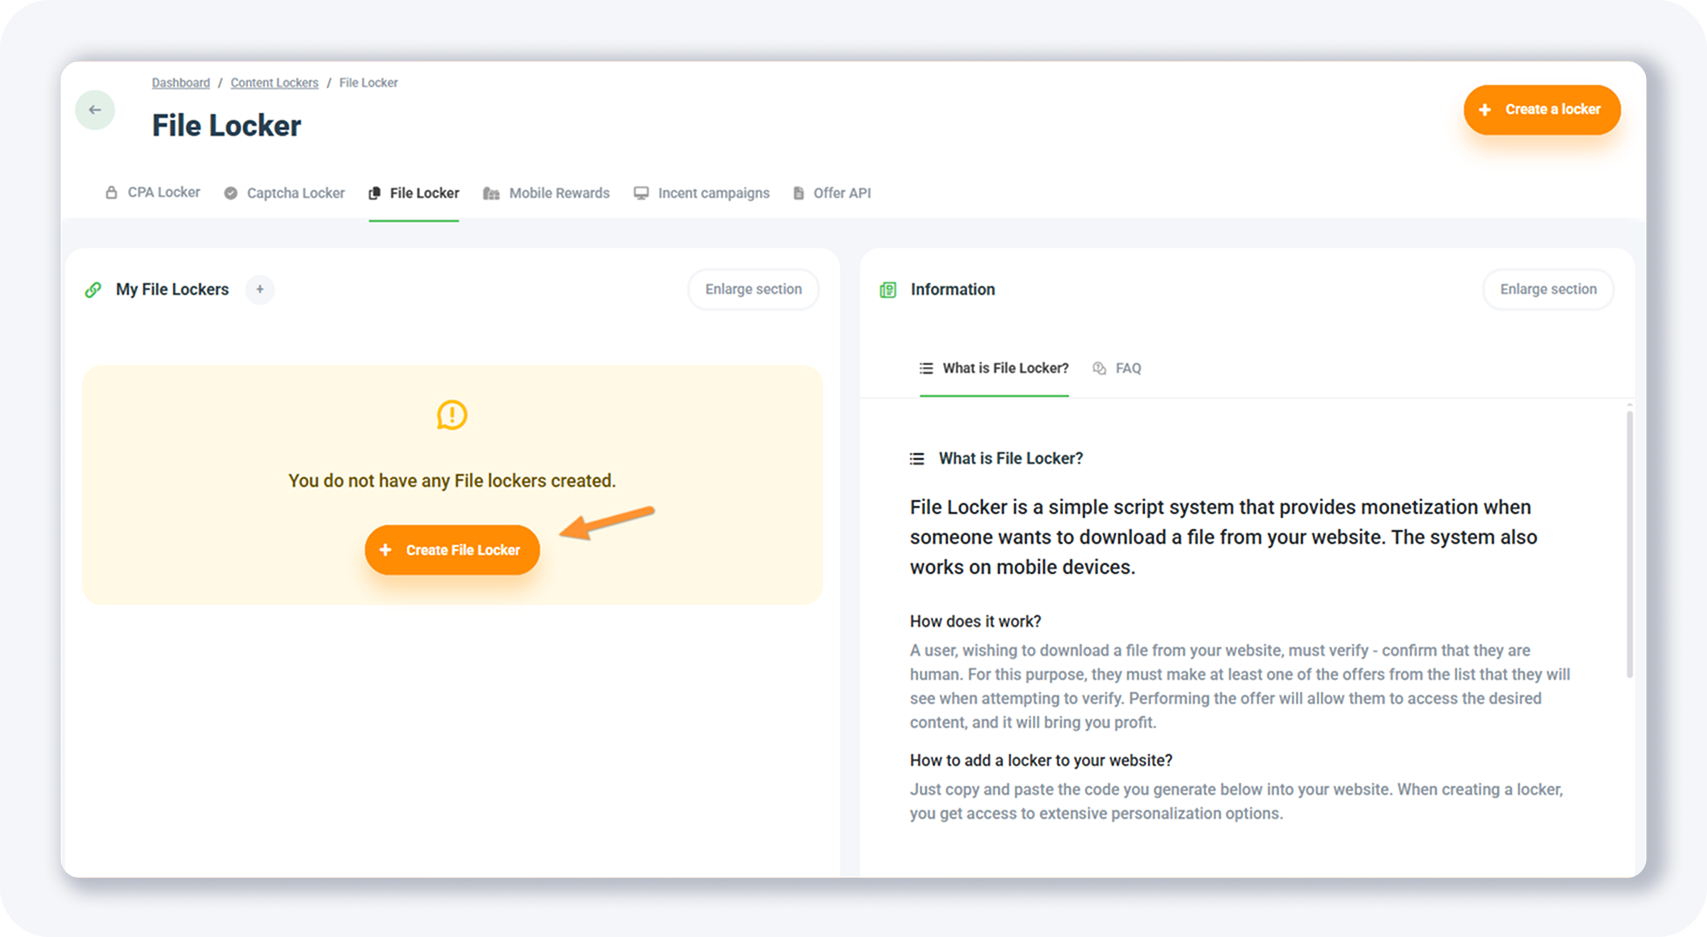
How does the File Locker work?
A File Locker blocks a file download until the visitor completes at least one offer; once they finish, they reach the file and you earn the commission. To create one, open the My File Lockers page, click + Create File Locker, then set the locker name, page title, theme, the redirect URL of the locked file, and your note. Four themes are available.
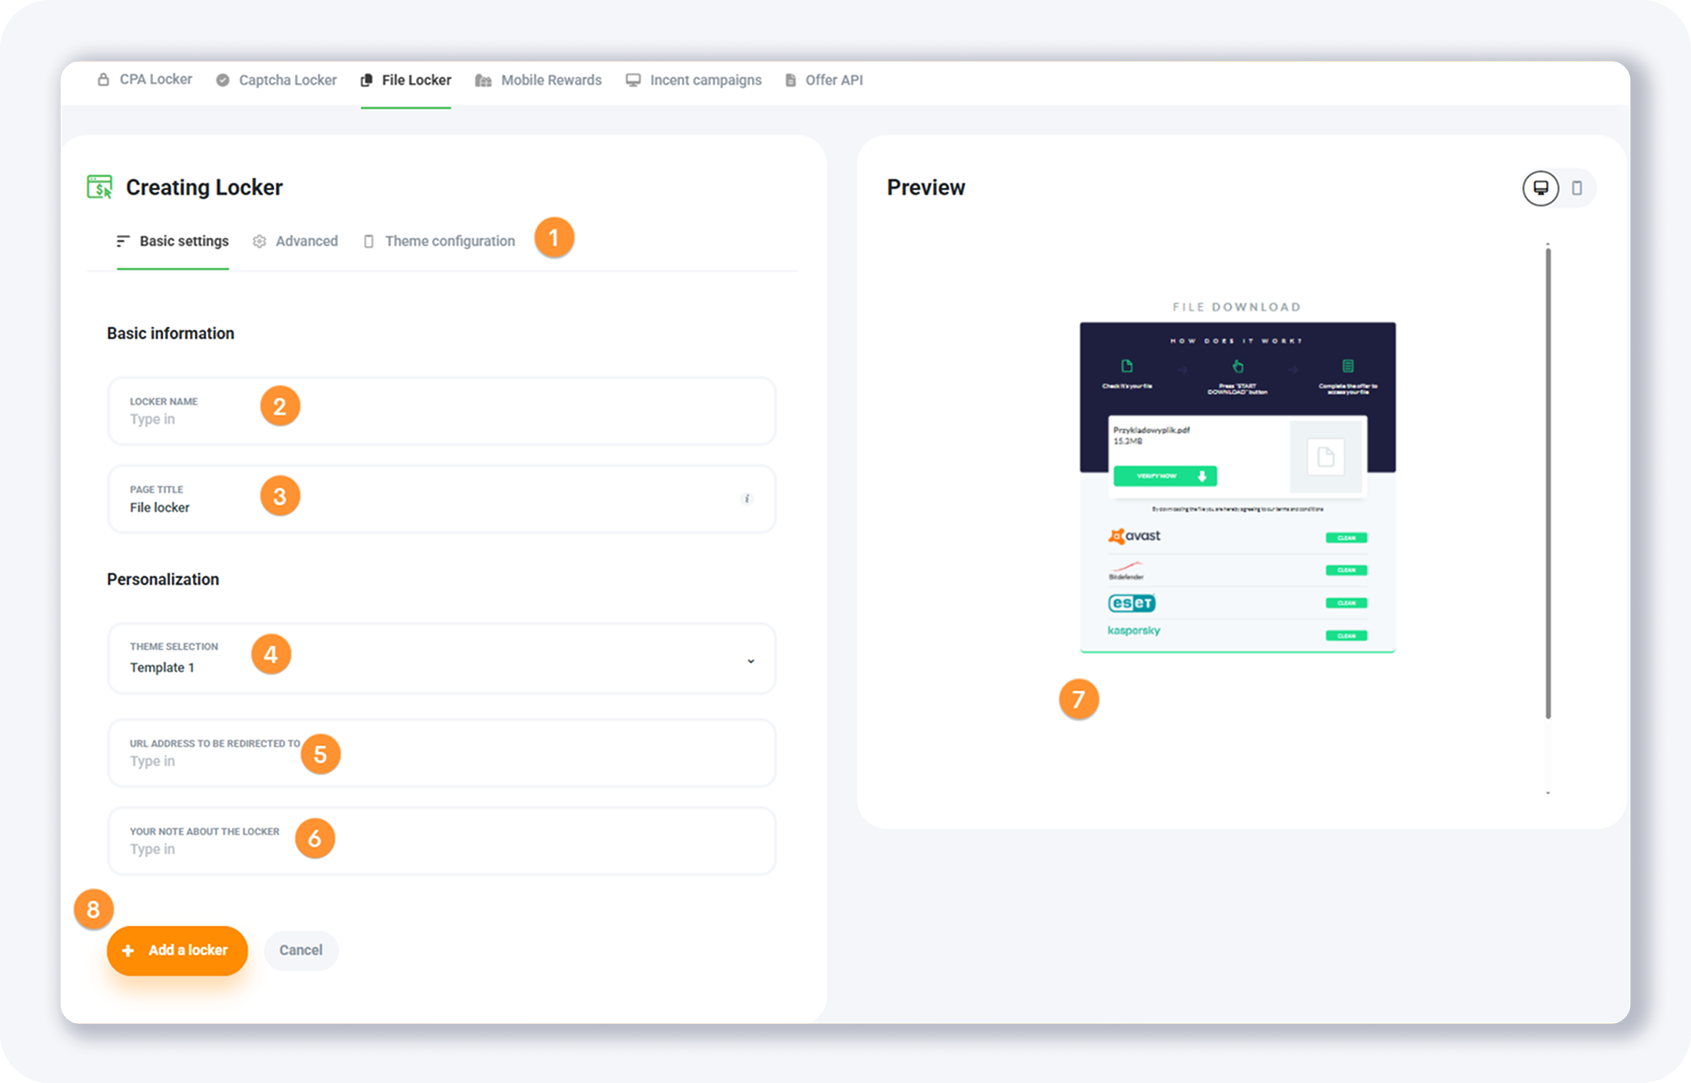
The Basic settings tab gives you eight fields. Pair the locker with the right offers using our guide on selecting the best affiliate programs for Content Lockers.
Settings tabs — three tabs: Basic settings, Advanced, and Theme configuration.
Locker name — an internal name, visible only to you.
Page title — text shown above the locker, such as Verification.
Theme selection — four premade themes.
URL address to be redirected to — the locked file's URL, where the visitor lands after converting.
Your note about the locker — text shown in some themes.
Preview panel — a live preview of changes.
Action buttons — click + Add Locker when you are done.
What File Locker advanced and theme options are available?
The Advanced tab fine-tunes how the File Locker behaves: required conversions, the maximum and minimum offers shown, access time, and the closing message. The Theme configuration tab adds a Customize the template option for fields like the file name and file size. After saving, the locker joins your list with profit, visits, and leads stats — the same setup that powers a case on how to make money with blocked articles.

Number of required conversions — completed offers needed to unlock.
Maximum number of offers displayed — the upper limit of offers shown.
Minimum number of offers displayed — the lower limit of offers shown.
Access time & time format — how long access lasts; the default is 3600 minutes.
Message displayed when closing the locker — the text shown when the locker is closed.
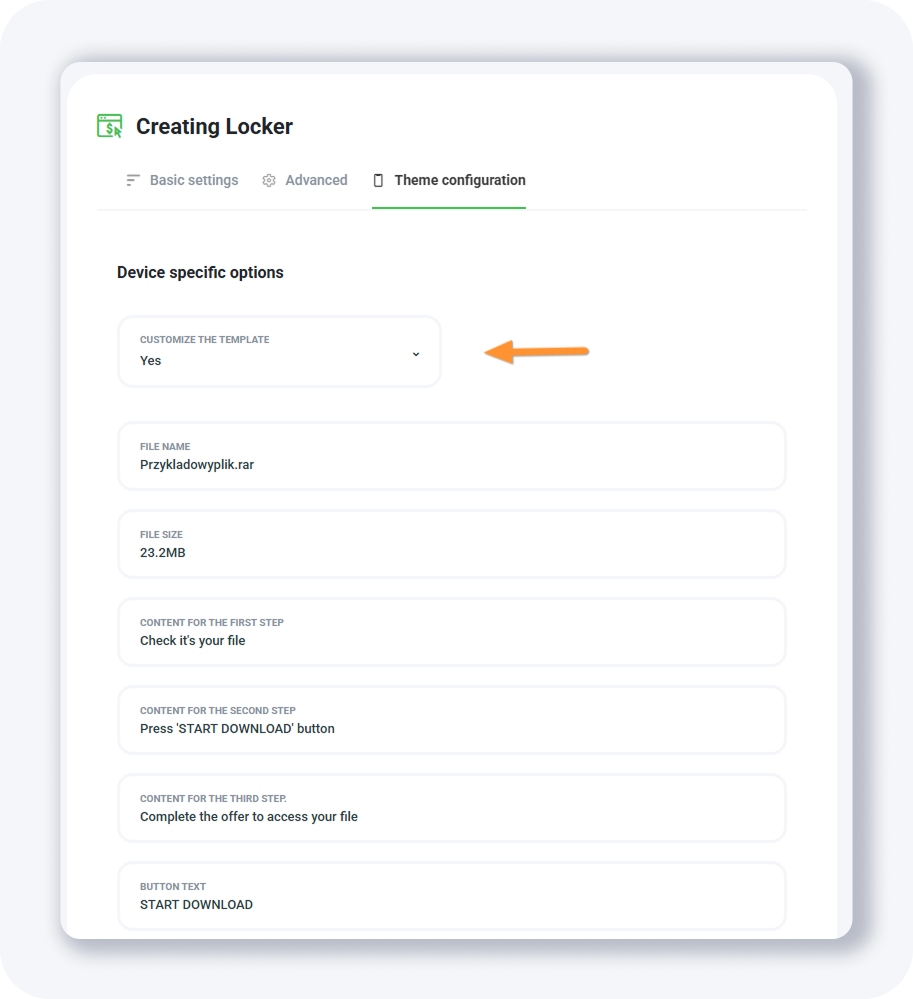
The Theme configuration tab's only field, Customize the template, lets you edit extra locker fields such as the file name or file size.
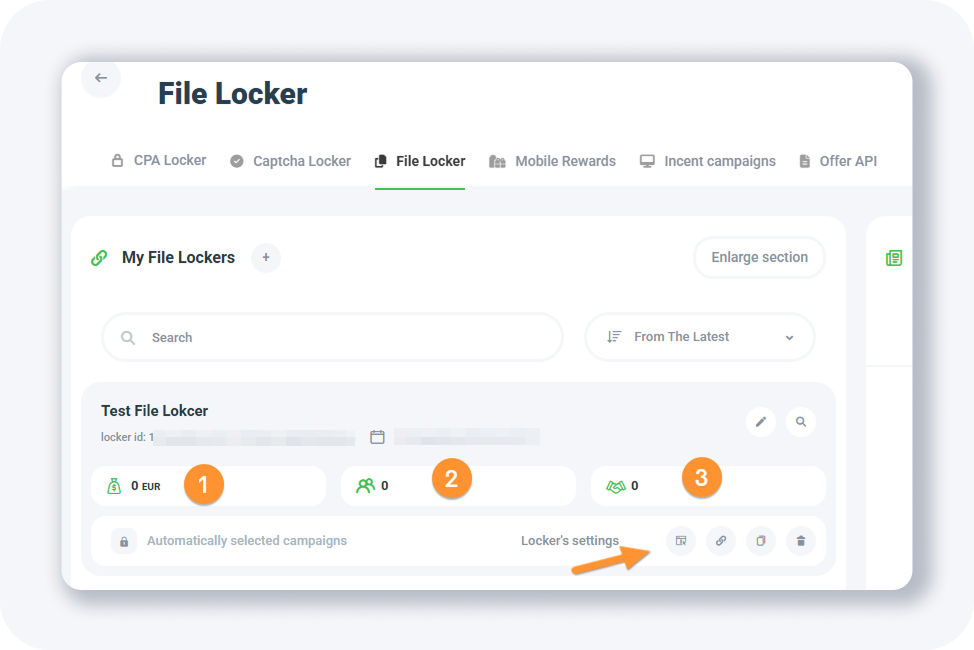
In the list, the File Locker shows profit, visits, and leads, plus Available Campaigns, Website codes, Duplicate, and Remove the locker buttons.
The Website codes popup lets you select the file locker's domain and toggle dynamic JavaScript parameters, content-tracking parameters (ml_sub1 to ml_sub5), and automatic translation.
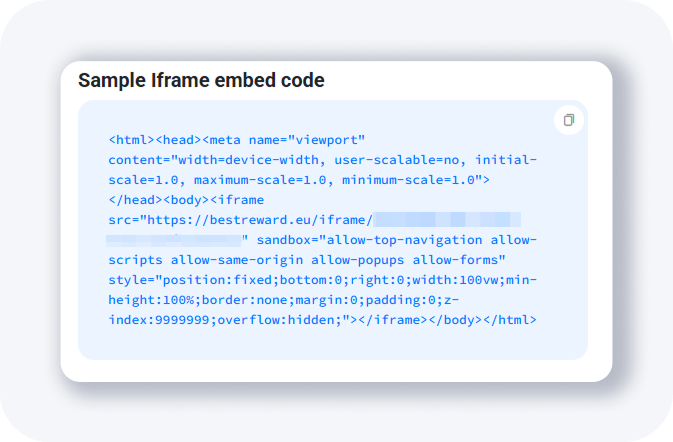
Use the URL for your iframe code as your iframe src, or open it directly to preview the locker; the Sample Iframe embed code gives you ready-to-paste HTML.
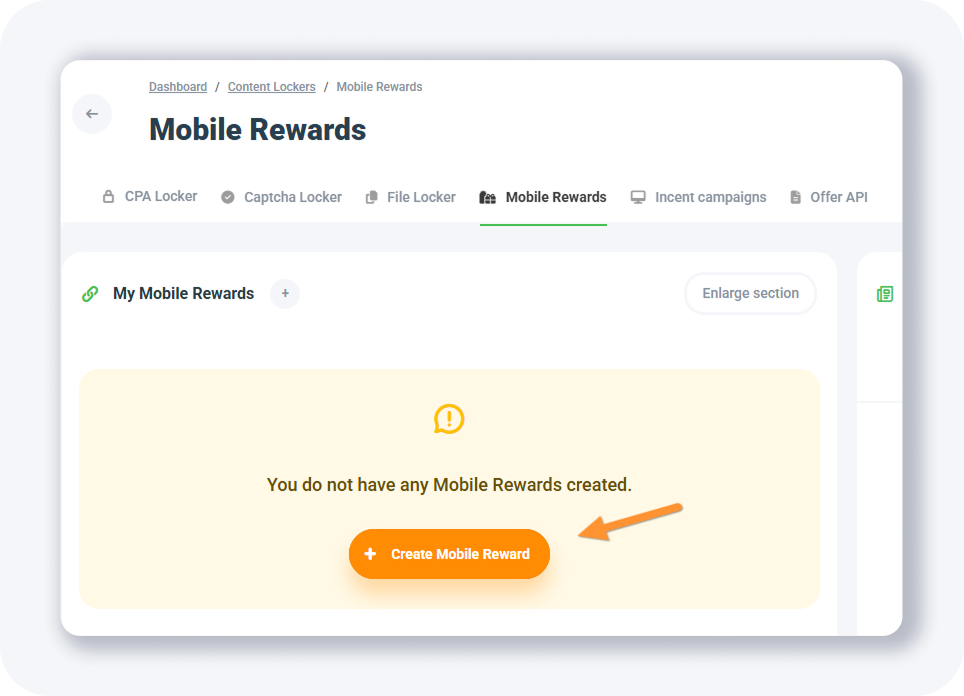
What are Mobile Rewards and how do you set them up?
Mobile Rewards is a points-based locker for mobile apps: users complete offers, earn points, and exchange them for rewards you define. It keeps engagement high without intrusive ads and works only on mobile devices. Open the Mobile Rewards page, click + Create Mobile Reward, and fill the Basic settings before moving on to themes and prizes.
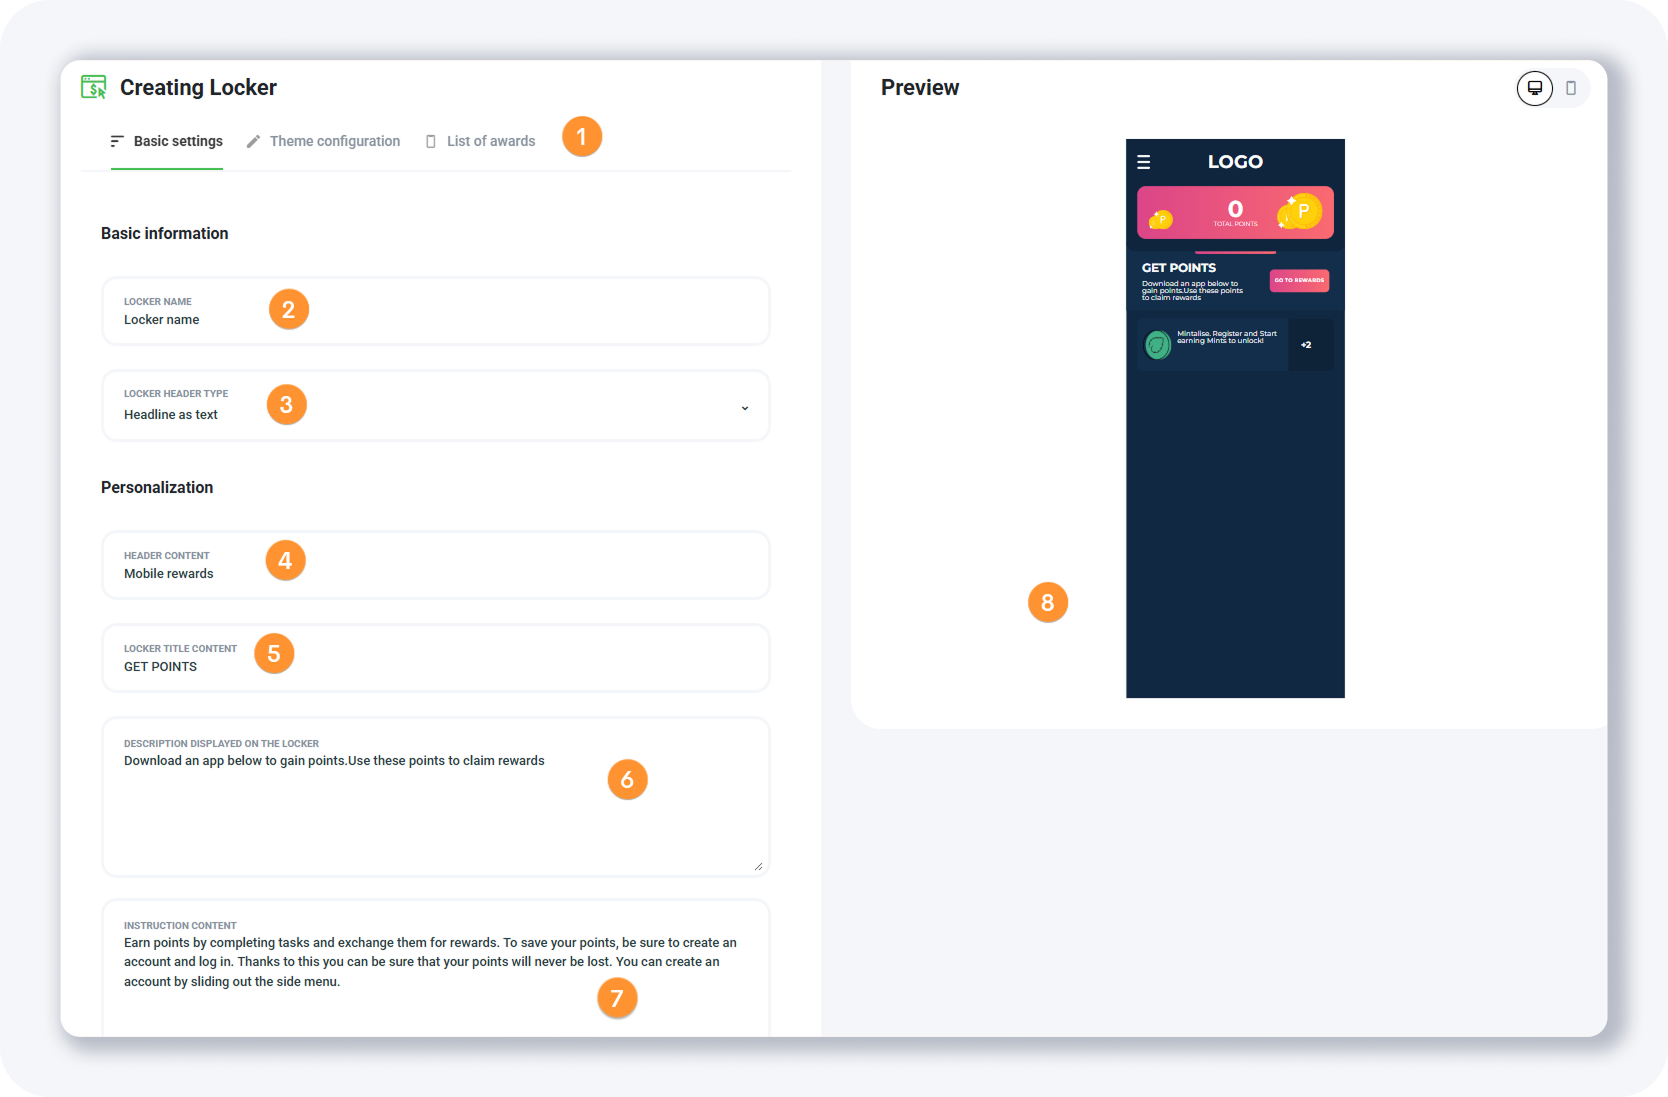
The Basic settings tab has eight fields. To go deeper, see how to earn with Mobile Rewards.
Settings tab — three tabs covering basics, theme, and the award list.
Locker name — visible only to you.
Locker header type — choose text or image.
Header content — the text shown in the header.
Locker title content — info about the reward the user receives.
Description displayed on the locker — a short explanation of what the visitor must do for points.
Instruction content — a longer explanation of how to earn and save points.
Preview panel — a live preview of settings.
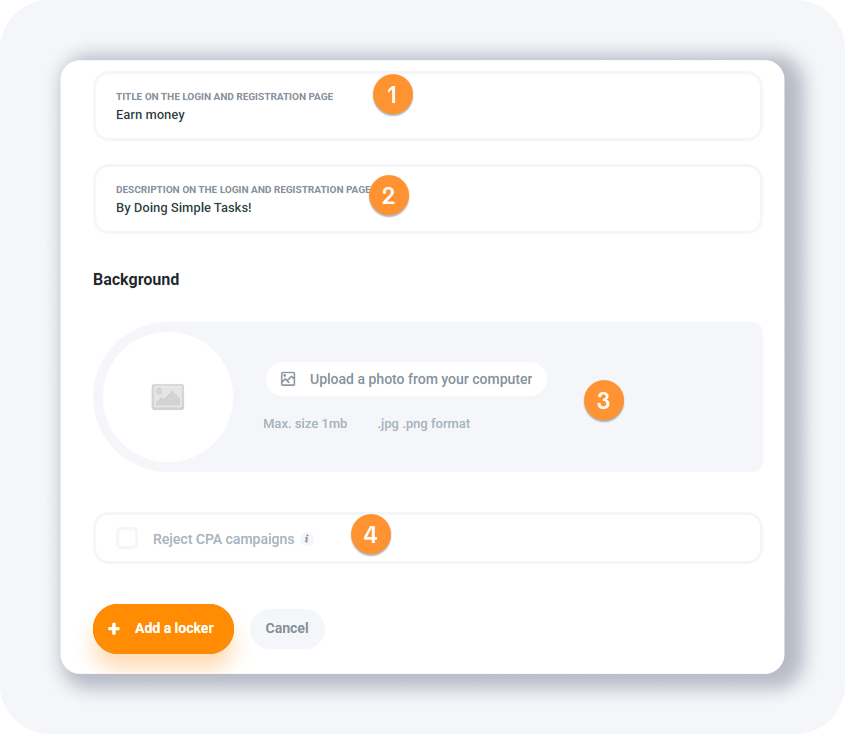
The bottom of the Basic settings tab adds four more fields:
Title on the login and registration page — text shown on that page.
Description on the login and registration page — supporting text on that page.
Background — upload a custom background image.
Reject CPA Campaigns — hide harder-to-convert CPA offers.
How do you set themes and add prizes in Mobile Rewards?
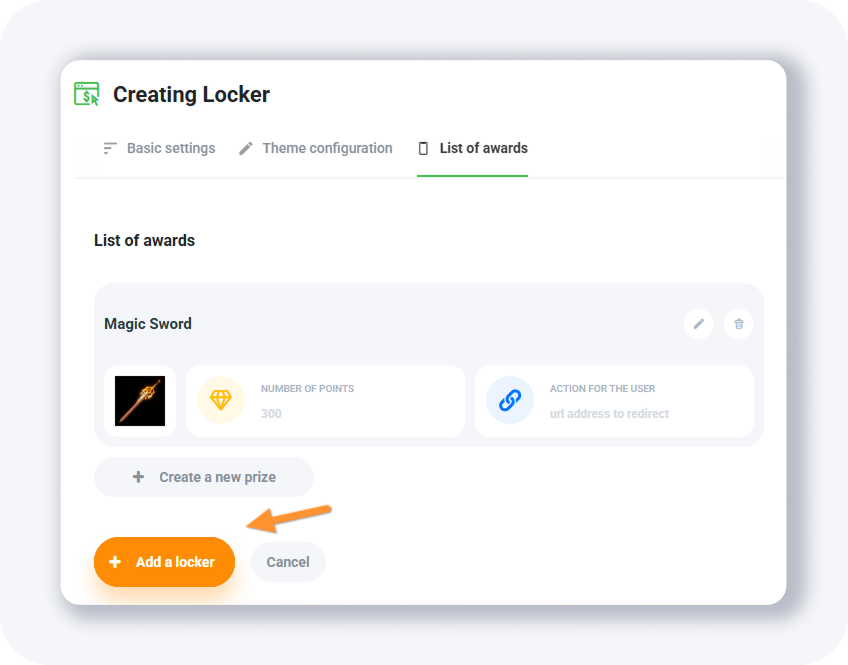
The Theme configuration tab offers two themes you can fully customize, and the List of awards tab is where you define the prizes users redeem with points — a Magic Sword in a game, a discount code, or any reward. You add each prize with a name, point cost, description, and photo, then choose what happens after a user claims it. The setup matches our guide on how to configure Mobile Rewards.
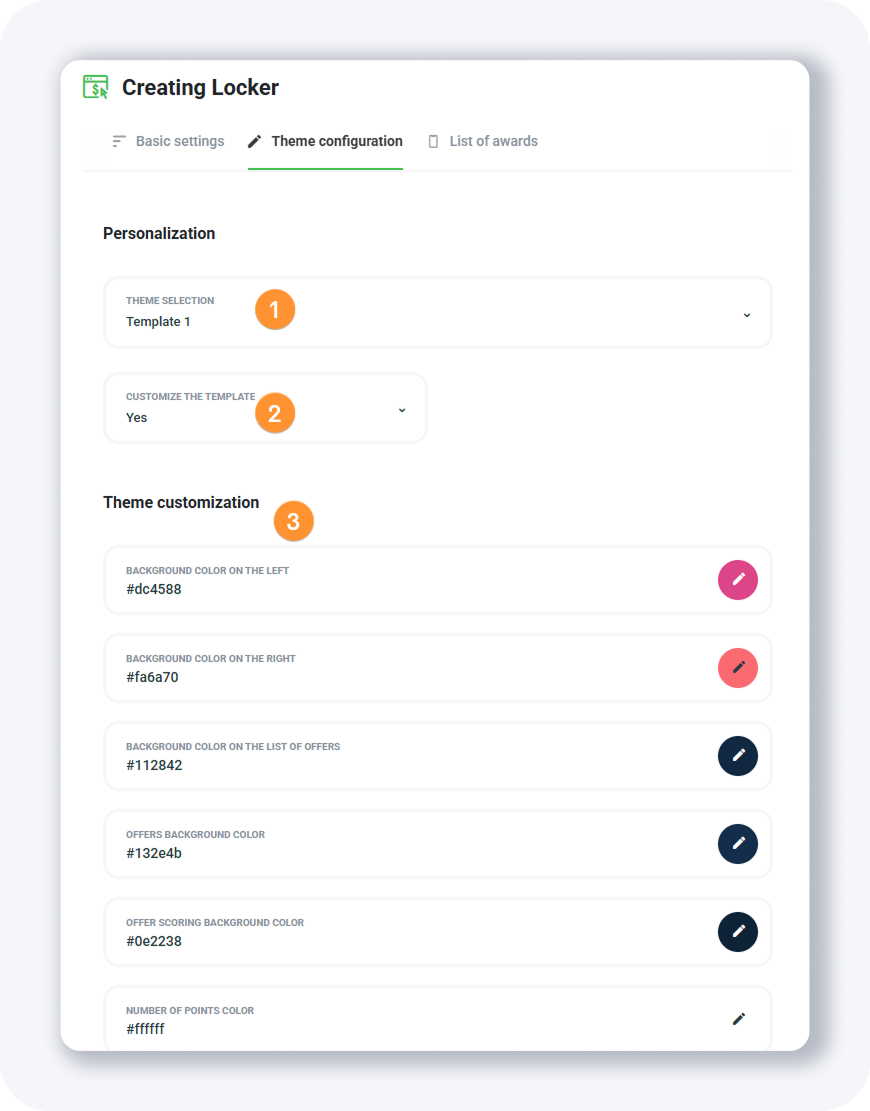
Theme configuration has two fields: theme selection (two themes) and customize the template (pick YES to edit them).
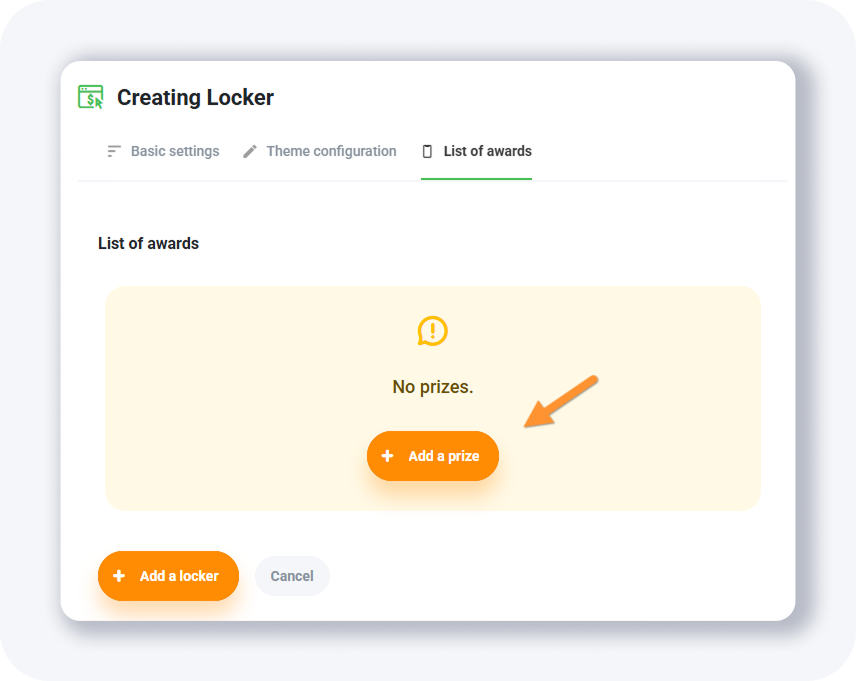
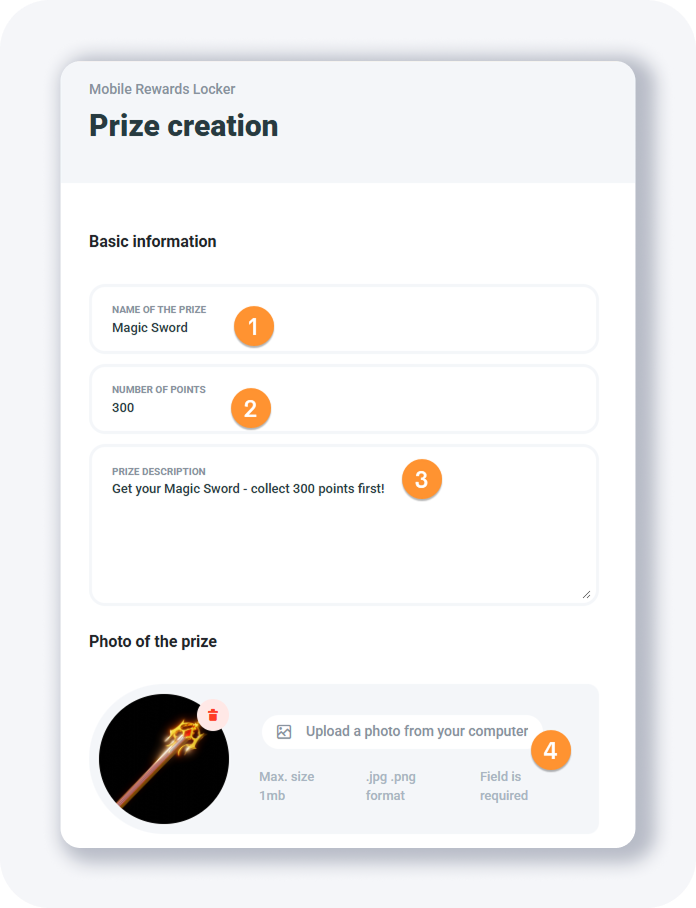
Click + Add a prize and fill four fields for each reward:
Name of the prize — the reward's label.
Number of points — points required to claim it.
Prize description — details about the reward.
Photo of the prize — an image of the reward.
The bottom of the prize form holds three more fields:
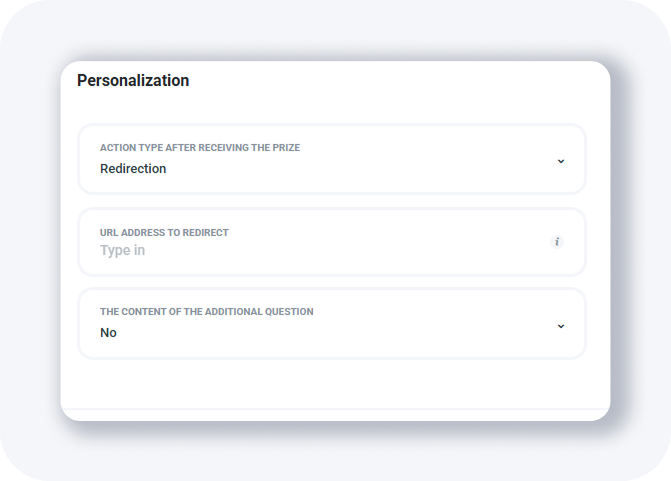
Action after receiving the prize — send an email or redirect to a URL after the claim.
URL address to redirect — the redirect target, or the email where prize info is sent.
The content of the additional question — optionally ask the user a question (pick YES).
Repeat for each reward, then click + Add a locker once you have added at least one prize.

The list view shows four stats — profit, visits, leads, and the number of awards — plus these buttons:
User list — opens the list of registered Mobile Rewards users.
Website codes — popup with the locker URL.
List of awards — shows the locker's awards.
Remove the locker — deletes the locker.
The Website codes popup passes ml_sub1 to ml_sub5 tracking tokens and provides the iframe URL you can drop into your own iframe src or open directly as an offer page.
What are Incent campaigns?
Incent campaigns are incentivized affiliate offers that reward users for completing a specific action — finishing a survey or installing an app. They are the offers you load into your content lockers and the Offerwall. You browse the Available Campaigns list, filter by conversion type, device, and offer type, then build a locker directly from any campaign.
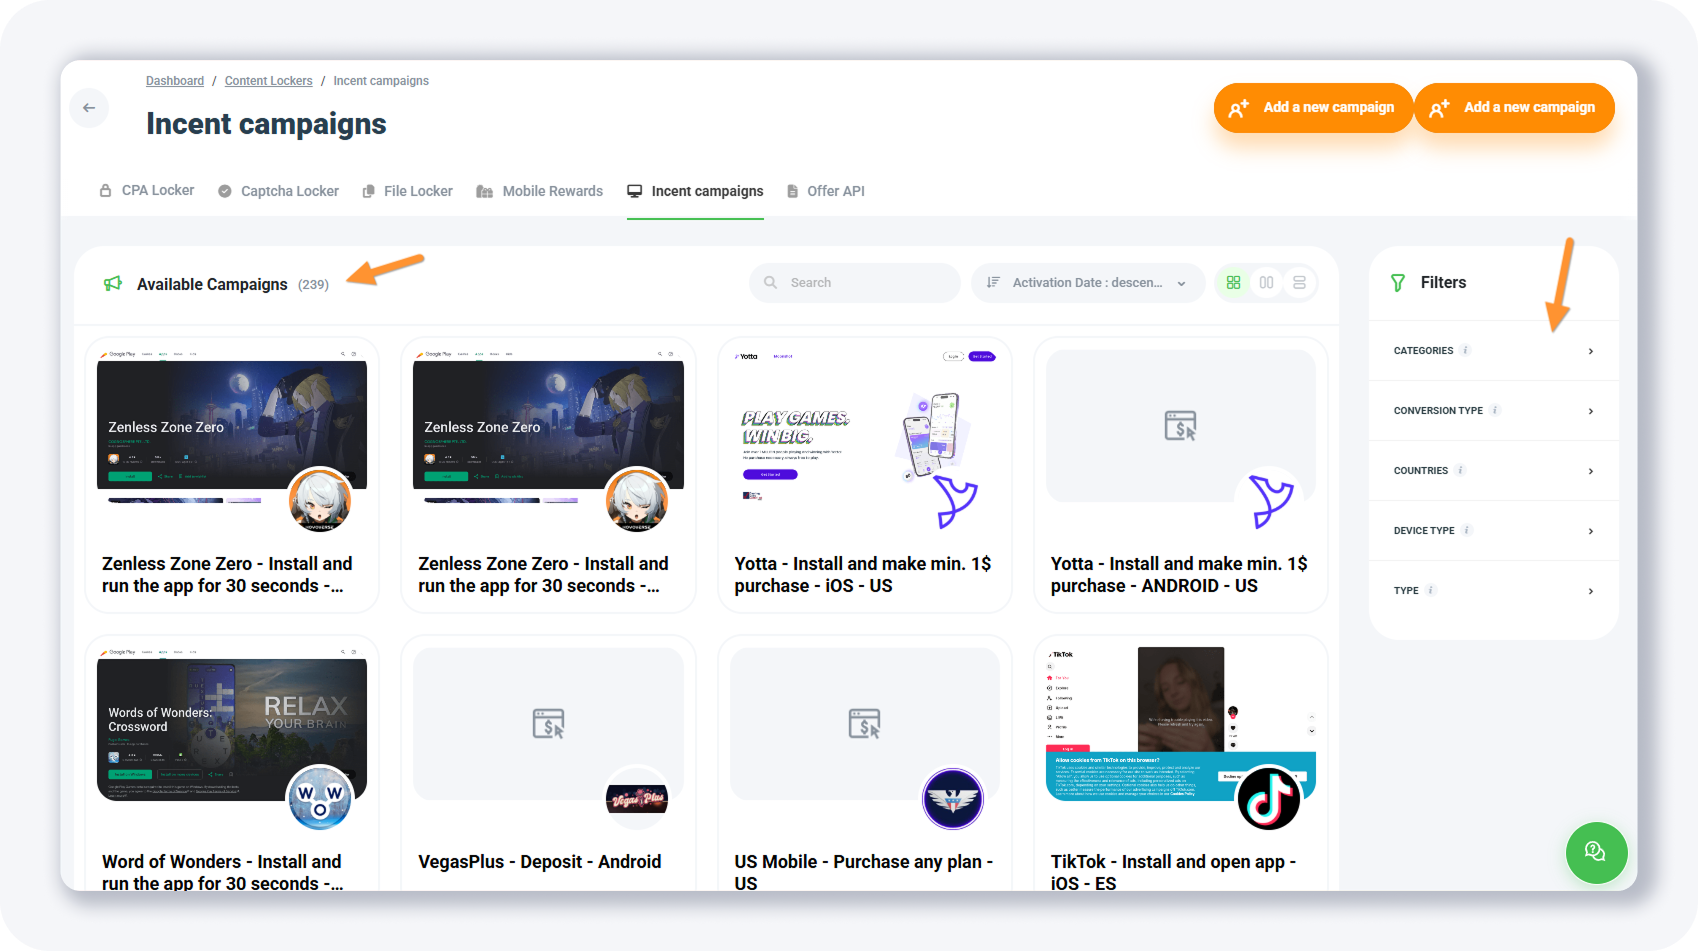
For example, filtering by Conversion type: Install, Device type: Mobile devices - Android, and Type: CPA returns about 28 offers. Each one is a ready-made affiliate campaign you can monetize.
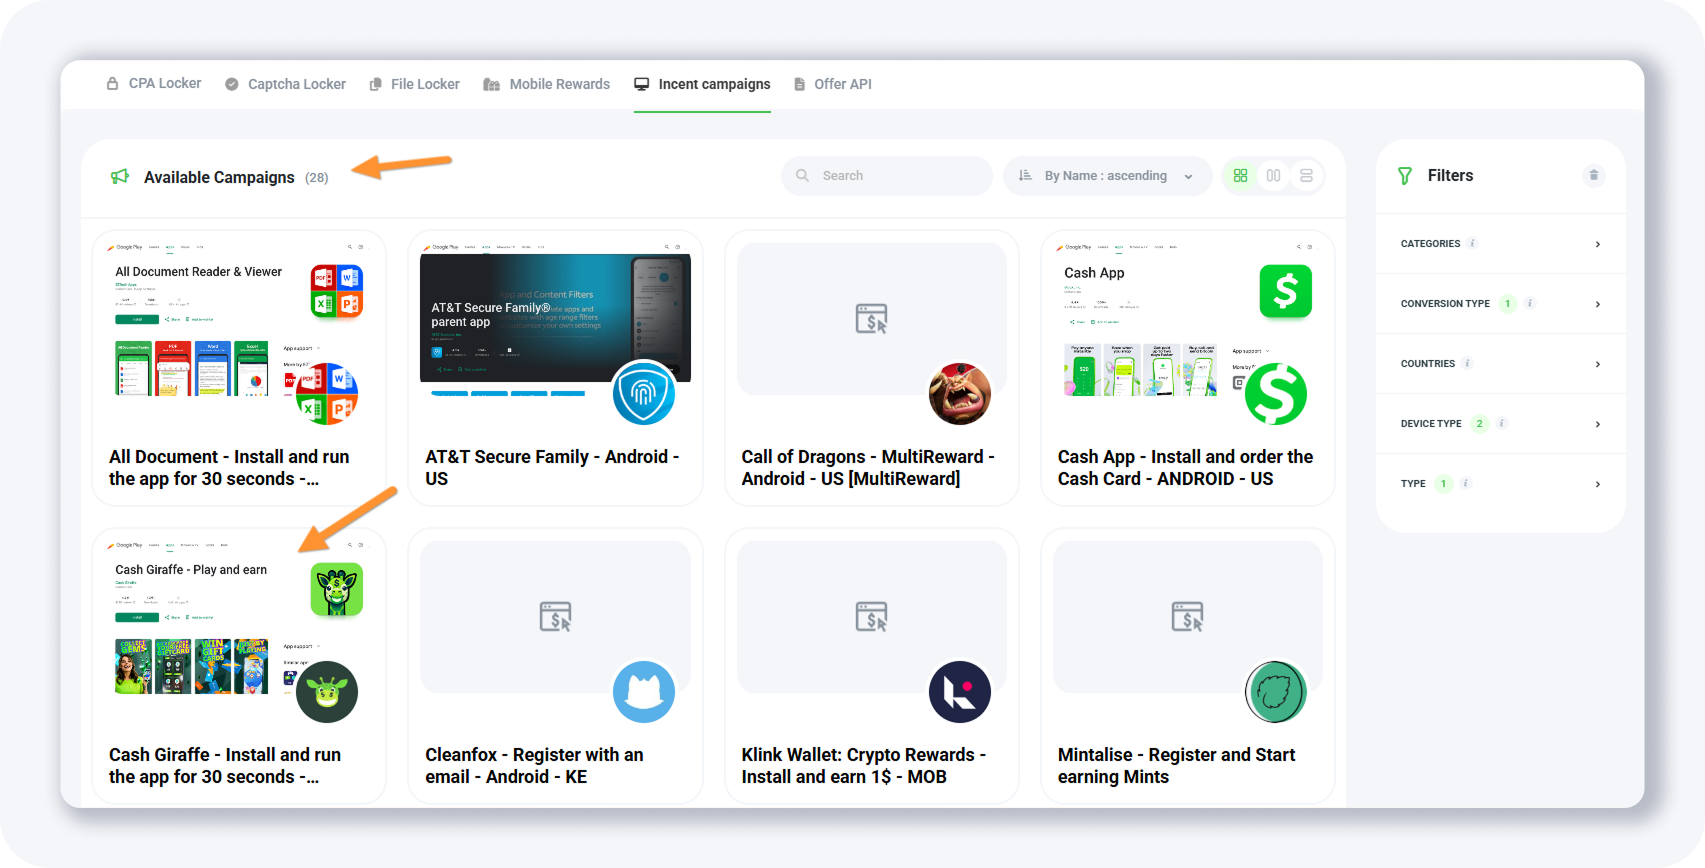
Open a campaign — say, Cash Giraffe — to see its details:
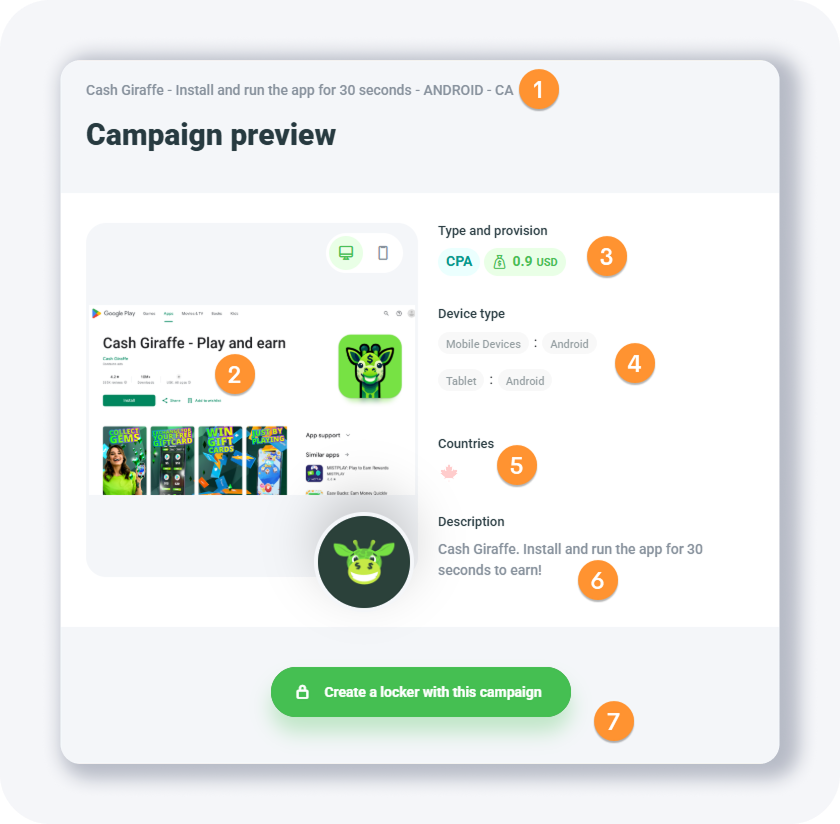
The offer name — the campaign's title.
The preview page thumbnail — usually a Google Play or App Store screenshot.
Type of offer and payout — for example, CPA at 0.9 USD.
Devices — where the offer is available.
List of countries — the geos where the offer runs.
What the user needs to do — the action that unlocks the locker.
Create the content locker button — builds a locker with this offer; pick the locker type first.
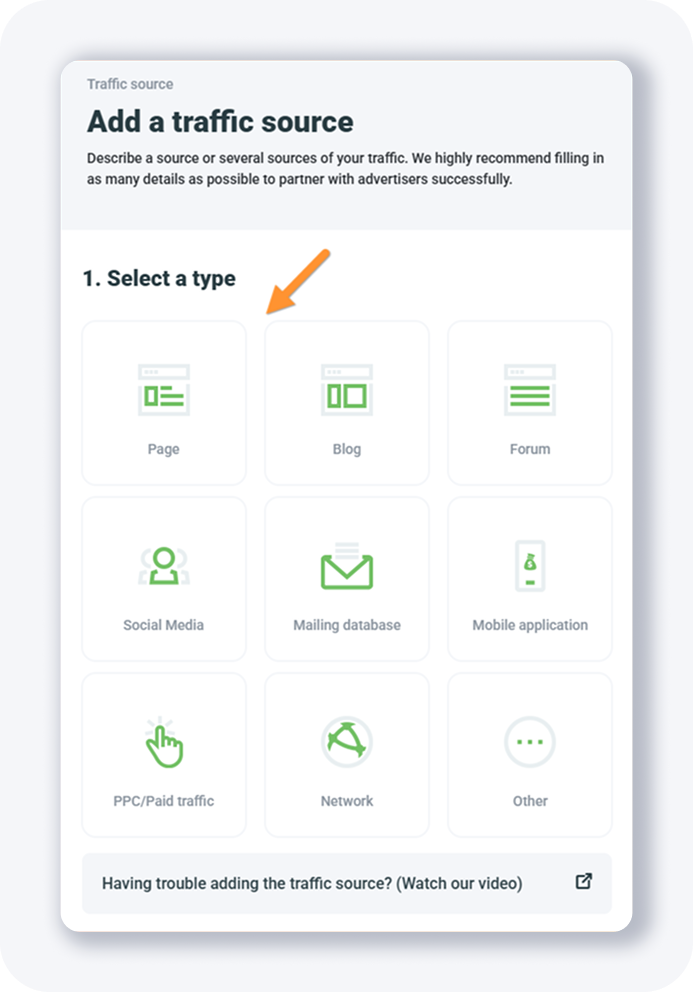
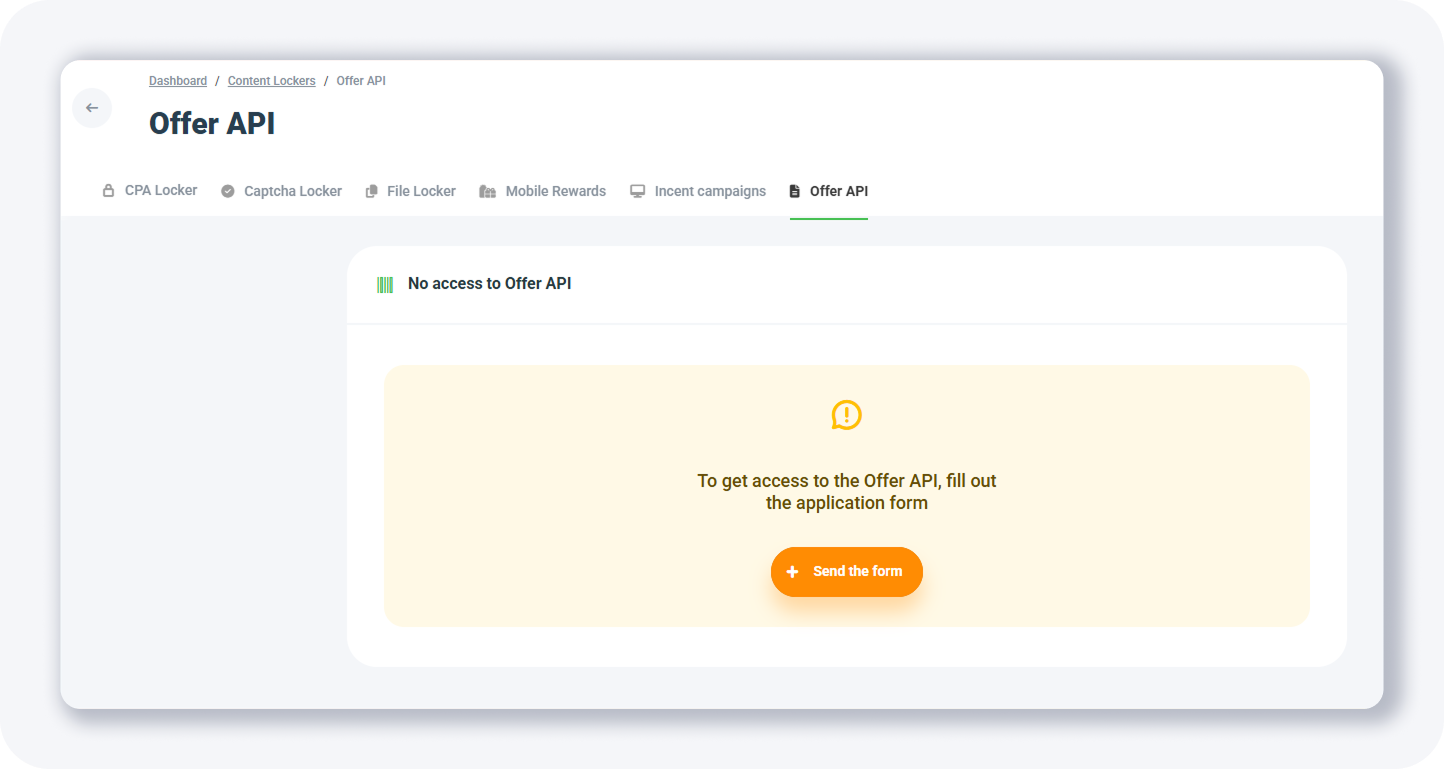
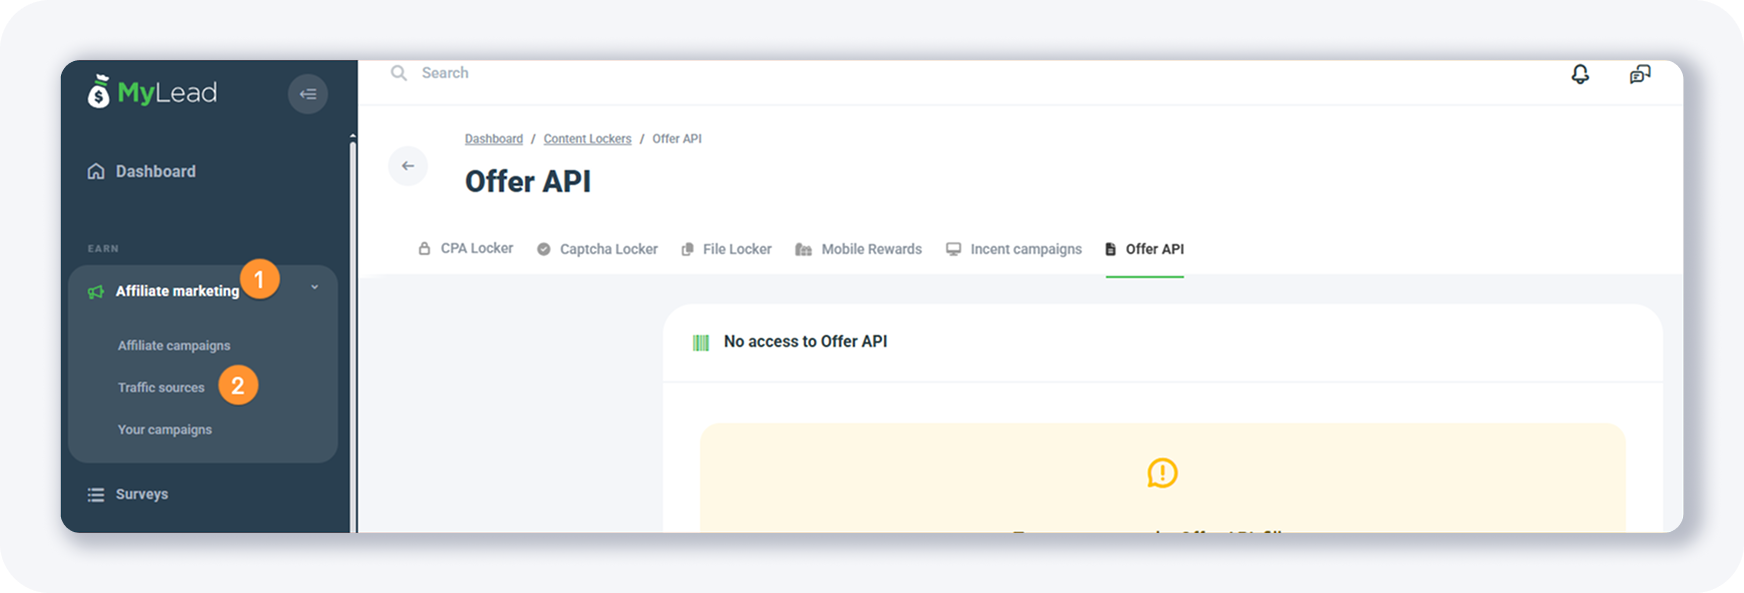
What is the Offer API and how do you add a traffic source?
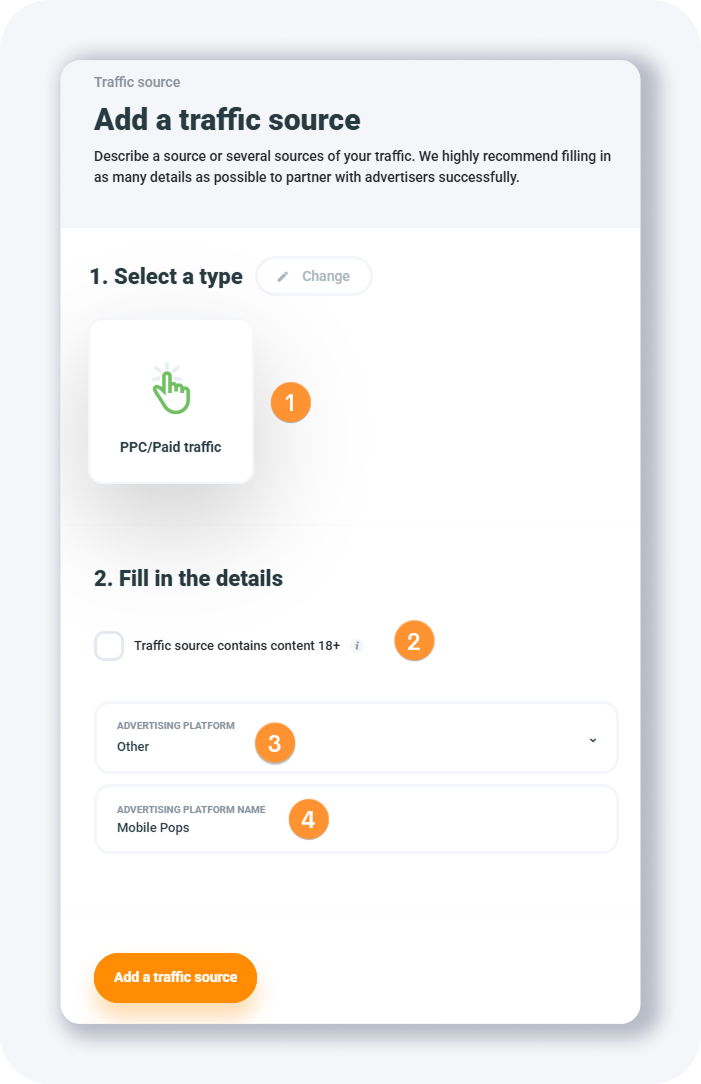
The Offer API automatically downloads information about incentive campaigns so you can use them in lockers and the Offerwall. To start, click + Add a traffic source and choose the traffic type you will use — for paid promotion, select PPC/Paid traffic. Every traffic source must be approved before the API works, so MyLead reviews it first.
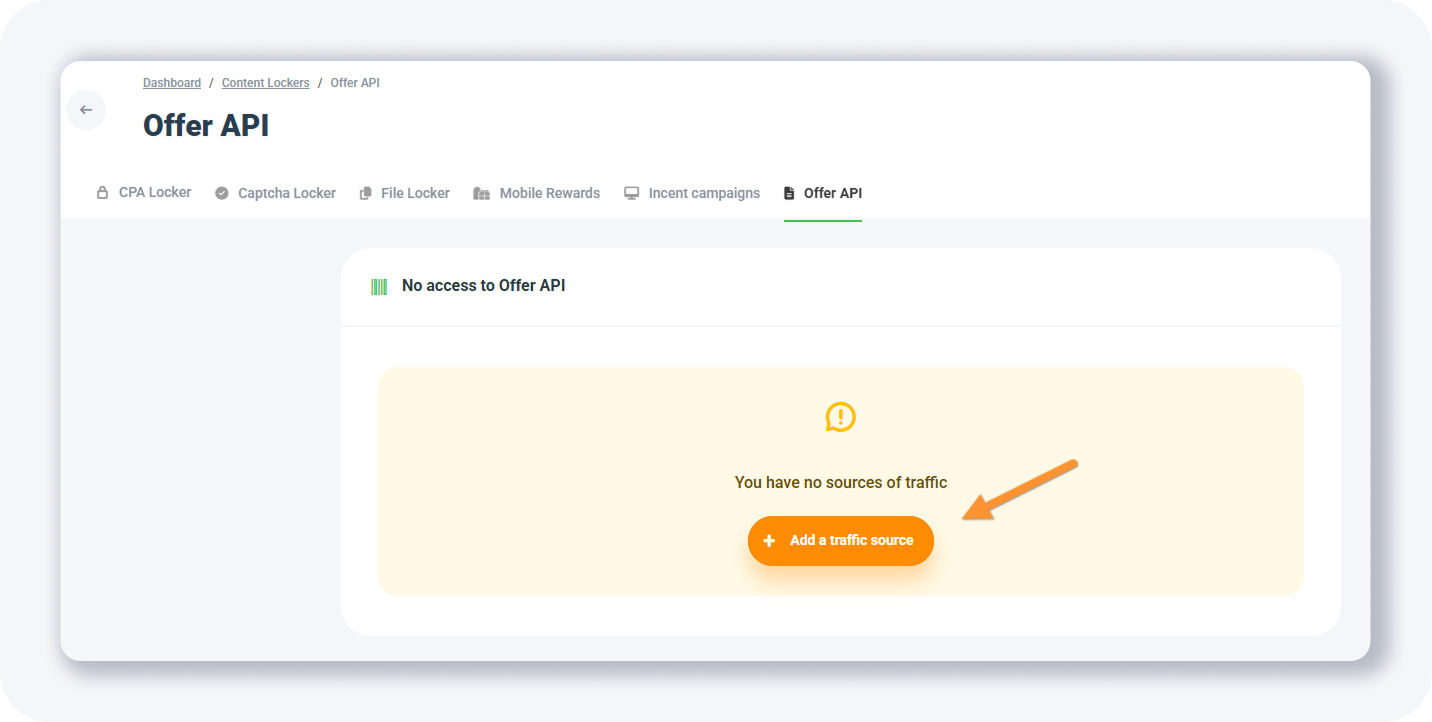
For mobile pops, select Other in the Advertising platform dropdown, type Mobile Pops as the platform name, then click Add a traffic source. Our guide on how to correctly add a traffic source covers the full process.
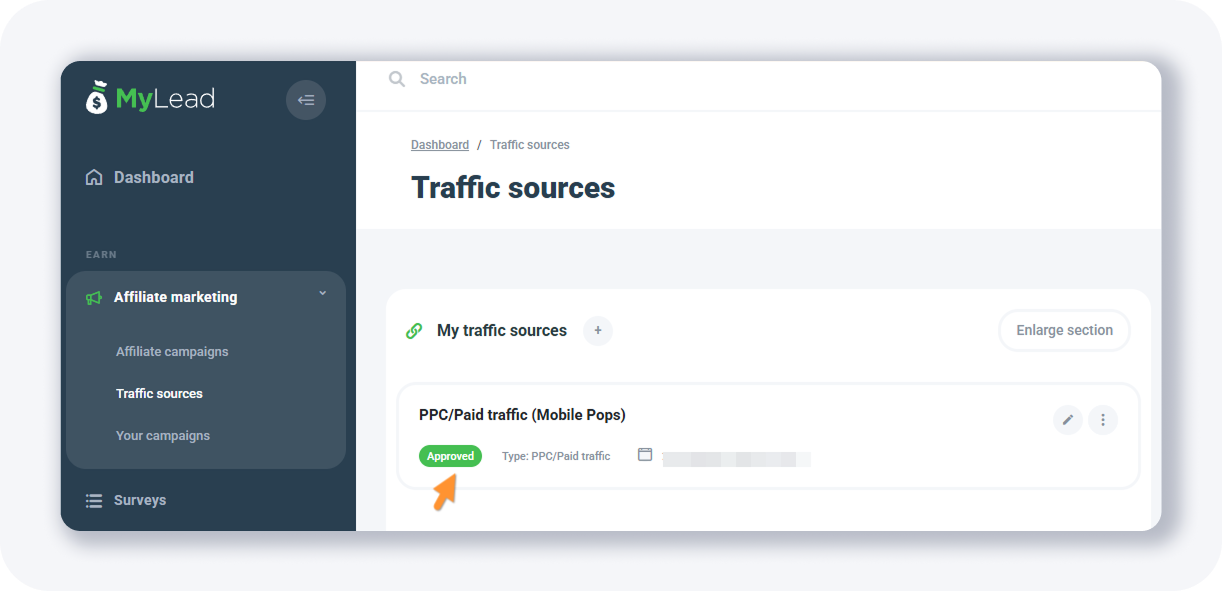
You will still see the same screen because each new traffic source needs approval. Open Traffic sources from the left menu to check its status.

Your source first appears as under approval; once approved, it is ready to use. Combine it with the right Postback/API configuration to record every conversion.
If you run into problems adding a traffic source, this video walks through it: https://www.youtube.com/watch?v=uoRT4kdlzh8
Key takeaways
MyLead offers four content locker types — CPA, Captcha, File, and Mobile Rewards — plus Incent campaigns and the Offer API to feed them.
Every locker follows the same logic: block content, require an offer, unlock, and pay you a commission per conversion.
The CPA Locker is the most flexible, with separate desktop and mobile designs, six themes, and adjustable required conversions.
Always pass ml_sub1 to ml_sub5 tracking parameters and set up a postback so you can see which traffic actually converts.
Mobile Rewards turns app engagement into a points-and-prizes system, ideal for mobile games and apps.
The Offer API needs an approved traffic source before it pulls incent campaigns into your lockers and Offerwall.
Complete MyLead Guide - Chapter list
1. How to register on MyLead - click to read
2. Main Dashboard - click to read
3. My Profile - click to read
4. Offers (Affiliate Campaigns) - click to read
5. Surveys - click to read
6. OfferWall Rewards - click to read
7. Content Lockers - now reading
8. CPA Locker
9. Captcha Locker
10. File Locker
11. Mobile Rewards
12. Icent Campaigns
13. Offer API
14. Smartlniks - click to read
15. Free Affiliate Tools - click to read
16. Coupons and promotions
17. HideLink
18. Passage of Offers
19. Damaged Links
20. Withdrawals - click to read
21. Statistics and Reports - click to read
22. Postbacks - click to read
23. Adding MyLead as an Affiliate Network to your Tracker - click to read
24. How to Add MyLead Offers to the Tracker - click to read
25. How to Add MyLead Lockers (as an Offer) to Tracker - click to read
26. How to Add MyLead Smartlinks (as an Offer) to Tracker - click to read
27. Community and News - click to read
FAQ
1. What is a content locker in MyLead?
A content locker is a tool that blocks part of your website, blog, or app until the visitor completes an offer. Once they convert, the content unlocks and you earn a commission.
2. How much can you earn with content lockers?
Earnings depend on your traffic and offers; incent campaigns such as Cash Giraffe pay per action — for example 0.9 USD per install. Active publishers with quality mobile and survey traffic scale to thousands per month.
3. Which content locker type should you use?
Use the CPA Locker for general content, the File Locker for downloads, the Captcha Locker for simple gating, and Mobile Rewards for mobile apps and games.
4. Do content lockers work with AdBlock users?
Yes. Enable AdBlock detection in the Website codes popup, and MyLead adds extra code so the locker still loads for visitors running AdBlock.
5. How do you track content locker conversions?
Pass your tracker's click_id through the ml_sub1 to ml_sub5 parameters in the Website codes, and configure a postback so each conversion is reported back to your tracker.
Summary
MyLead content lockers let you monetize any page, file, or app by gating it behind an offer, with CPA, Captcha, File, and Mobile Rewards options plus Incent campaigns and the Offer API to power them. Set tracking parameters and a postback from day one. Join MyLead as a publisher and start monetizing your content.
Have any questions? Feel free to reach us through our channels.