
Blog / MyLead Guide
How Do You Set Up OfferWall Rewards in MyLead?
This article is updated regularly
Last update:
08 December 2025
OfferWall Rewards is a MyLead monetization tool that lets publishers place a wall of offers on a website, app, or game, where users complete tasks — installs, surveys, videos — to earn virtual points. Each completed action pays the publisher a commission, while users redeem points for cash, gift cards, or in-app rewards.
This guide walks you through setting up your first OfferWall Rewards configuration in MyLead, adding a postback, and connecting popular trackers. You will get the exact fields and steps, without guesswork.
What you'll learn from this article:
how OfferWall Rewards works and what users earn points for,
how to create and configure your first OfferWall step by step,
which action buttons control each OfferWall you create,
how to set up a postback for BeMob, Skro, and MaxConv trackers,
where to place OfferWall Rewards to monetize sites and games.
What are OfferWall Rewards and how do they work?
OfferWall Rewards is an affiliate tool that displays a set of offers users complete in exchange for virtual currency. Users watch videos, install apps, take surveys, or engage with ads, then earn points. You decide what those points are worth and what users redeem them for — cash, gift cards, or in-game items.
MyLead is the affiliate network behind the offers: it tracks completions and pays your commission, while you focus on traffic. For the wider picture, read about OfferWall Rewards monetization and the common facts and myths about Offerwall.
How do you set up your first OfferWall in MyLead?
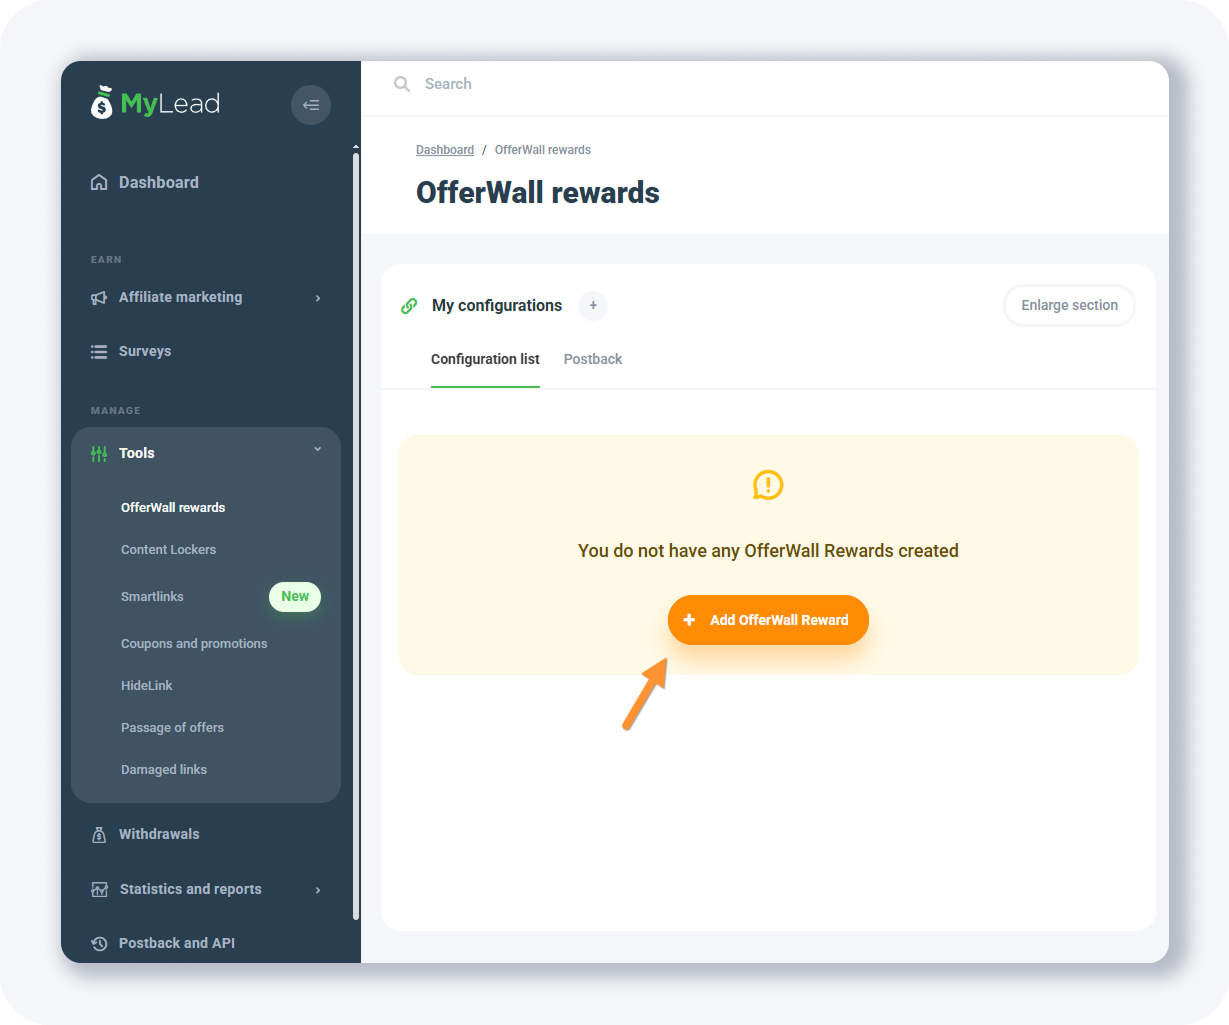
Setting up your first OfferWall in MyLead begins in the Tools → OfferWall Rewards section, opened with the + Add OfferWall Reward button. The configuration form has seven main fields covering the name, destination link, currency multiplier, and the virtual currency shown to users, with a live preview that updates as you edit.
After opening the OfferWall Rewards section, click + Add OfferWall Reward to start a new configuration.
The form opens with input fields on the left and a live preview on the right. A fuller walkthrough also lives in this step-by-step Offerwall setup guide.
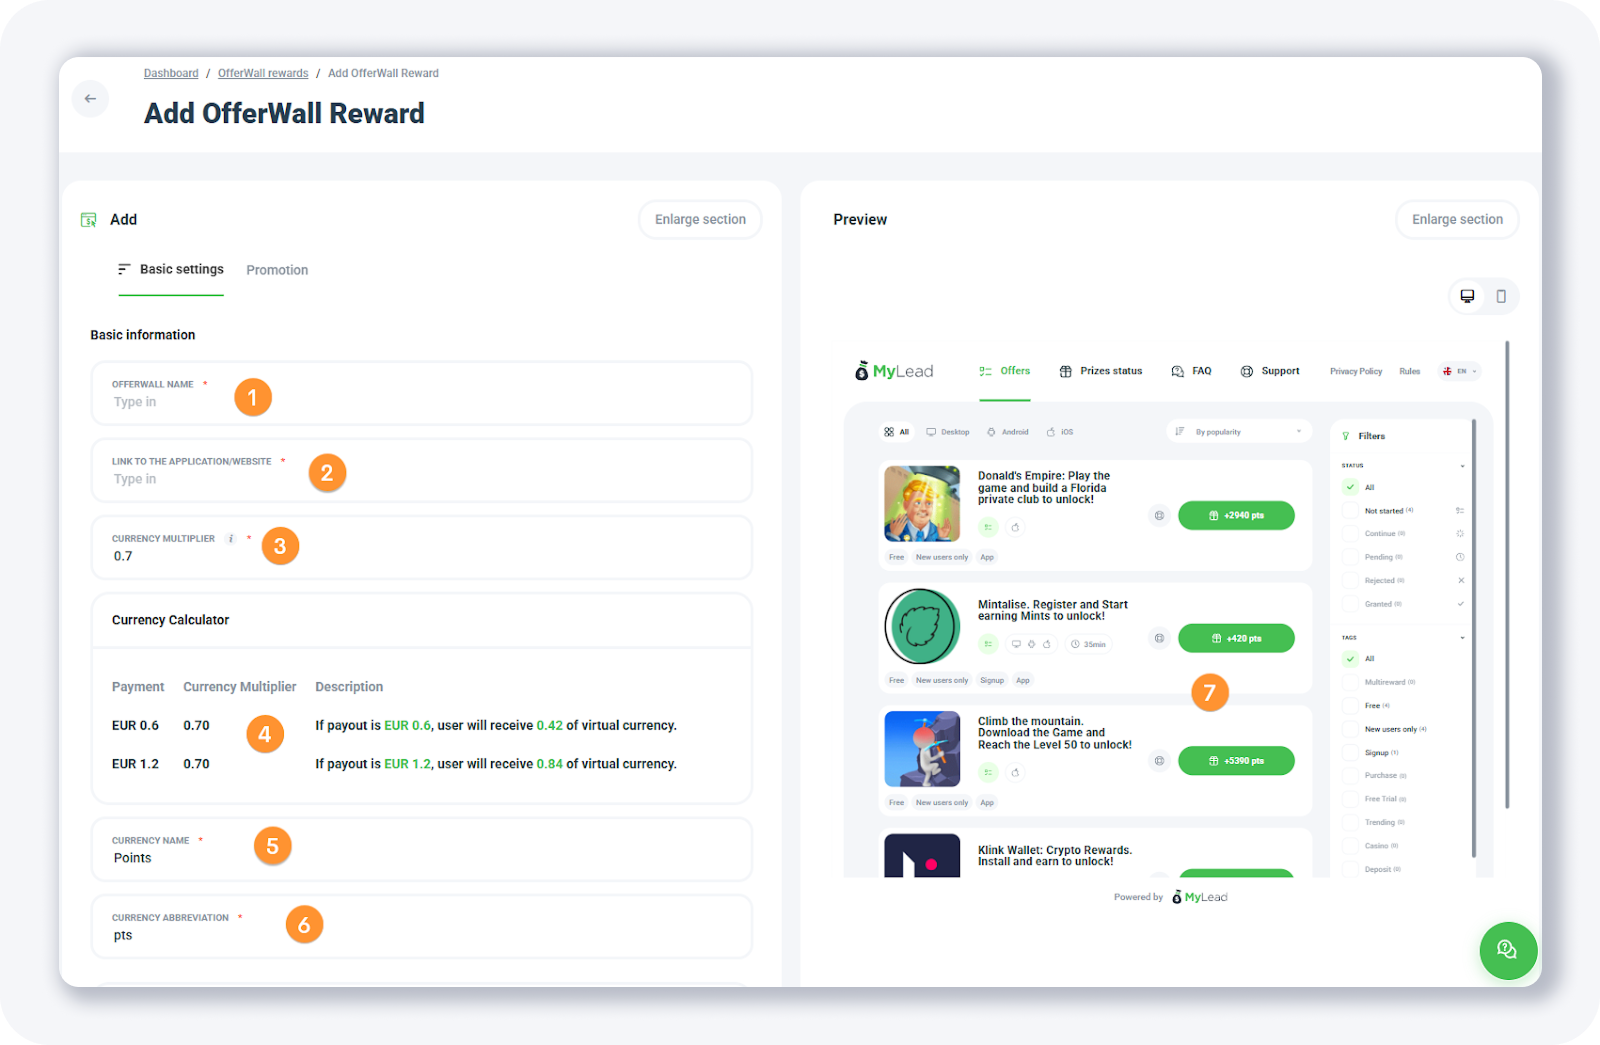
Here are the seven main fields you fill in:
OfferWall name — an internal label visible only to you.
Link to the application/website — the URL where you will use the OfferWall, or the link to your mobile app or game.
Currency multiplier — sets how points are calculated from your currency. With EUR, points are shown in cents; at a rate of 0.7, a €5 conversion appears as 350 points (500 cents × 0.7).
Currency calculator — shows the live calculation based on the multiplier you set.
Currency name — the displayed name of the virtual currency (for example points, pts, or gold).
Currency abbreviation — the short form of the currency name above.
Preview — updates instantly in the right-hand panel as you make changes.
At the bottom of the form you set three more options:

Platform — choose one platform; the OfferWall shows offers only for it. To cover all three platforms, create three separate OfferWalls.
Additional options — disable 18+, gambling, or pin-submit offers if you don't want to show them.
Personalization — set custom colors for your OfferWall.
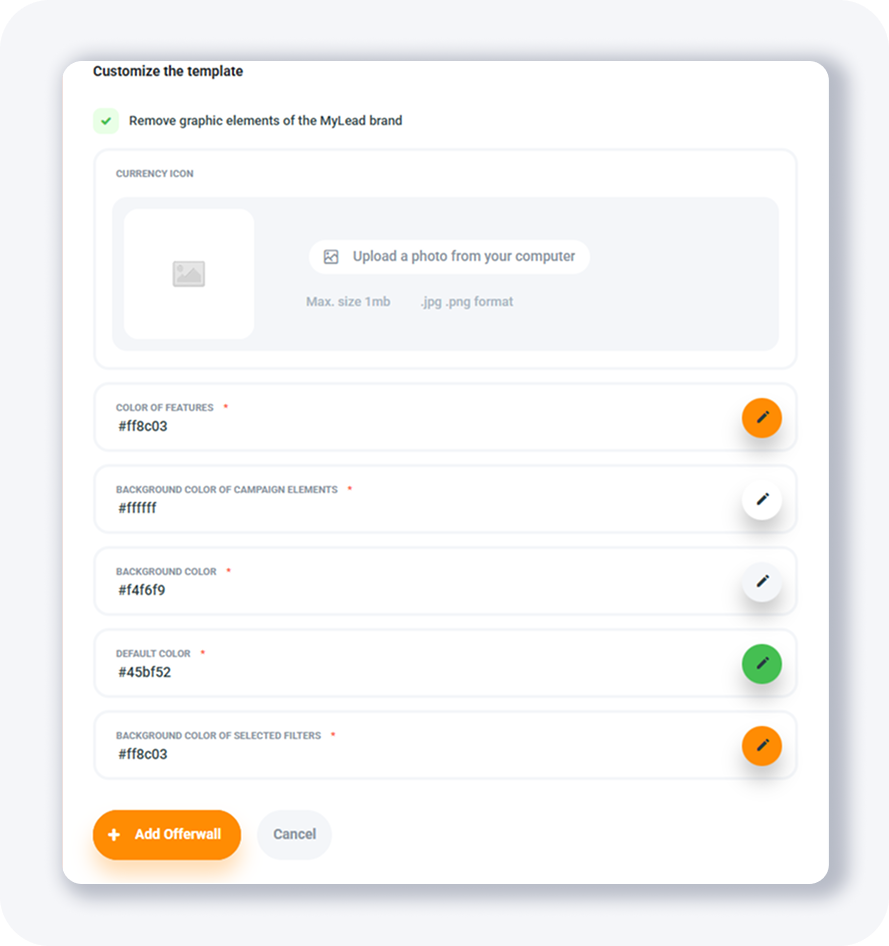
When you're ready, click + Add OfferWall and your OfferWall is created:

What do the OfferWall action buttons do?
Every OfferWall you create comes with six action buttons that manage it after setup. They let you preview the wall, control which offers appear, grab the website code, clone the configuration, delete it, or edit its settings. These controls sit next to each OfferWall in your list.
The six buttons are:
Preview — opens a popup showing how your OfferWall looks.
Choose displayed offers — lets you manually remove offers from your OfferWall.
Website codes — gives the URL of your OfferWall, where you send visitors or players.
Clone offerwall — creates a copy of the OfferWall.
Remove offerwall — deletes your OfferWall.
Edit offerwall — lets you change its settings.
How do you add a postback to OfferWall?
A postback lets MyLead tell your website or app each time a player completes an offer and how many points they earned, so you can credit them in your database. To make it work, you first send your player_id to the MyLead OfferWall; once the action completes, MyLead sends the data back.
Start by selecting Website codes:

Then modify the URL, like this:
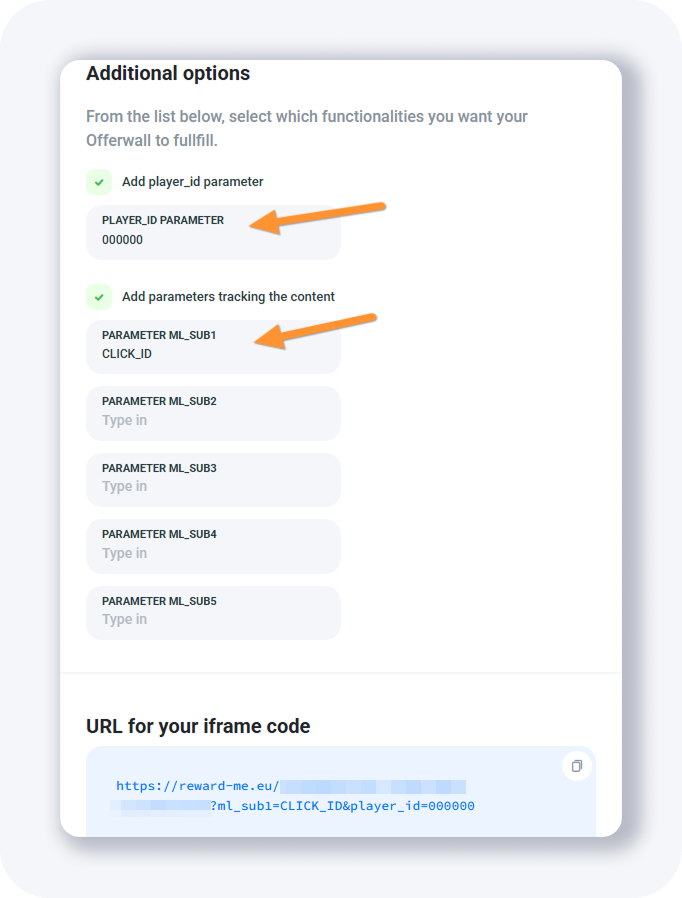
Your OfferWall URL might look something like this:
[PLAIN]https://reward-me.eu/a118d360-992c-2222-be6b-111111111?ml_sub1=CLICK_ID&player_id=000000[/PLAIN]
This is the offer URL, which you can also add to your tracker if you want to promote it. Pass your tracker's CLICK ID under ml_sub1 and set a correct postback URL in the MyLead dashboard, and you will see all conversions and revenue in your tracker. For the basics, see the MyLead postbacks guide.
The player_id attribute assigns virtual points to the right player on your website, application, or game — send a unique player ID each time.
Setting up a postback URL for OfferWall
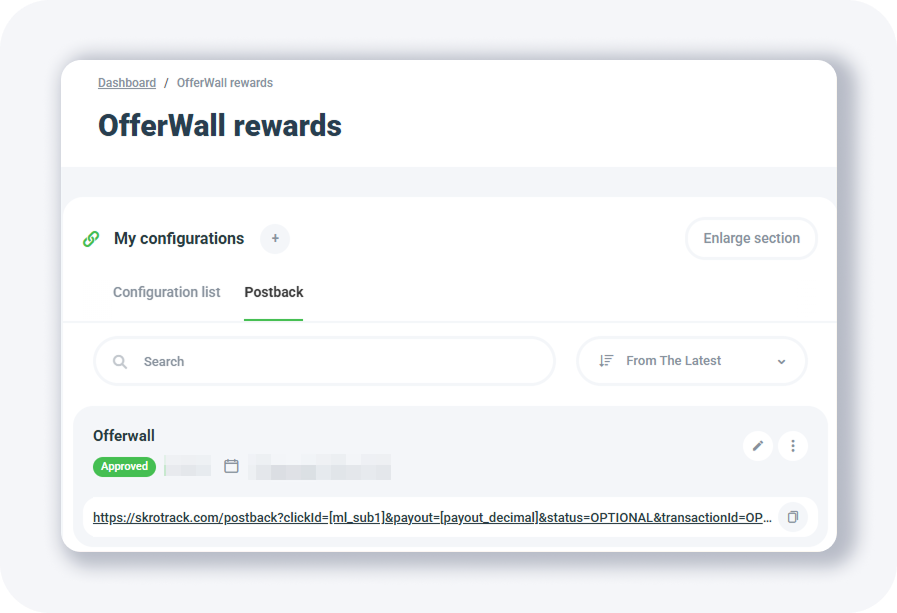
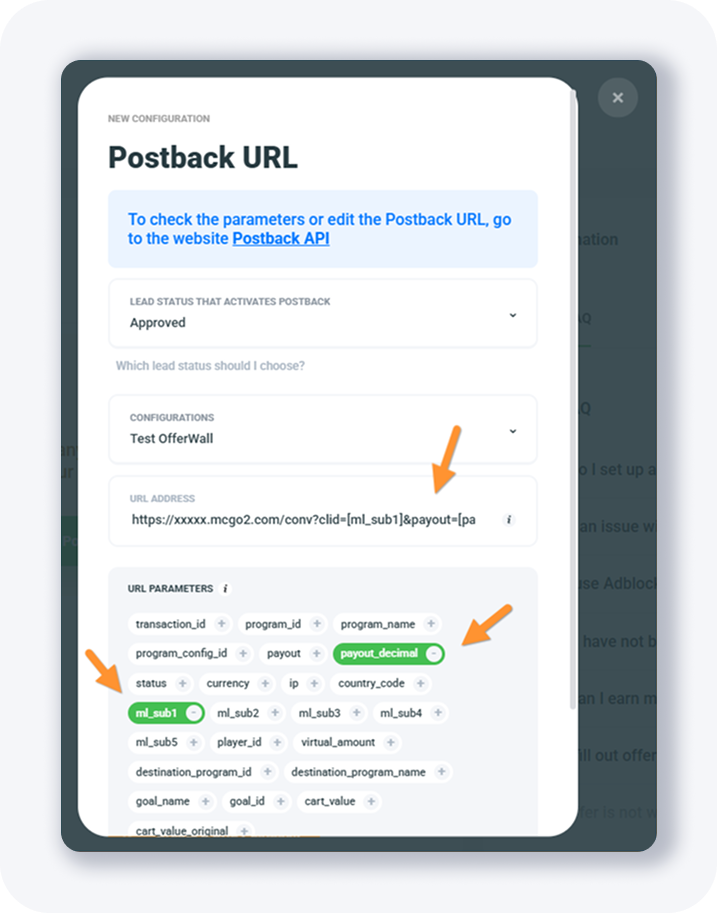
To receive a notification whenever a visitor completes an offer, open the Postback tab and click + Add a Postback URL. A popup opens where you map four main fields: the lead status that fires the postback, the OfferWall configuration, the tracker URL, and the URL parameters that carry click and payout data.

Select the Postback tab, then click + Add a Postback URL. You'll see a popup like this:
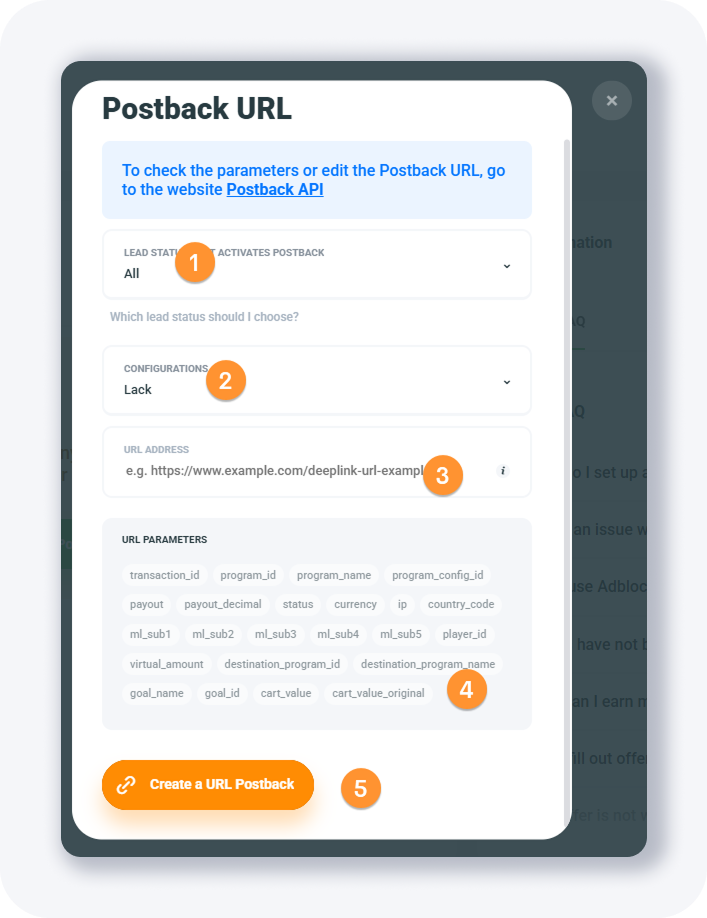
The main fields work as with other affiliate networks:
Lead status that activates postback — sets when the postback fires (pre-approved, pending, approved, or rejected, or just one). For simple tracking, select only Approved.
Configurations — select your OfferWall from the list.
URL Address — the postback URL from your tracker.
URL parameters — tokens for your postback URL; the most common are click_id (usually ml_sub1) and payout.
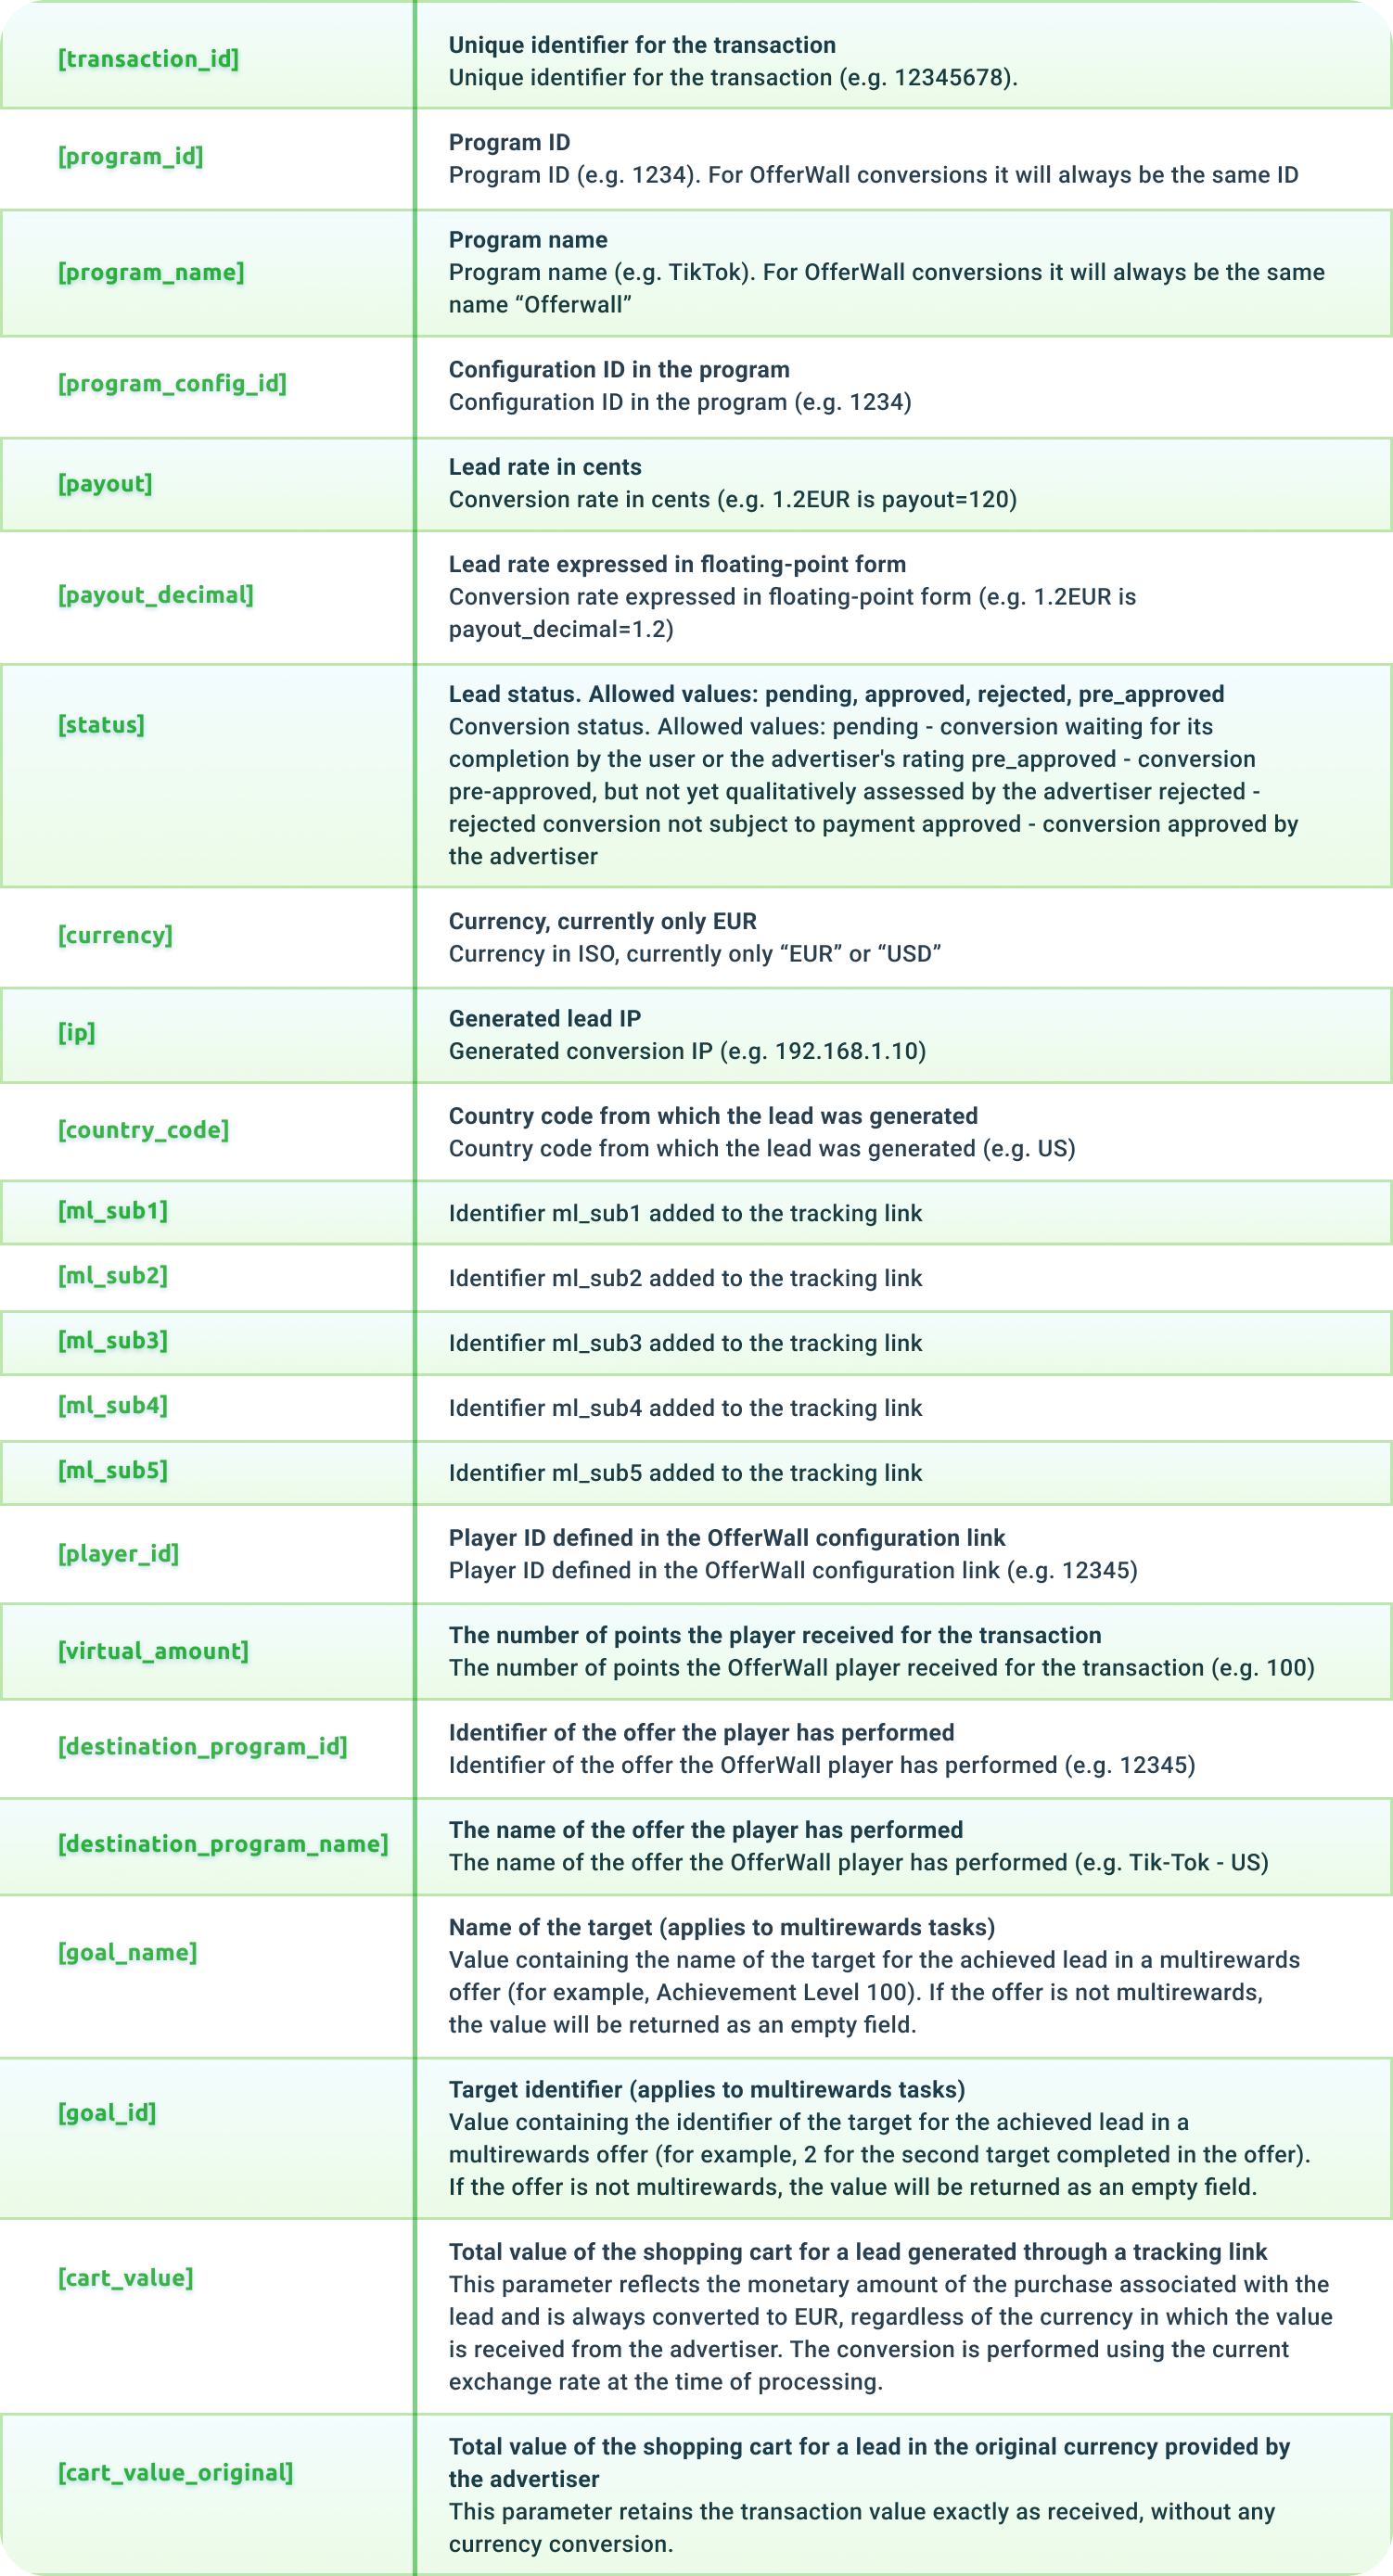
Here are all the tracking tokens you can use in the postback URL:
How do you configure the postback URL for each tracker?
Each tracker uses its own default postback URL, but the MyLead setup is the same: replace the click ID token with [ml_sub1] and the payout token with [payout_decimal]. This guide covers BeMob, Skro, and MaxConv — copy your tracking domain, insert the two MyLead tokens, then generate the URL postback.
If you're new to trackers, start with how to set up a tracker.
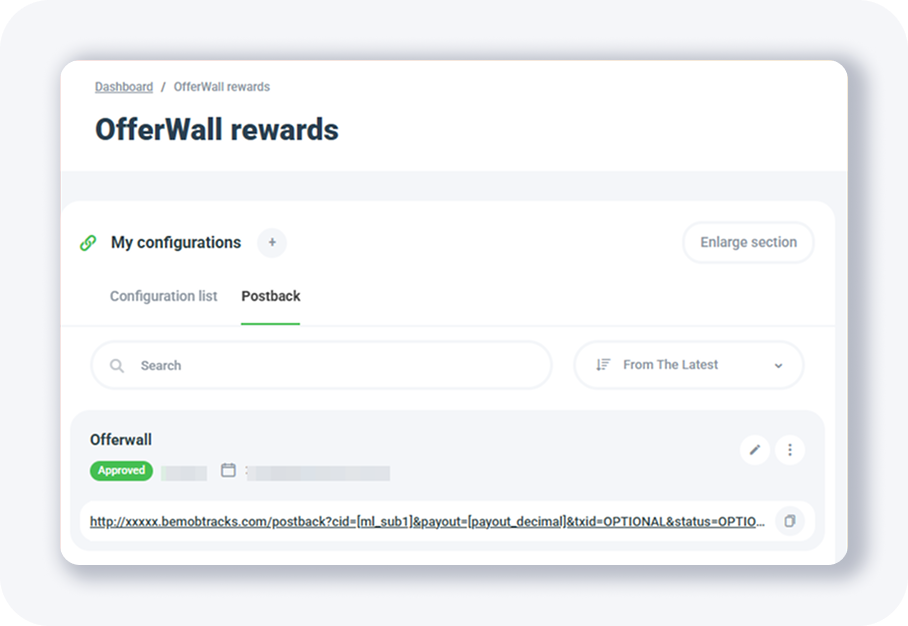
Setting the postback URL for BeMob
For BeMob, find one of your default tracking domains on the Domains page — it looks like https://xxxxx.bemobtracks.com, where xxxxx is unique to your account. BeMob's postback URL takes a cid and a payout parameter, which you map to MyLead's [ml_sub1] and [payout_decimal] tokens before generating the final URL.

The BeMob postback URL always looks like this:
[PLAIN]http://xxxxx.bemobtracks.com/postback?cid=REPLACE&payout=OPTIONAL&txid=OPTIONAL&status=OPTIONAL[/PLAIN]
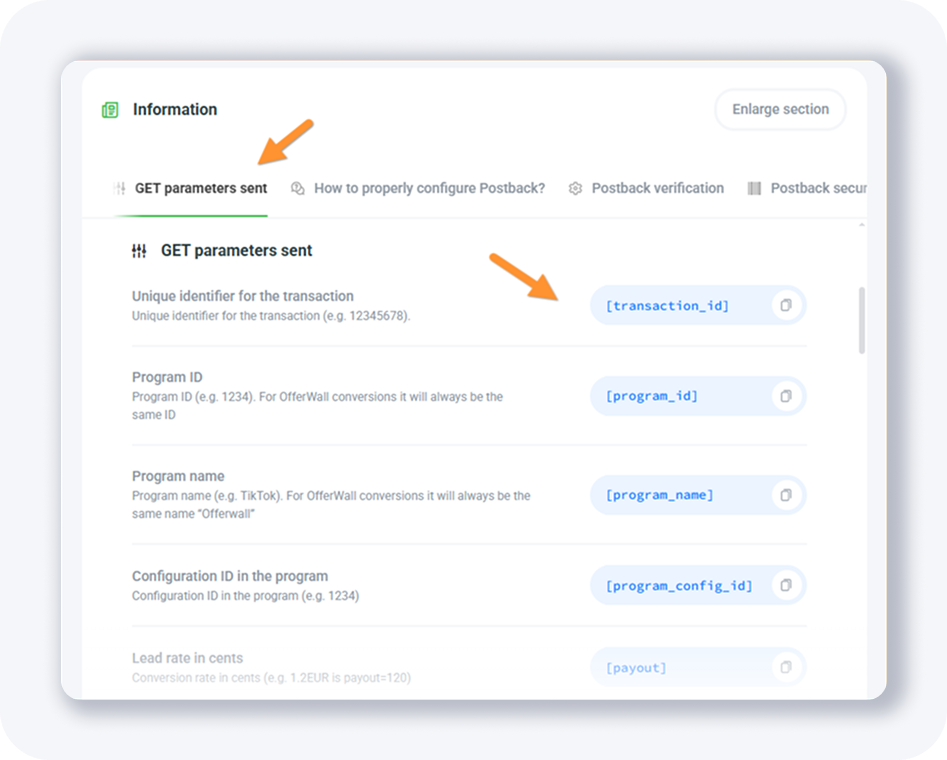
You only need the correct MyLead tokens for two parameters: cid and payout. Find the affiliate network tokens on the Postback/API page or in the table above.

Place [ml_sub1] and [payout_decimal] like this:
cid=[ml_sub1]
payout=[payout_decimal]
The full postback URL then looks like:
[PLAIN]http://xxxxx.bemobtracks.com/postback?cid=[ml_sub1]&payout=[payout_decimal]&txid=OPTIONAL&status=OPTIONAL[/PLAIN]
Copy the tag URL and paste it into the popup window:

Then click GENERATE a URL POSTBACK once you're done.
Setting the postback URL for Skro
Skro setup is just as simple. Its default postback URL uses clickId and payout parameters, which map to MyLead's [ml_sub1] and [payout_decimal] tokens. Copy the default Skro postback URL, swap in the two MyLead tokens, paste the tag into the popup, and generate the URL postback to finish the connection.
The default Skro postback URL is:
[PLAIN]https://skrotrack.com/postback?clickId=REPLACE&payout=OPTIONAL&status=OPTIONAL&transactionId=OPTIONAL[/PLAIN]
Map the two parameters: clickId=[ml_sub1] and payout=[payout_decimal]. Find the tokens on the Postback/API page or the table above.
The full Skro postback URL then looks like:
[PLAIN]https://skrotrack.com/postback?clickId=[ml_sub1]&payout=[payout_decimal]&status=OPTIONAL&transactionId=OPTIONAL[/PLAIN]
Grab the tag URL and paste it:

Then click GENERATE a URL POSTBACK once you're done.
Setting the postback URL for MaxConv
For MaxConv, find a default tracking domain on the Domains page — it looks like https://xxxxx.mcgo2.com, with xxxxx unique to you. MaxConv's postback URL uses clid and payout parameters, mapped to MyLead's [ml_sub1] and [payout_decimal] tokens. Insert the tokens, paste the tag, and generate the URL postback.
The MaxConv postback URL always looks like this:
[PLAIN]https://xxxxx.mcgo2.com/conv?clid=REPLACE&payout=OPTIONAL&txid={OPTIONAL}¤cy={OPTIONAL}&event={OPTIONAL}[/PLAIN]
You only need the correct tokens for clid and payout. Find the affiliate network tokens on the Postback/API page.
Place [ml_sub1] and [payout_decimal] in the URL: clid=[ml_sub1] and payout=[payout_decimal]. The full postback URL then looks like:
[PLAIN]https://xxxxx.mcgo2.com/conv?clid=[ml_sub1]&payout=[payout_decimal]&txid={OPTIONAL}¤cy={OPTIONAL}&event={OPTIONAL}[/PLAIN]
Grab the tag URL and paste it:
Then click GENERATE a URL POSTBACK once you're done. A YouTube video showing how to configure OfferWall Rewards is also available: https://www.youtube.com/watch?v=rir4eoCE_9A
Where can you use OfferWall Rewards?
OfferWall Rewards fits any product where users will trade actions for virtual currency. You'll see it on GPT (get-paid-to) websites, where users swap earned points for physical products or prepaid gift cards, and inside free mobile games, where developers reward players with extra points or lives for completing offers.
See how this works in practice in this case study on using the Offerwall in a mobile game, or read the reasons mobile game developers use Offerwall. Set up your first OfferWall Rewards in MyLead and start monetizing your site, app, or game today. Here's a helpful video explaining it: https://www.youtube.com/watch?v=9MPwNiPcaOY
Key takeaways
OfferWall Rewards lets users earn virtual points for completing offers — installs, surveys, videos — and pays you a commission per action.
You configure the wall in Tools → OfferWall Rewards with seven main fields plus platform, content, and color options.
The currency multiplier controls how many points users see: payout in your currency × the multiplier (a 0.7 multiplier turns €5 into 350 points).
Each OfferWall has six action buttons: preview, choose offers, website codes, clone, remove, and edit.
A postback notifies your site or app when a user completes an offer; map ml_sub1 to the click ID and payout_decimal to the payout.
BeMob, Skro, and MaxConv all connect the same way — swap the tracker's default tokens for MyLead's [ml_sub1] and [payout_decimal].
Complete MyLead Guide - Chapter list
1. How to register on MyLead - click to read
2. Main Dashboard - click to read
3. My Profile - click to read
4. Offers (Affiliate Campaigns) - click to read
5. Surveys - click to read
6. OfferWall Rewards - now reading
7. Content Lockers - click to read
8. CPA Locker
9. Captcha Locker
10. File Locker
11. Mobile Rewards
12. Icent Campaigns
13. Offer API
14. Smartlniks - click to read
15. Free Affiliate Tools - click to read
16. Coupons and promotions
17. HideLink
18. Passage of Offers
19. Damaged Links
20. Withdrawals - click to read
21. Statistics and Reports - click to read
22. Postbacks - click to read
23. Adding MyLead as an Affiliate Network to your Tracker - click to read
24. How to Add MyLead Offers to the Tracker - click to read
25. How to Add MyLead Lockers (as an Offer) to Tracker - click to read
26. How to Add MyLead Smartlinks (as an Offer) to Tracker - click to read
27. Community and News - click to read
FAQ
1. What is OfferWall Rewards in MyLead?
OfferWall Rewards is a MyLead tool that displays a wall of offers users complete — surveys, installs, videos — to earn virtual points. You set what those points are worth, and MyLead pays your commission for each completed action.
2. How are the points users see calculated?
Points come from your payout in the publisher's currency multiplied by your currency multiplier. With a multiplier of 0.7 and a €5 conversion, the user sees 350 points (500 cents × 0.7). You set both the multiplier and the currency name.
3. Do you need a postback for OfferWall?
A postback is optional but recommended. It lets MyLead notify your site or app each time a user completes an offer, so you can credit their points automatically and see conversions and revenue in your tracker.
4. Which trackers work with OfferWall postbacks?
OfferWall postbacks work with standard trackers using the same token setup. This guide covers BeMob, Skro, and MaxConv, mapping ml_sub1 to the click ID and payout_decimal to the payout value.
5. Where can you place an OfferWall?
You can place an OfferWall on a website, a GPT (get-paid-to) platform, or inside a free mobile game or app. Users exchange the points they earn for cash, gift cards, or in-game rewards.
Summary
OfferWall Rewards is a flexible way to monetize a website, app, or game in MyLead: users complete offers for virtual points, and you earn a commission on every action. Configure the wall, set your currency multiplier, and add a postback with the [ml_sub1] and [payout_decimal] tokens to track conversions in BeMob, Skro, or MaxConv.
Have any questions? Feel free to reach us through our channels.