
Blog / Guides
How to Set Up an Affiliate Tracker? A Step-by-Step Keitaro Guide
This article is updated regularly
Last update:
28 March 2025
Setting up an affiliate tracker means installing tracking software that records clicks, conversions, and visitor data between your traffic source and the affiliate network. With a self-hosted tracker like Keitaro, you rent a VPS, install the software through a single terminal command, connect a domain via Cloudflare, and configure postback so every conversion is logged automatically.
This guide walks you through the full tracker setup with Keitaro — from renting a server to configuring tracking macros — so every click in your MyLead campaigns is measured.
What you'll learn from this article:
how a tracker collects clicks, conversions, and visitor data, and why media buyers need one,
the difference between cloud-hosted and self-hosted trackers,
how to install Keitaro on a VPS step by step, from server to dashboard,
how to connect a domain, enable SSL, and read tracking macros in your campaign URLs.
How do you set up an affiliate tracker?
Setting up an affiliate tracker follows four stages: choosing a tracker type (cloud or self-hosted), preparing a server, installing the software, and connecting a domain with postback. A self-hosted setup with Keitaro on a DigitalOcean VPS takes roughly 30-40 minutes and gives you full control over the data on your own server.

The complete process breaks down into clear steps you repeat for every tracker you deploy:
Pick a tracker model — cloud-hosted (ready instantly) or self-hosted (you run the server).
Rent a VPS sized to your daily click volume and located near your target GEO.
Connect to the server over SSH and update the operating system.
Install Keitaro with a single command and activate your license.
Connect a domain through Cloudflare and enable an SSL certificate.
Configure bot filtering, enable autosave, and add the campaign domain you will track.
What is a tracker and is it mandatory in affiliate marketing?
A tracker is software that records and manages campaign data — impressions, clicks, and conversions — together with details about each visitor. For media buyers it is mandatory: without it, you cannot tell which sources, placements, or hours generate profit. The tracker stores this information and becomes the basis for every optimization decision you make.
A tracker organizes the data it gathers into two layers:
Events — impressions, clicks, and conversions (leads or sales).
Visitor information — country, city, device, operating system, and the cost of each click.
This structured data is what lets you scale a campaign instead of guessing which traffic works. For a wider look at how tracking tools fit into your stack, see earn with offer trackers.
How does a tracker pass conversion data?
A tracker passes data in a loop: traffic source → tracker → affiliate network → tracker → traffic source. When a user converts at the advertiser, an S2S postback signal travels from the network's servers through your tracker back to the traffic source, confirming the conversion without relying on the user's browser or cookies.
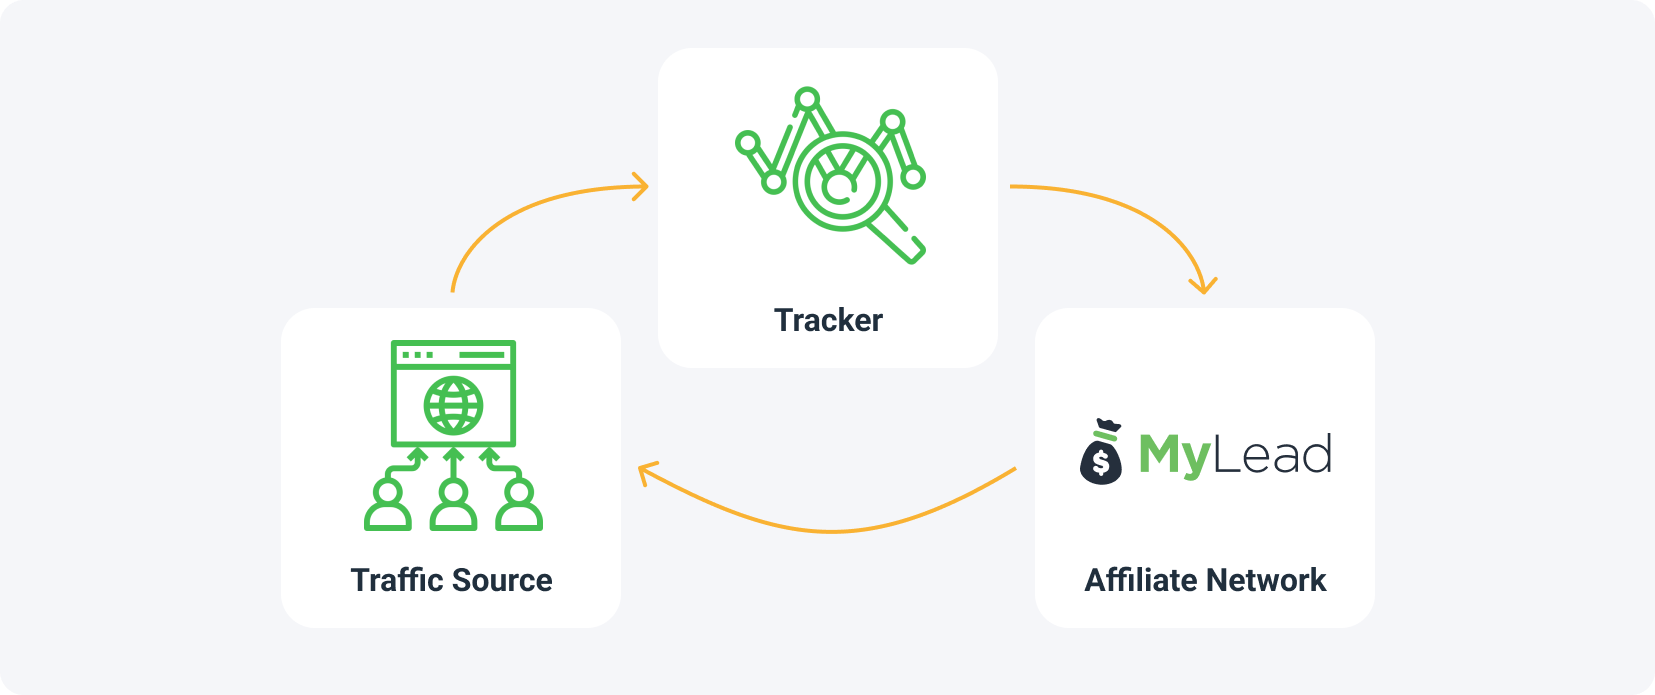
In this model your tracker acts as a bridge between the traffic source and the affiliate network. Because the signal is server-to-server, it works even when cookies are blocked — the standard for reliable conversion tracking in 2026. MyLead supports this method natively; the full setup is covered in postback in affiliate marketing.
Cloud-hosted vs self-hosted tracker: which should you choose?
Trackers split into two groups. A cloud-hosted tracker needs no server setup — you use it immediately and pay a subscription. A self-hosted tracker like Keitaro runs on a VPS you control, so your data stays on your own server. Self-hosting costs less long-term and gives full data ownership, at the price of a one-time setup.
| Tracker type | Server setup | Best for | Data location |
|---|---|---|---|
| Cloud-hosted | None — ready instantly | Beginners, fast start | Provider's servers |
| Self-hosted (Keitaro) | VPS required (~30-40 min) | Full control and scale | Your own server |
Pro tips for using your tracker efficiently
A tracker only pays off when you act on its data. Common uses include cutting wasted spend, scheduling campaigns around real conversion windows, separating ad formats, and watching subscriber freshness. These four habits turn raw statistics into profit and prevent the most common money leaks new media buyers face.
Find the sites and sources that spend money without converting, and blacklist them at the traffic source immediately.
Check which hours your conversions arrive, and run the campaign only during those windows.
If you accidentally run different ad formats in one campaign (e.g. classic push and in-page push), use the tracker to find the profitable one.
Track the subscription age of classic push notifications — new subscribers usually perform best.
Pair these habits with the right numbers to read; start with the key metrics every affiliate should know.
What server do you need to install Keitaro?
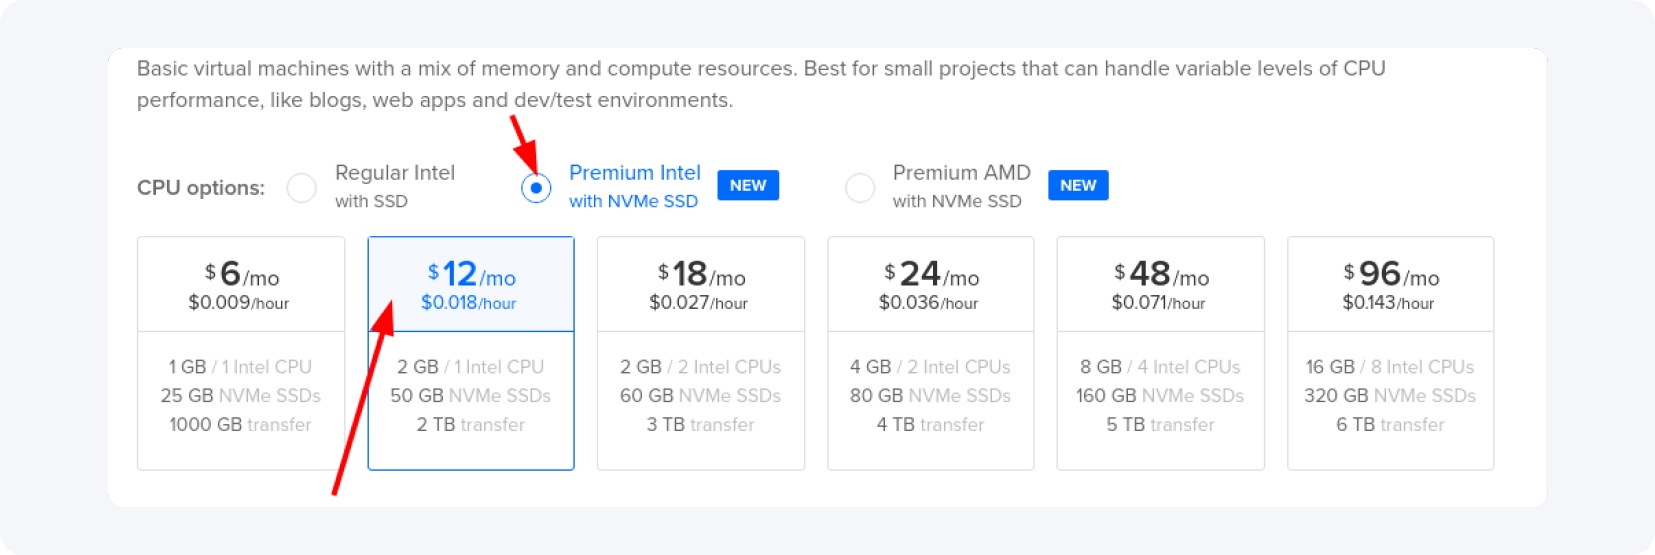
Keitaro needs a VPS running CentOS, a valid license, and about 30-40 minutes. For volumes under 10,000 clicks a day, a 2 GB / 1-core VPS is enough; for 10,000-100,000 clicks daily, 4 GB and 2 cores are recommended. An NVMe SSD droplet and a location near your target GEO keep tracking fast.
Keitaro itself costs $20 for the basic version and $40 for Pro — affordable for a fast, customizable tracker. Its creators recommend a server from DigitalOcean, so start by creating a droplet:
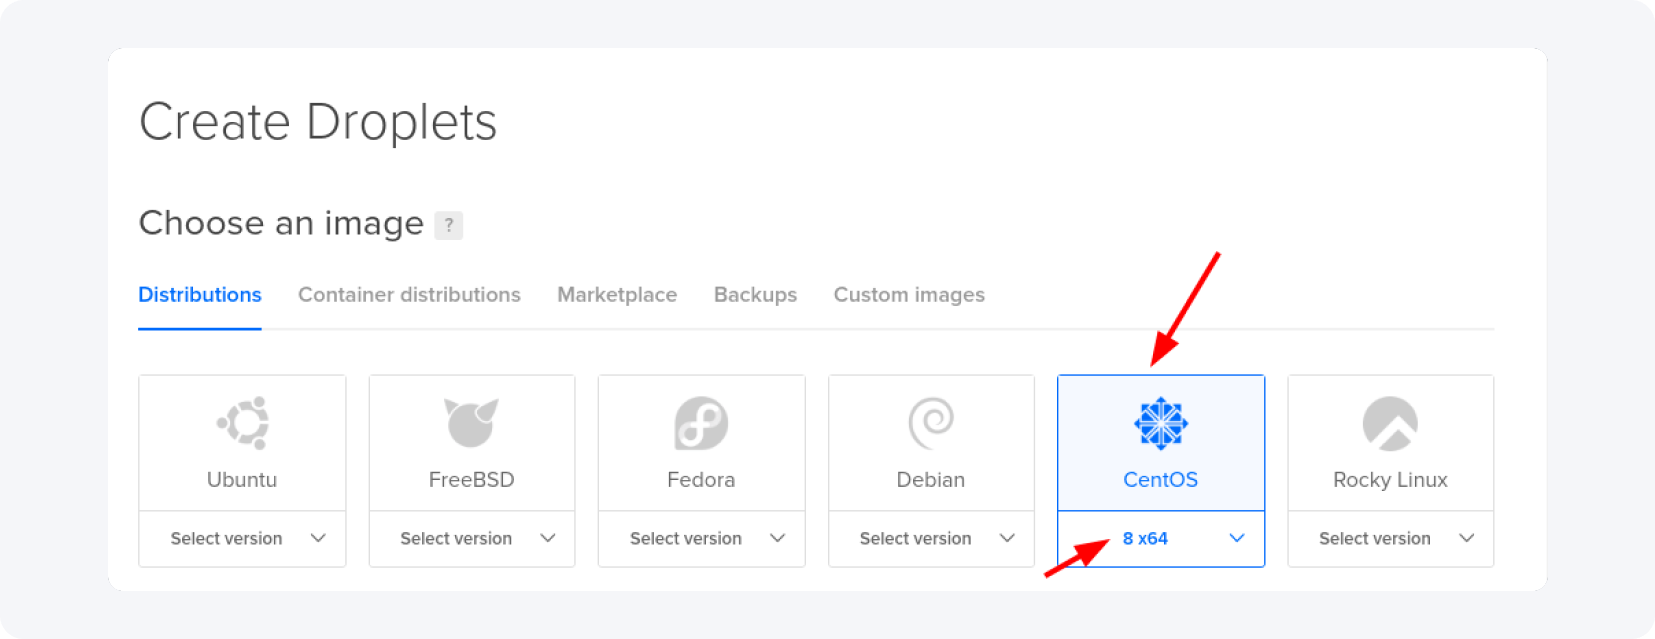
Choose CentOS as the image and select the latest 8th 64-bit version. Match the droplet size to your expected traffic and pick an NVMe SSD plan:
Place the VPS near your audience. A campaign in Europe runs well from Frankfurt, Germany; for Asia, choose Singapore:

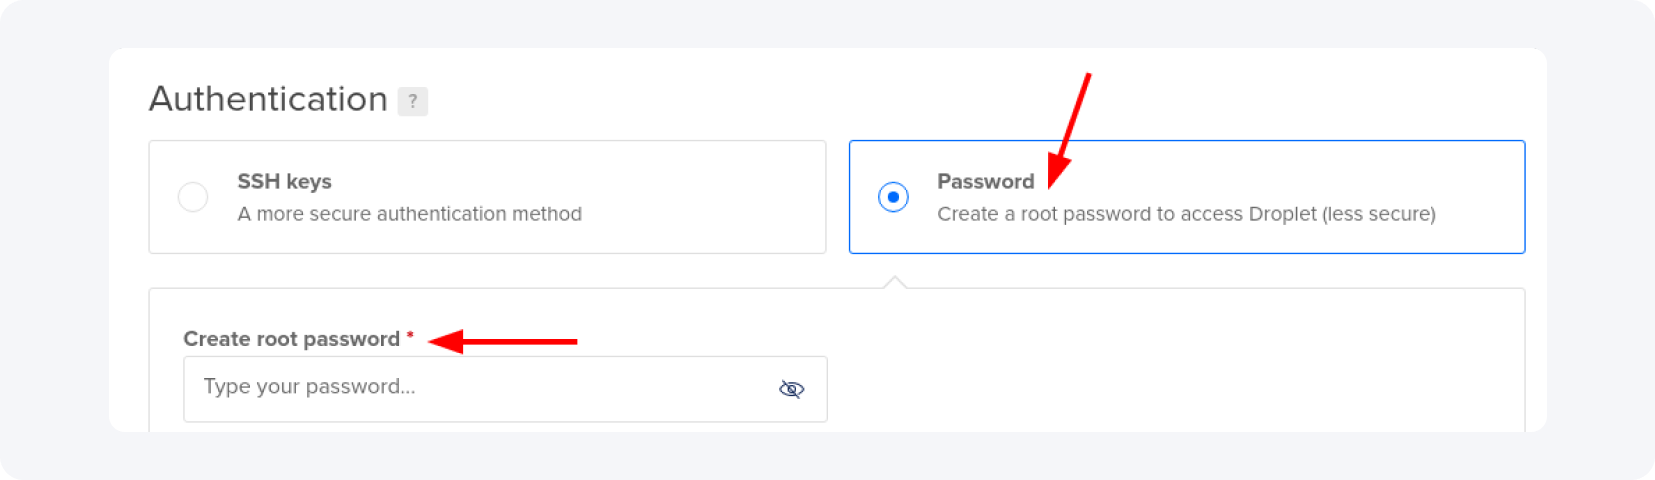
For the authentication method, select 'Password' and type your password in the field:
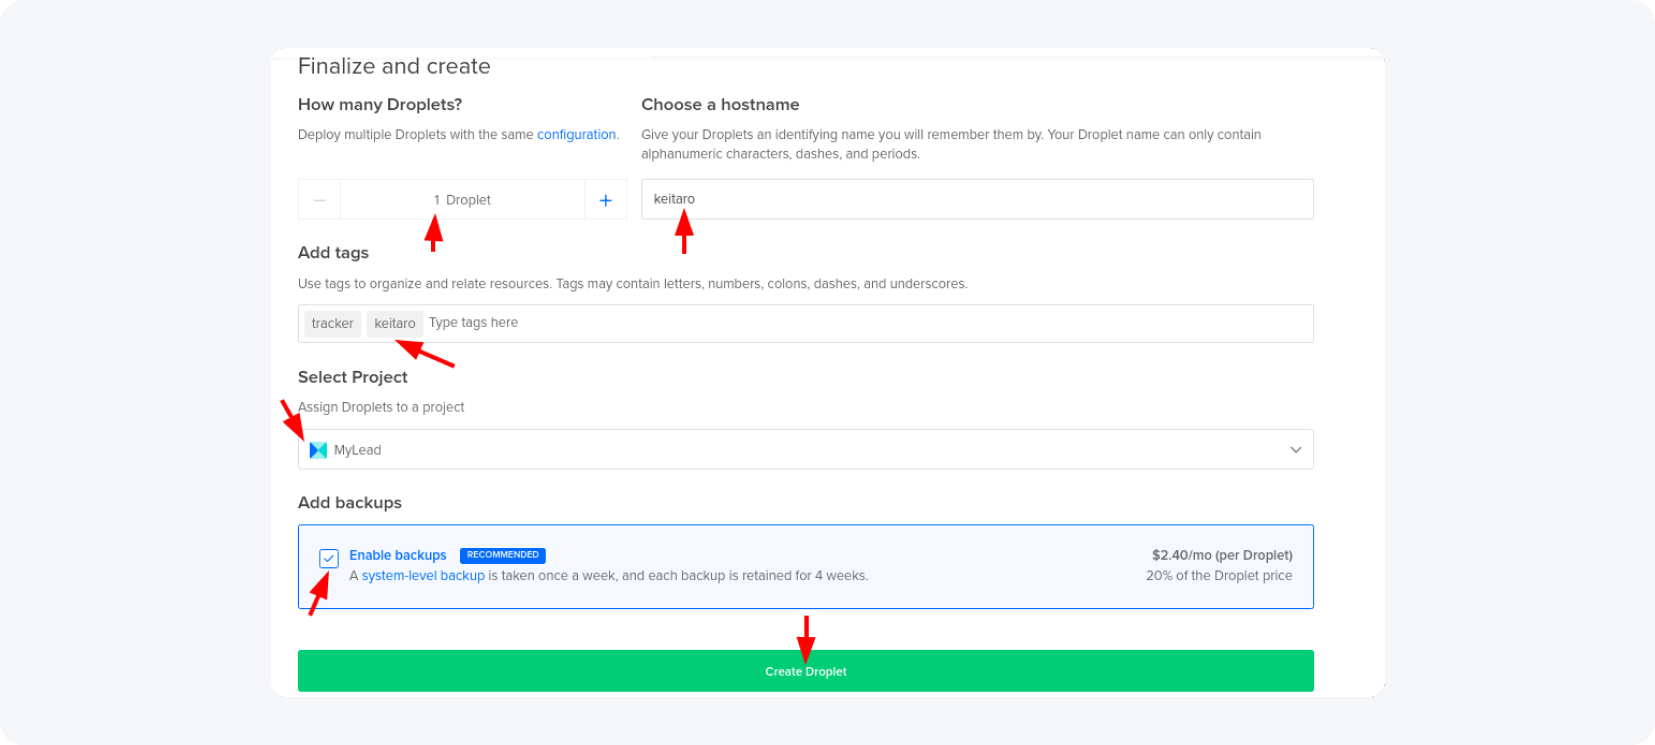
Then set the hostname, add tags, and decide on backups — enabling them protects the data you pay to collect:
The full walkthrough of creating a DigitalOcean account and droplet is in how to set up a server.
How do you install the Keitaro tracker step by step?
After the server is ready, the installation runs in a few steps: connecting over SSH, updating CentOS, and running Keitaro's one-line installer. The script asks for your license key, sets up the software in minutes, and returns a username and password. The dashboard then opens at your server's IP for the first login.
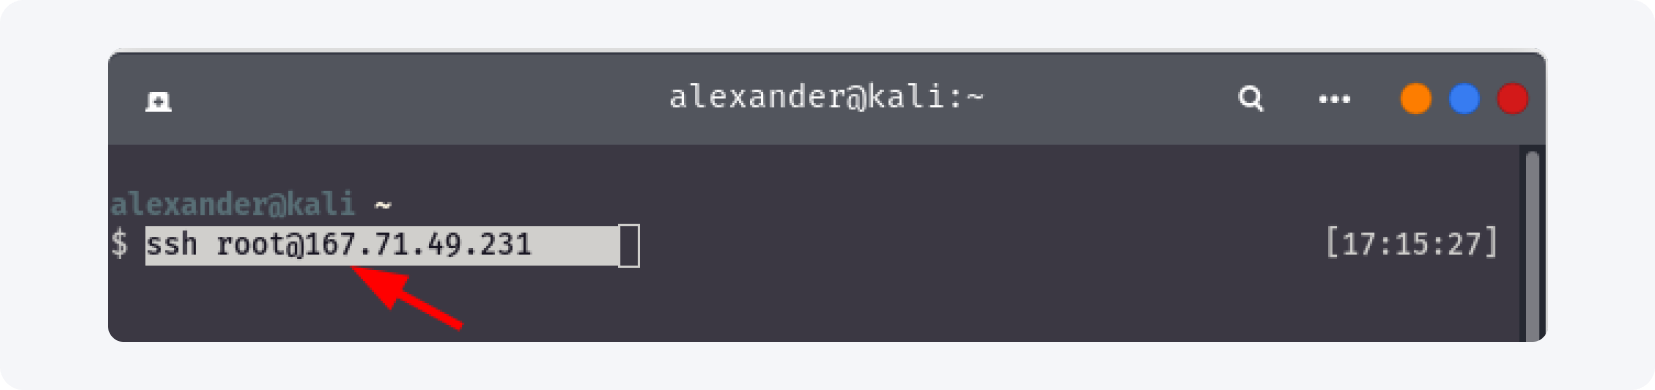
Connect to the server. On Windows use the PuTTY client; on Linux or macOS open a terminal and run the following, where xxx.xxx.xxx.xxx is your server's IP:
Answer 'yes' to the prompts and enter your VPS password:
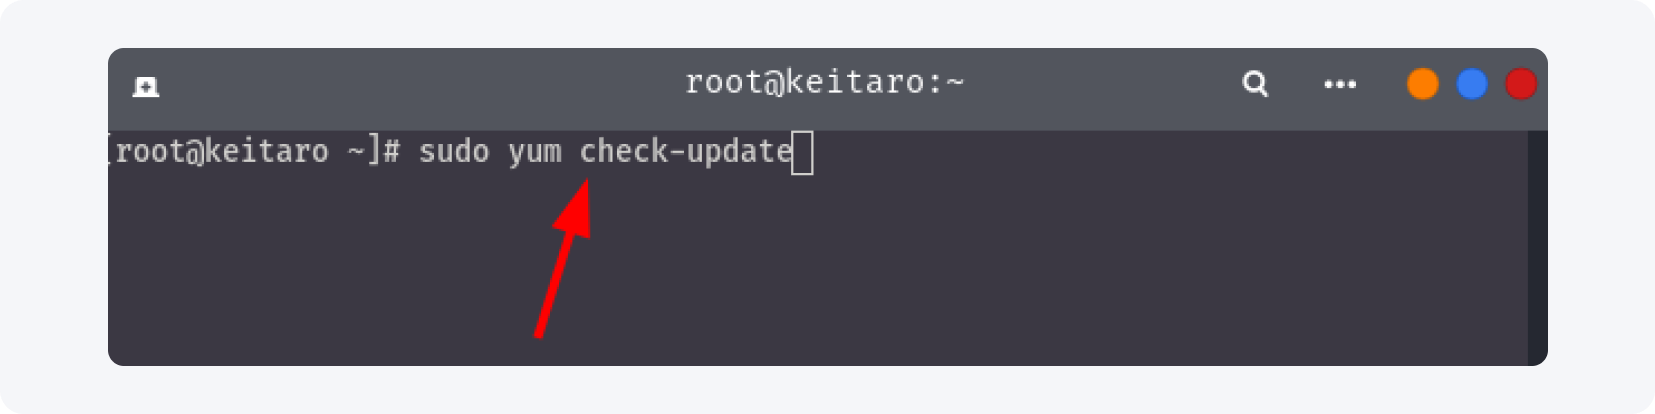
Once logged in, check for and apply CentOS updates:

This takes about 3-5 minutes depending on the number of updates. When it finishes, restart the server with the reboot command:

Wait around 30 seconds, reconnect, then install Keitaro with one command:
curl -fsSL keitaro.io/install.sh | bash -s -- -L en
The installation starts automatically:

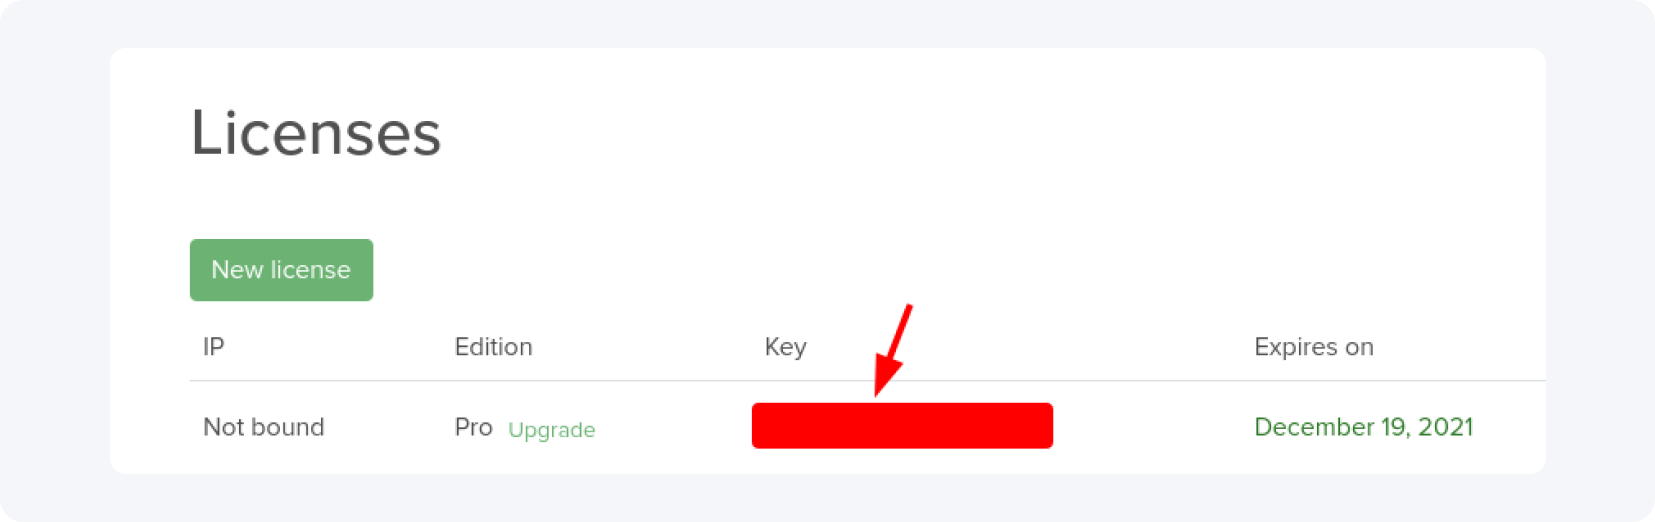
Paste your Keitaro license — found under the 'Licenses' tab in your Keitaro dashboard — when prompted:
After a few minutes you should see the success message. Save the username and password it shows:

Open the admin panel in your browser at http://xxx.xxx.xxx.xxx/admin and sign in:
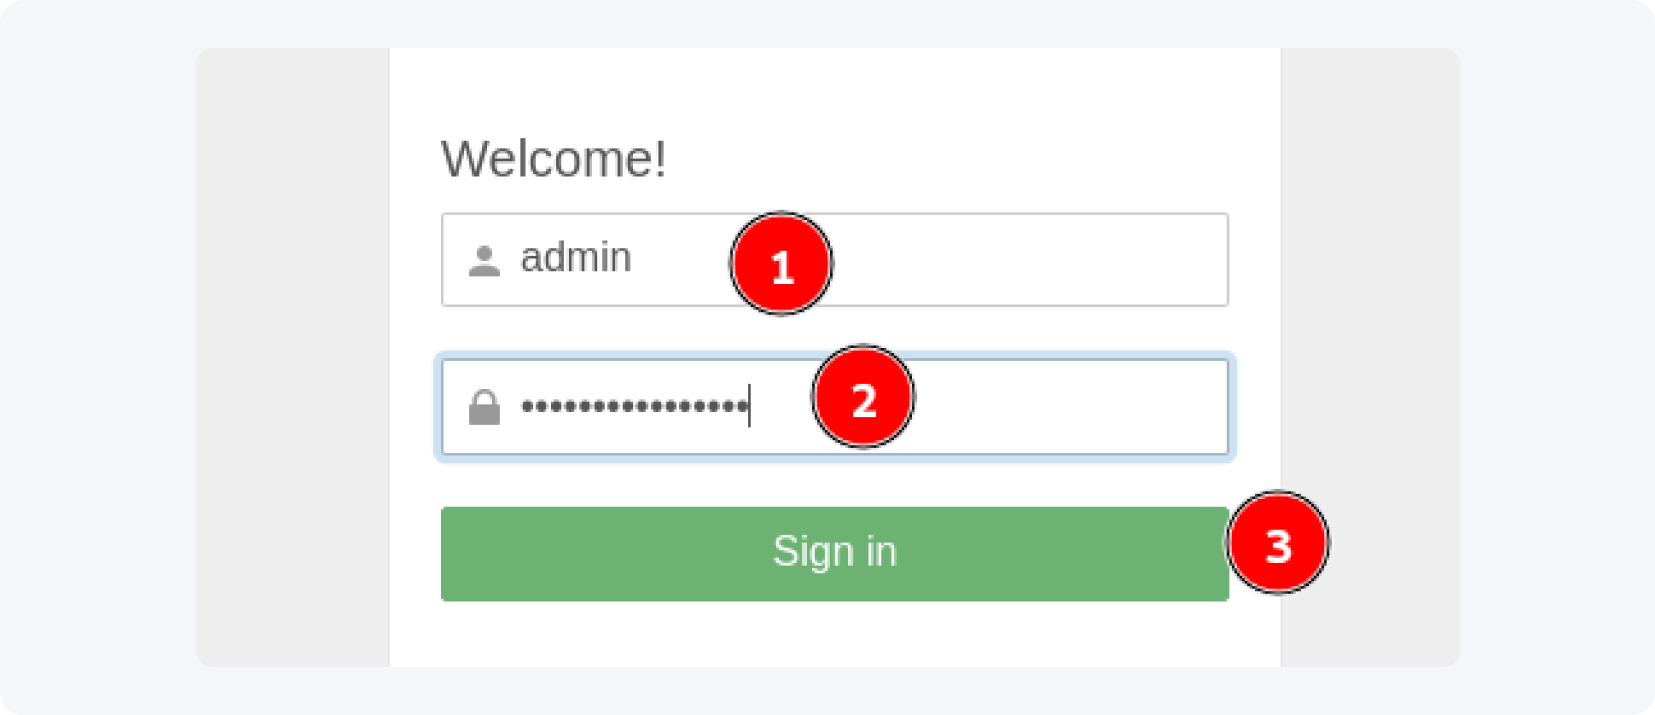
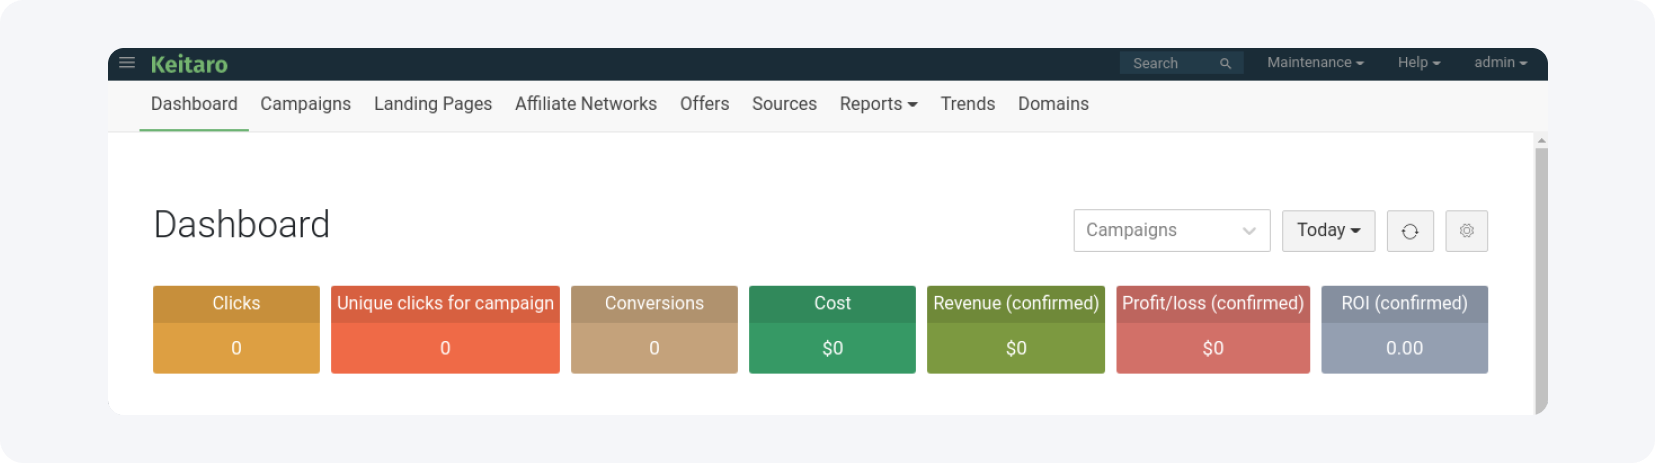
If the dashboard loads after you sign in, the install is complete:
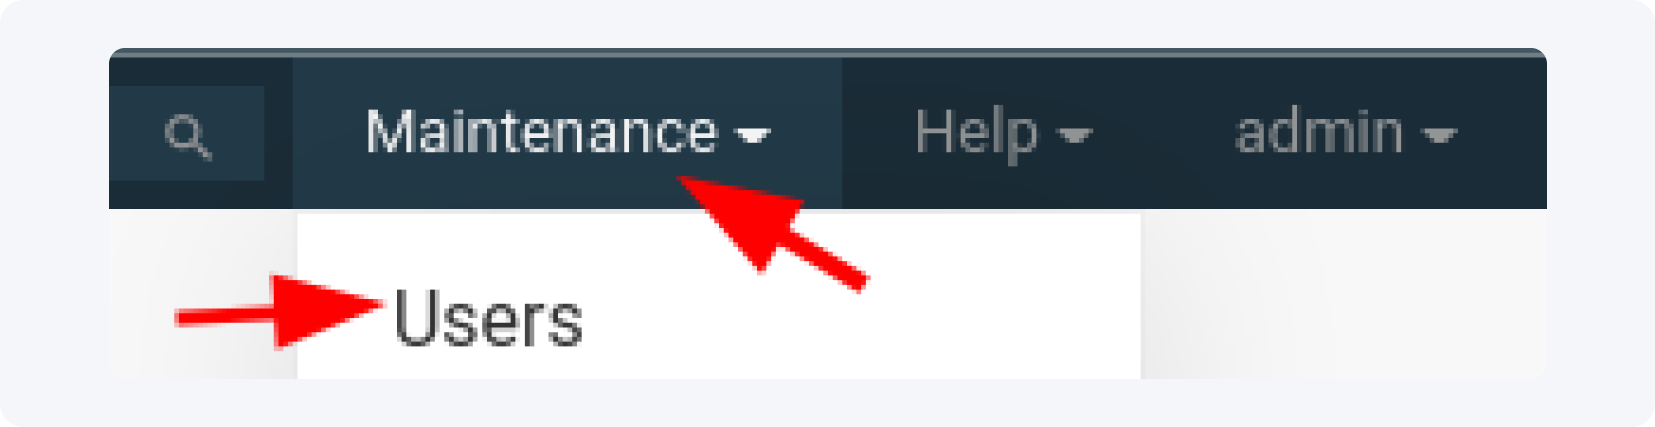
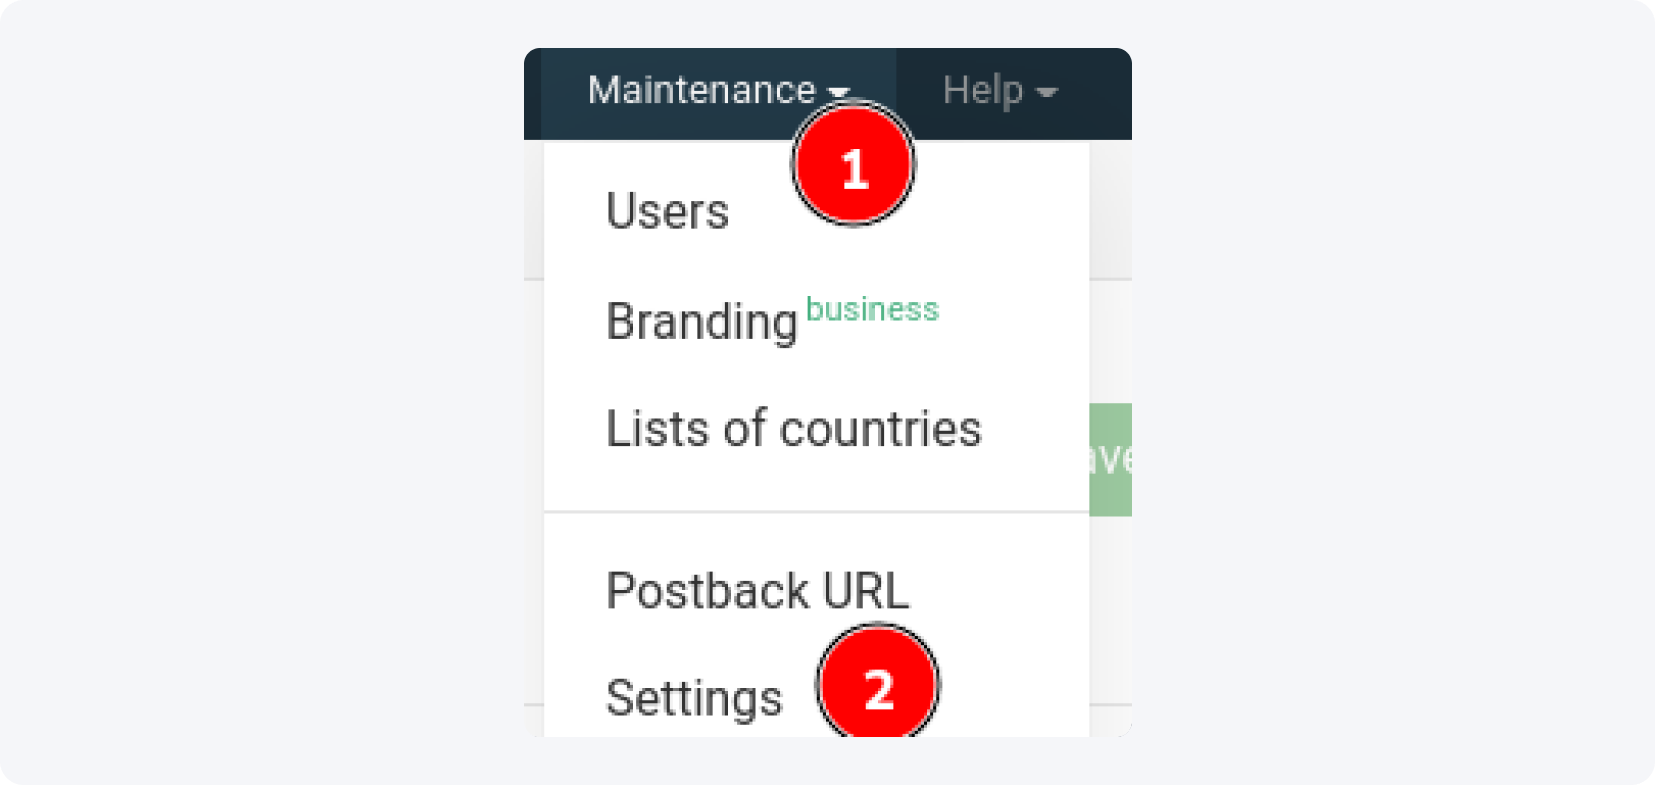
Random passwords are hard to remember, so change yours. Open the 'Maintenance' dropdown in the upper right corner and select 'Users':
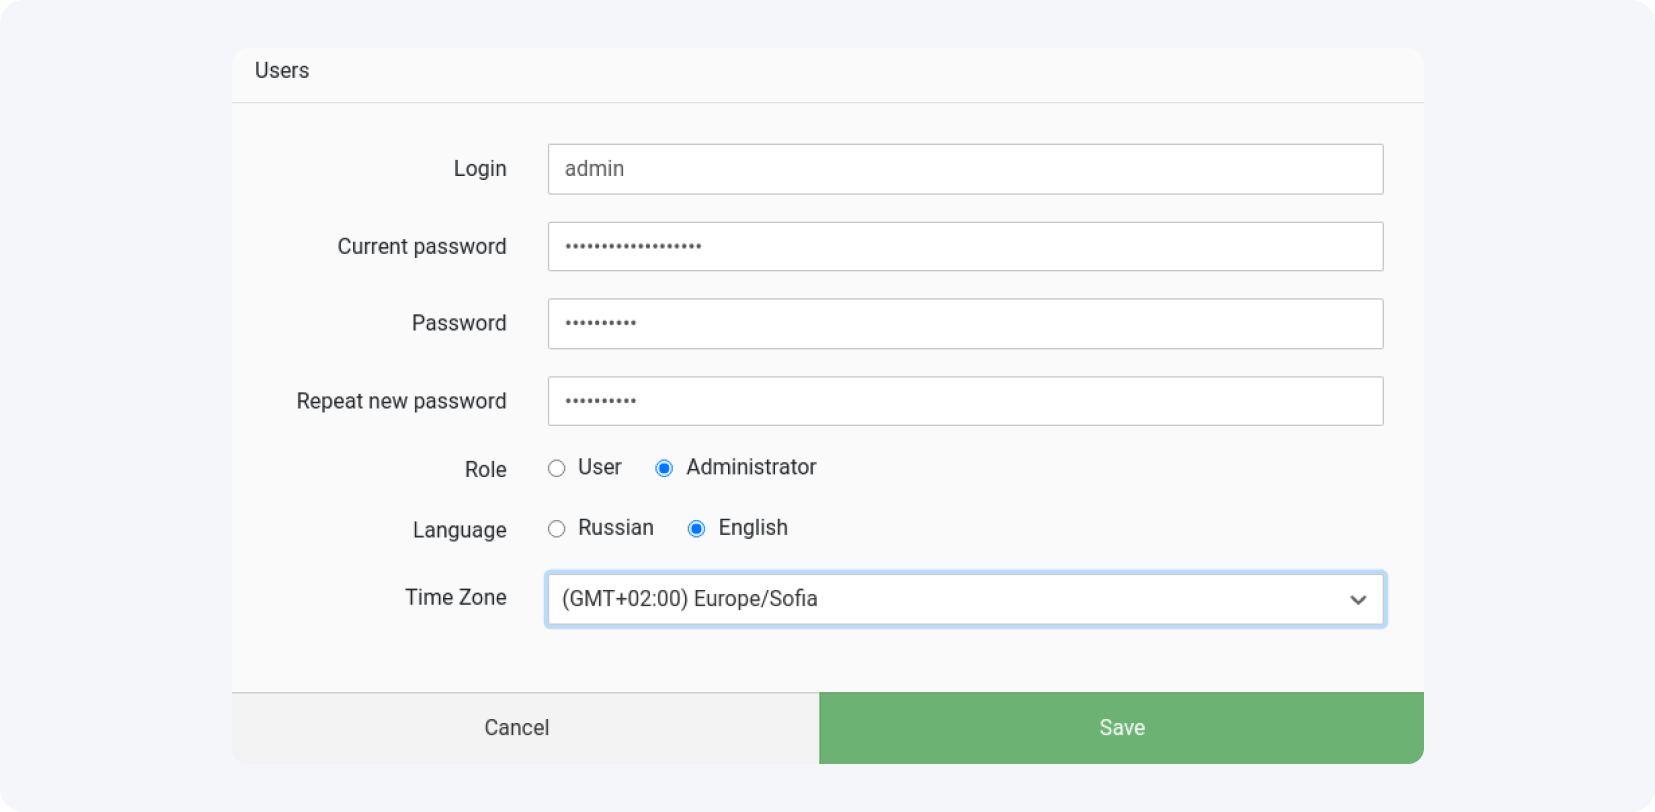
Click 'Edit' next to the admin user, then update the password, username, and time zone — running campaigns in your own time zone avoids confusion when you manage several at once:
How do you connect a domain and SSL to the tracker?
Connecting a domain replaces the bare server IP with a real address campaigns can use. The process runs through Cloudflare: an 'A' record points the domain to your server's IP, the registrar's nameservers switch to Cloudflare's, and SSL/TLS set to 'Flexible' adds HTTPS. After about 15 minutes the tracker is reachable at yourdomain.com/admin.
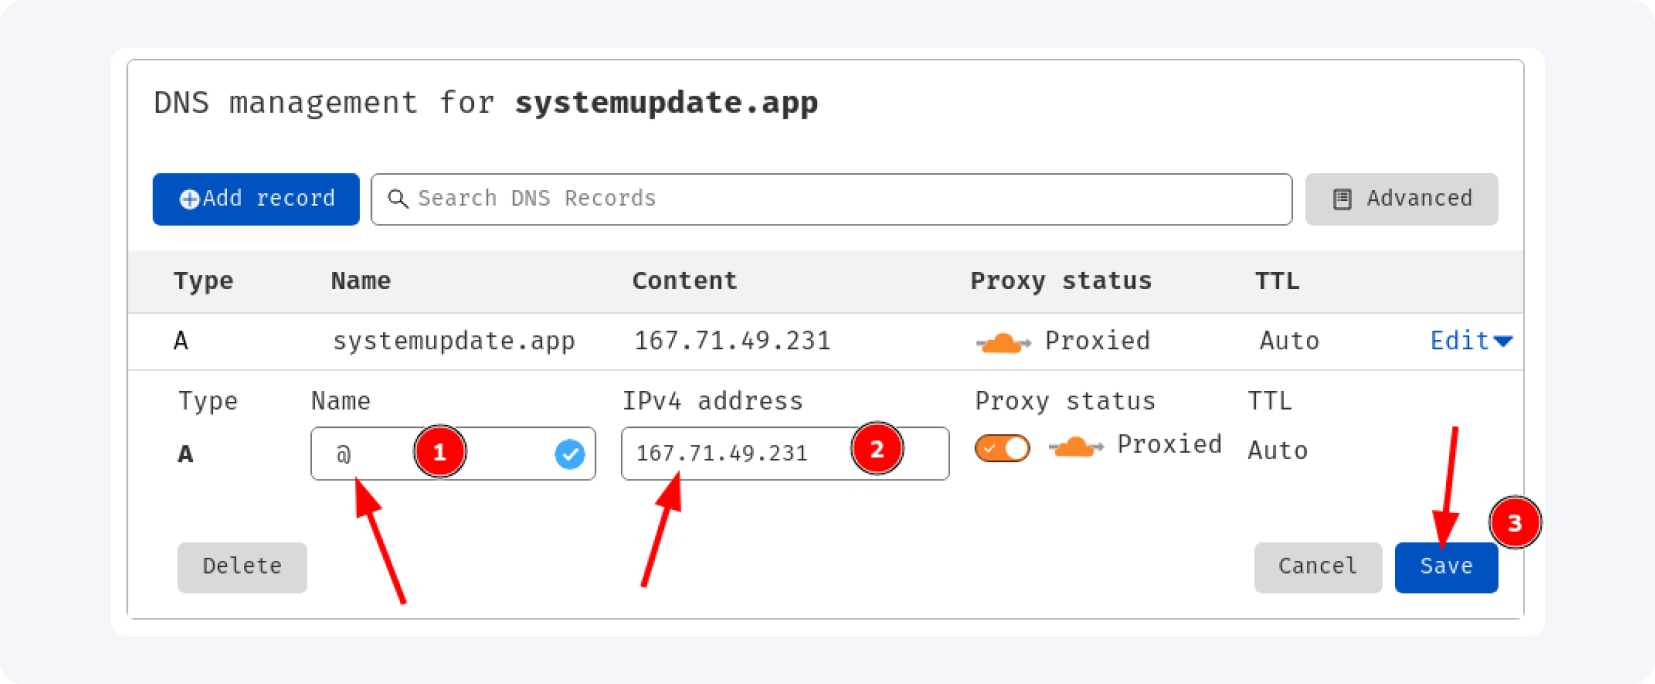
Buy one or two domains: one for the Keitaro admin panel (e.g. keitaroadmin.com) and one for campaigns, named after the vertical you promote. Namecheap works well for registration. Add the admin domain to Cloudflare, delete old records, and create an 'A' record — name '@', IPv4 your server's IP — then save:
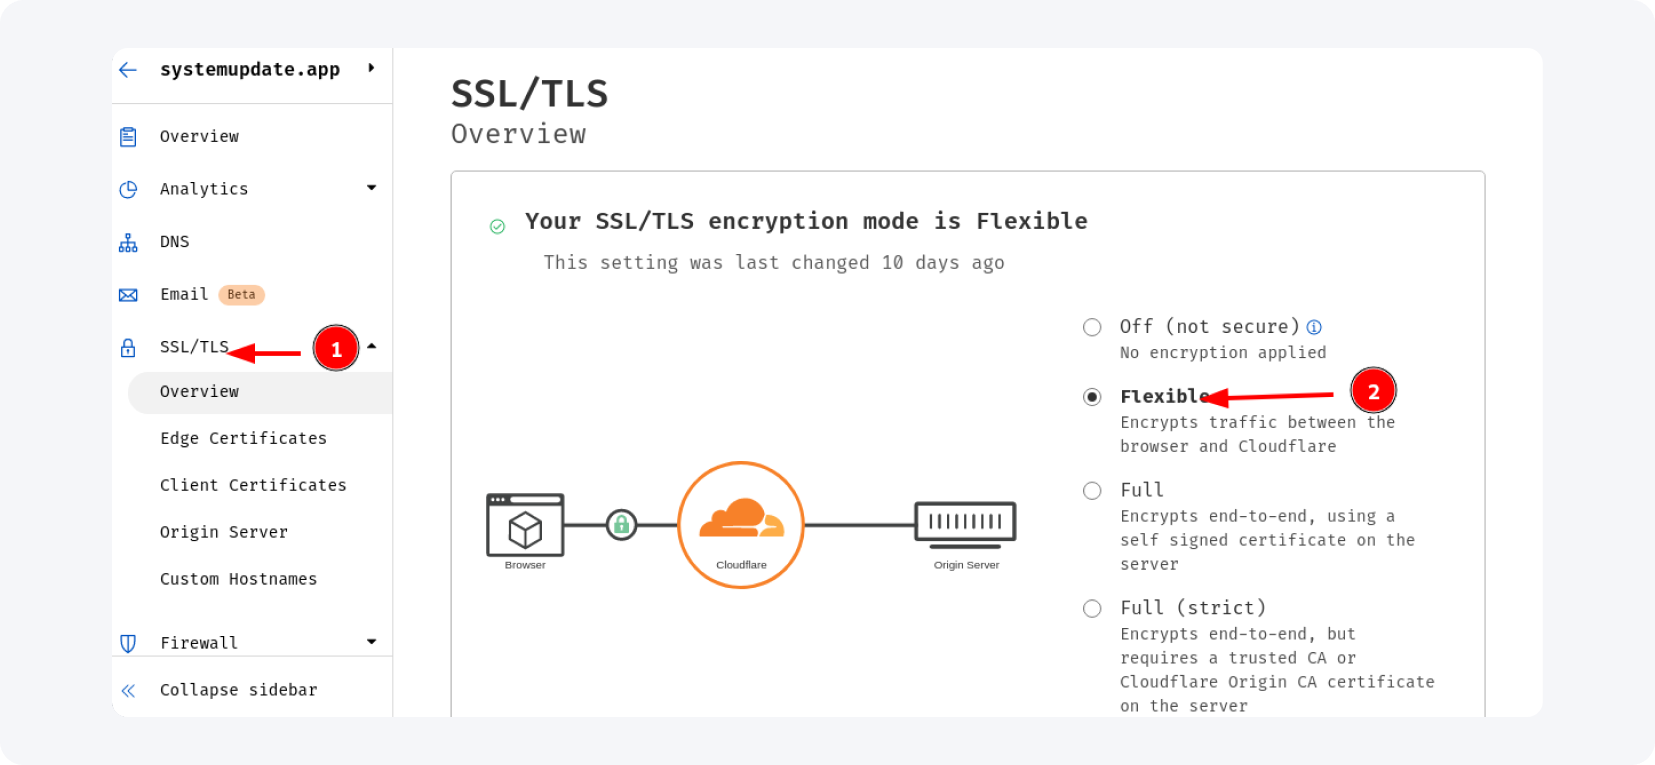
Cloudflare returns new nameservers; set them at your registrar. Back in Cloudflare, open 'SSL/TLS' and choose 'Flexible' mode:
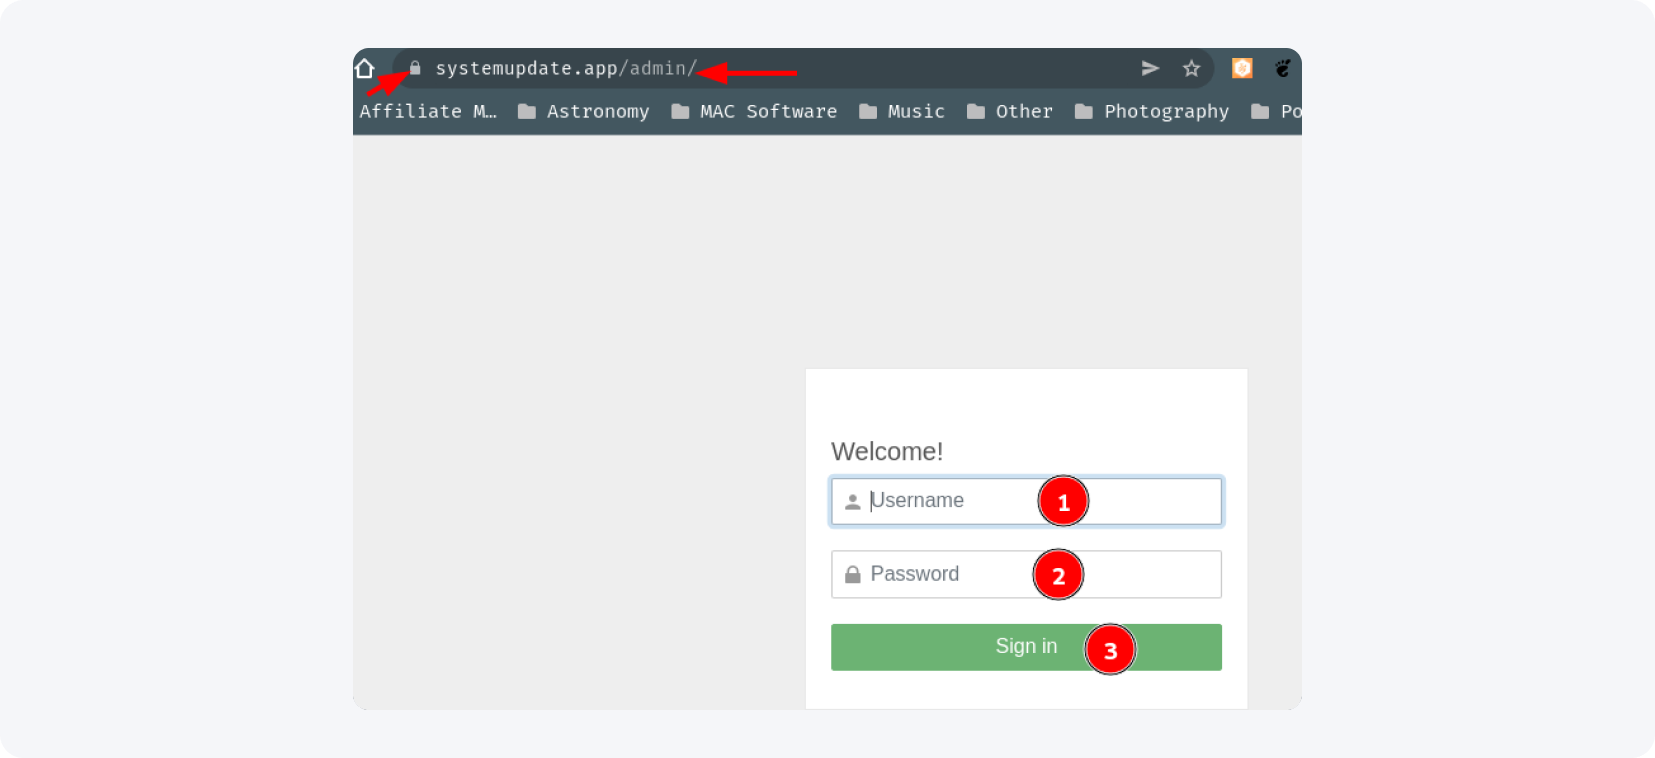
Wait about 15 minutes (sometimes longer), then open yourdomain.com/admin. A padlock next to the domain name and a login prompt mean you are set:
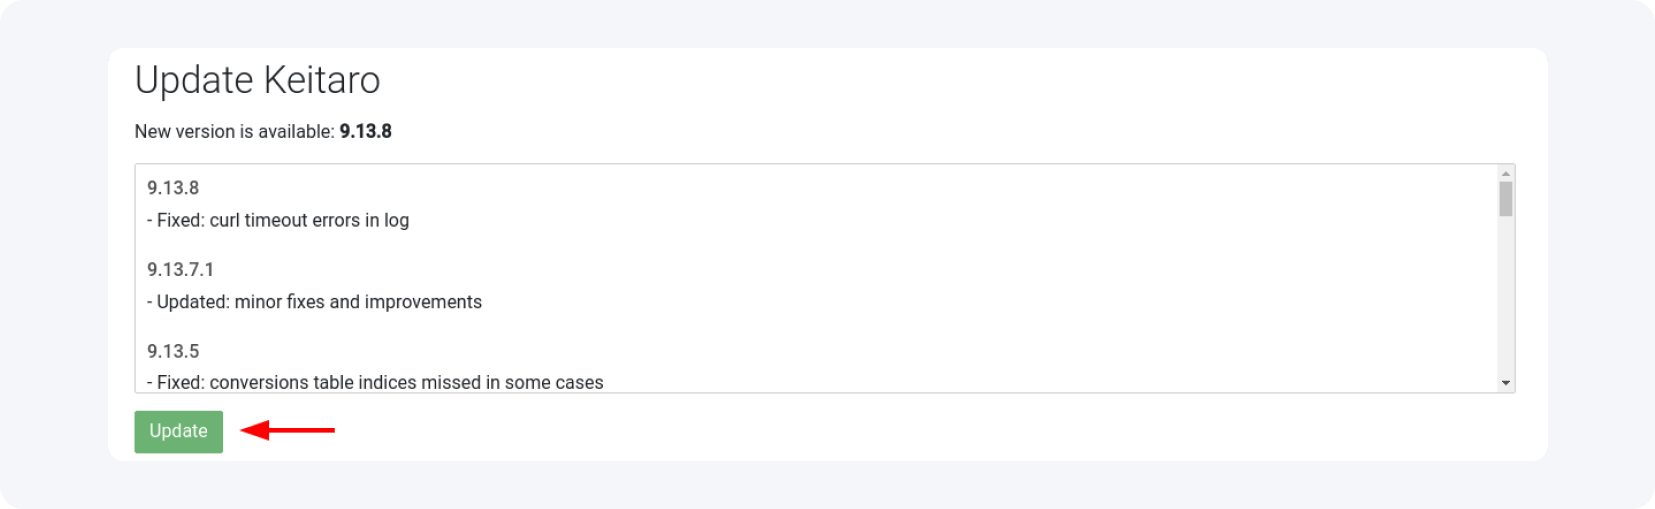
Log in and, if prompted, update Keitaro to the latest version:

Now open the 'Maintenance' menu and select the 'Settings' tab:
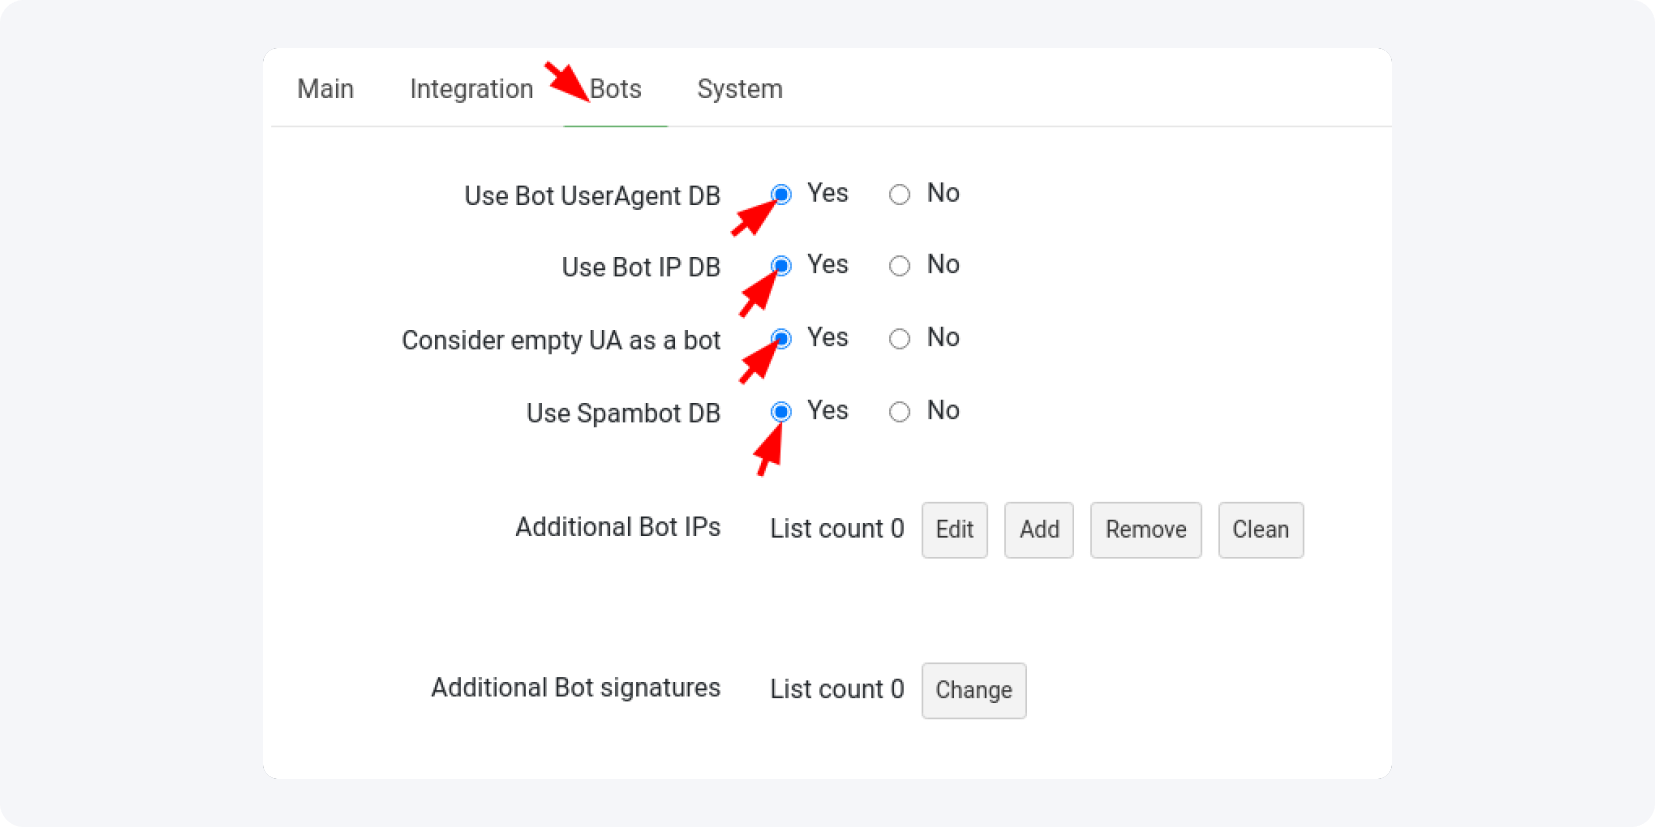
In the 'Bots' tab, set every option to 'Yes' as shown, and add any bot IP database you have under 'Additional bot IPs':
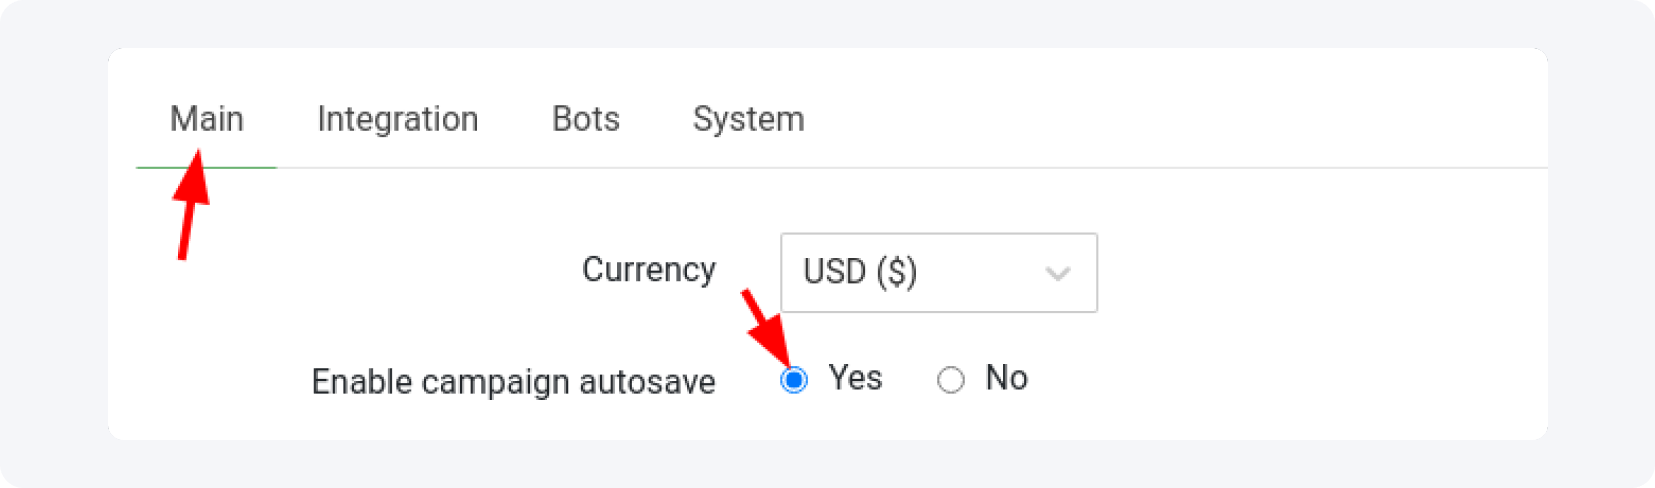
Switch to the 'Main' tab and enable the campaign autosave option — it can be a lifesaver:
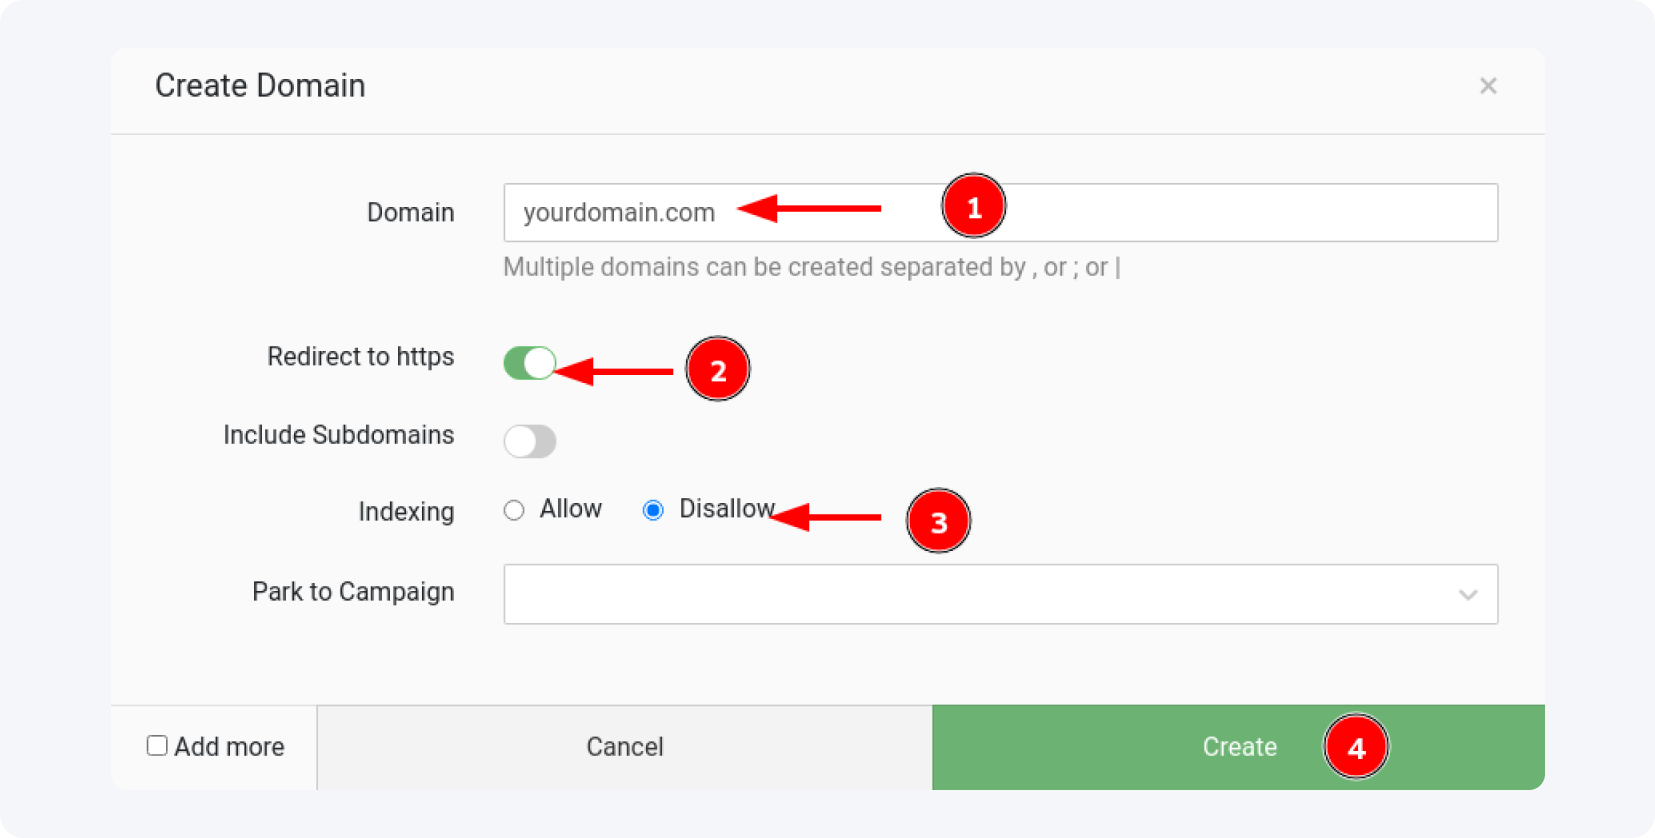
Finally, add the domain for your first campaign. Repeat the Cloudflare steps — connect the domain, reset its records to a new 'A' record, update the nameservers — then in Keitaro open the 'Domains' tab and click 'Add':

Enter the domain, enable 'redirect to HTTPS', and disable indexing so search engines do not crawl your landing pages, then click 'Create':
Nameserver propagation takes up to an hour, so check back periodically. Once the tracker is live, the next move is adding MyLead as an affiliate network to a tracker.
What are macros, parameters, and values in tracking?
Macros (or tracking tokens) are dynamic placeholders in a URL that pass data — from the click ID to the device name — to your tracker. A parameter is the label for what you track (like cost or campaign ID); the value is the data it holds. The macro sits in the URL and is replaced by the real value at click time.
Look at this example campaign URL:
https://systemupdate.app/nzBvY3?cost={bid}&creative_id={creativity_id}&ad_campaign_id={campaign_id}
The first part is the domain. 'nzBvY3' is the alias Keitaro assigns to the campaign (you can change it). The question mark begins the query string. cost, creative_id, and ad_campaign_id are parameter names; the parts in braces are values; the & signs separate them. The query string is where information passes from one server to the next on each redirect and click.
Every offer passes your tracking click ID through this query string — in a Keitaro URL you place the {subid} token in every offer URL. Keep in mind that each traffic source uses different tokens. You will find all the parameters used in the MyLead network in Postback/API configuration.
With the tracker live, you are ready to add your offers and launch. Start with how to add MyLead offers to the tracker and run your first campaign.
Key takeaways
A tracker is mandatory for media buyers: it records clicks, conversions, and visitor data you need to optimize.
Cloud-hosted trackers start instantly; self-hosted Keitaro gives full data ownership on your own VPS.
A 2 GB / 1-core VPS handles under 10,000 clicks a day; scale to 4 GB / 2 cores for up to 100,000.
S2S postback confirms conversions server-to-server, working even when cookies are blocked.
Macros are dynamic URL placeholders; the {subid} token carries your click ID through every offer URL.
Always connect a domain with SSL — you cannot run campaigns on a bare IP address.
FAQ
1. Is a tracker mandatory in affiliate marketing?
Yes, for media buyers. Without a tracker you cannot see which sources convert, so you cannot optimize spend or scale a campaign profitably.
2. How much does the Keitaro tracker cost?
Keitaro costs $20 for the basic version and $40 for the Pro version, plus the cost of the VPS it runs on.
3. What VPS size do I need for Keitaro?
For under 10,000 clicks daily, a 2 GB / 1-core VPS is enough; for 10,000-100,000 clicks, use 4 GB and 2 cores with an NVMe SSD.
4. What is S2S postback?
S2S (server-to-server) postback is a signal sent from the affiliate network through your tracker to the traffic source, confirming a conversion without using the visitor's browser or cookies.
5. What is the {subid} token in Keitaro?
{subid} is the macro that carries your unique click ID. You place it in every offer URL so the tracker can match conversions back to the right click.
Summary
Setting up an affiliate tracker comes down to choosing self-hosted Keitaro, sizing a VPS to your click volume, installing the software, and connecting a domain with postback. Done once, it gives you full ownership of your data and the metrics to scale every MyLead campaign. Spin up your server, install the tracker, and start measuring every click today.
Have any questions? Feel free to reach us through our channels.