
Blog / Guides
Media Buying: How to Set Up a Server for Affiliate Marketing?
This article is updated regularly
Last update:
11 June 2025
Setting up a server for media buying means renting a VPS (Virtual Private Server), connecting via SSH, installing a control panel like VestaCP, and pointing a domain through Cloudflare to host your landing pages. A basic VPS costs $6–$12 monthly and gives you full control over hosting affiliate landing pages without third-party limits.
This guide walks you through the entire server setup for media buying — from creating a DigitalOcean droplet to uploading your first landing page. No prior server experience is required.
What you'll learn from this article:
why a VPS gives you full control over your media buying landing pages,
how to create and configure a DigitalOcean droplet step by step,
how to install the VestaCP control panel and secure it with a password,
how to connect a domain with Cloudflare and Namecheap,
how to upload a landing page and fix the most common SSL error.
Why do you need your own server for media buying?
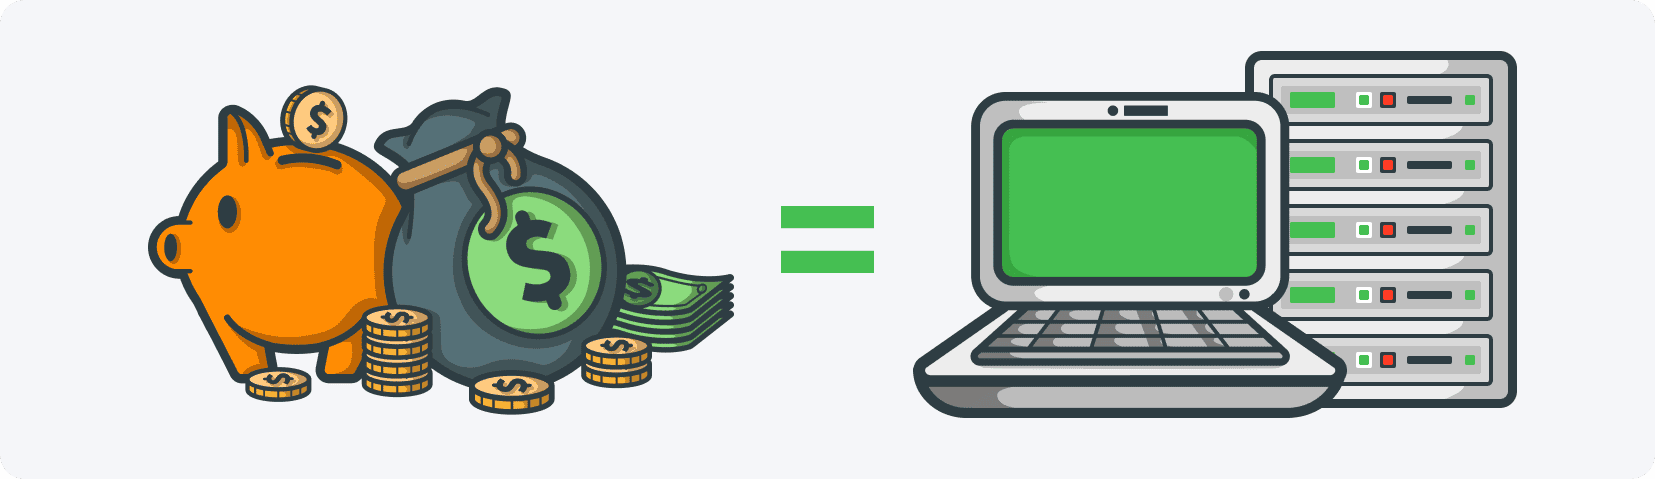
A dedicated server gives media buyers full control over hosting, with no limits on the number of landing pages or affiliate sites it holds. It allows choosing the GEO location closest to a campaign's audience and connecting campaign-specific domains. A VPS (Virtual Private Server) costs only $6–$12 monthly — roughly $0.20–$0.40 per day.
Owning a server delivers four concrete advantages over free hosting like sites.google.com:
Full control — you manage every file, setting, and configuration on the machine.
No hosting limits — host unlimited landing pages and affiliate sites for your campaigns.
GEO targeting — place the server near your traffic; for campaigns in Italy or Austria you choose a European data center (usually Germany), not the USA.
Custom domains — connect a domain that matches the offer, e.g. takeyouriphone.com for iPhone sweepstakes.
Cost and complexity are not real barriers. A VPS with NVMe SSD handles a beginner's traffic for the price of a coffee per week, and the full setup below takes under an hour. If paid traffic is new to you, start with our guide on media buying in affiliate marketing and the best paid traffic for CPA offers.
What do you need to set up a server?
Setting up a media buying server requires four tools: an account with a VPS provider such as DigitalOcean or Vultr, terminal access (built into macOS and Linux, or PuTTY on Windows), a free Cloudflare account for DNS and SSL, and an FTP client like FileZilla to upload landing page files to the server.
VPS provider — DigitalOcean or Vultr rent you the server; this guide uses DigitalOcean.
Terminal access — to connect over SSH and run setup commands.
Cloudflare account — free DNS management, SSL certificates, and code minification.
FTP client — FileZilla or a similar tool to transfer landing page files.
New MyLead publishers can claim a $100 DigitalOcean credit, enough to run a small VPS free for months. A server pairs naturally with a tracker — once it is live, follow our guide on how to set up a tracker to measure every click and conversion.
How do you create a VPS droplet on DigitalOcean?
Creating a droplet on DigitalOcean takes about five minutes and involves seven steps: opening a new project, launching a droplet, picking the Basic NVMe SSD plan ($6–$18), selecting a data center near the audience, setting a root password, choosing the operating system, and confirming creation. The server goes live within a minute.
Log in to DigitalOcean and open the 'New Project' tab in the top-left corner.
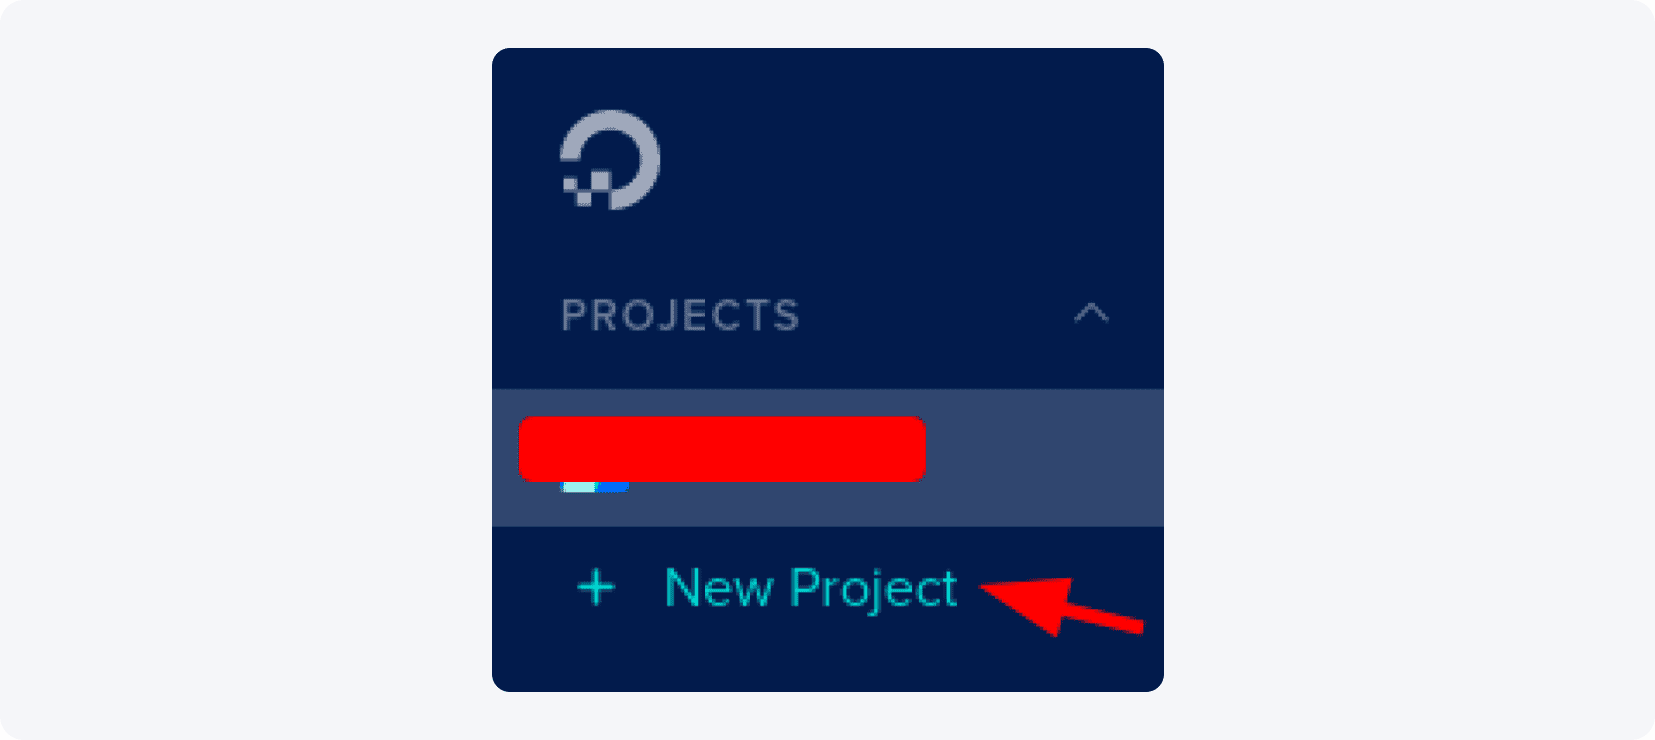
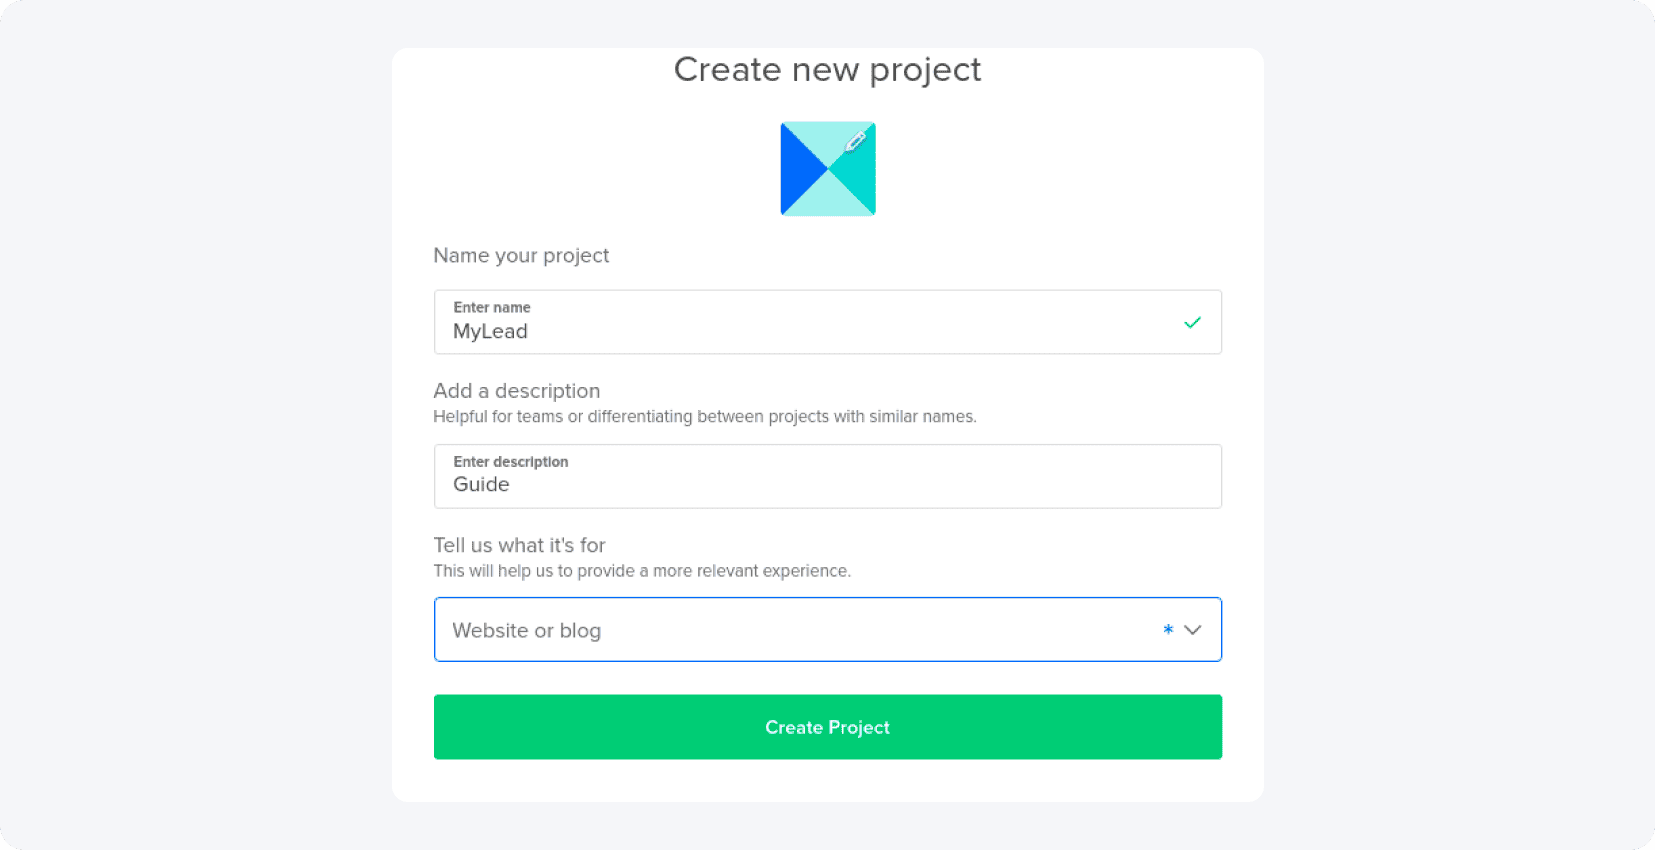
Name the project, add a short description, choose 'Website or blog' from the dropdown, and click the green 'Create Project' button.
After about a minute, the dashboard lets you create your first droplet.
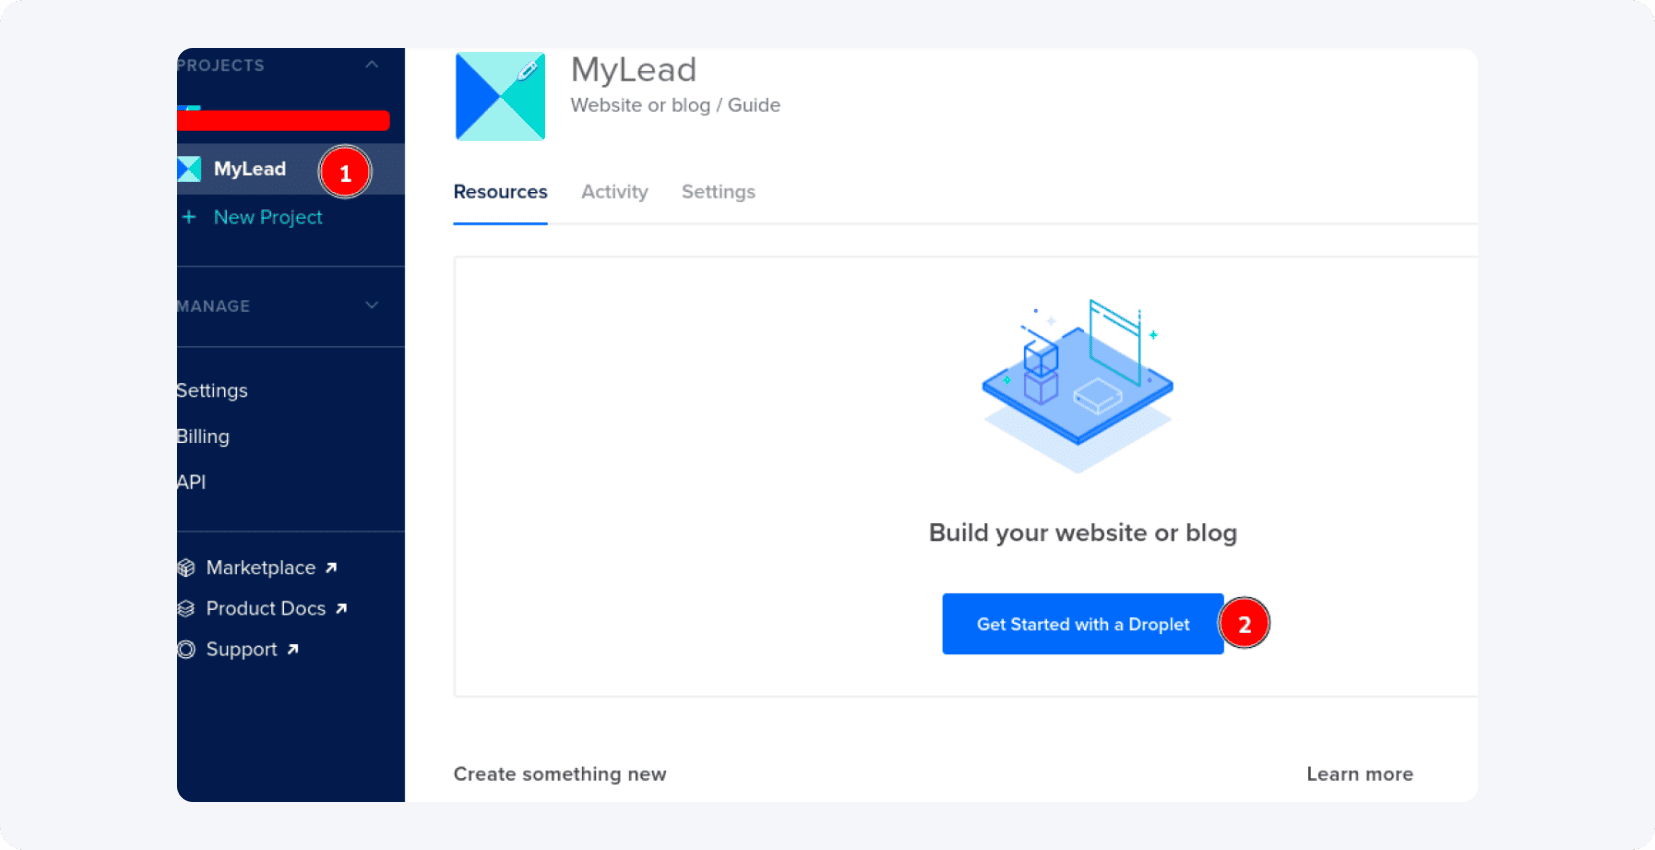
Click 'Get Started with a Droplet' to open the configuration screen.
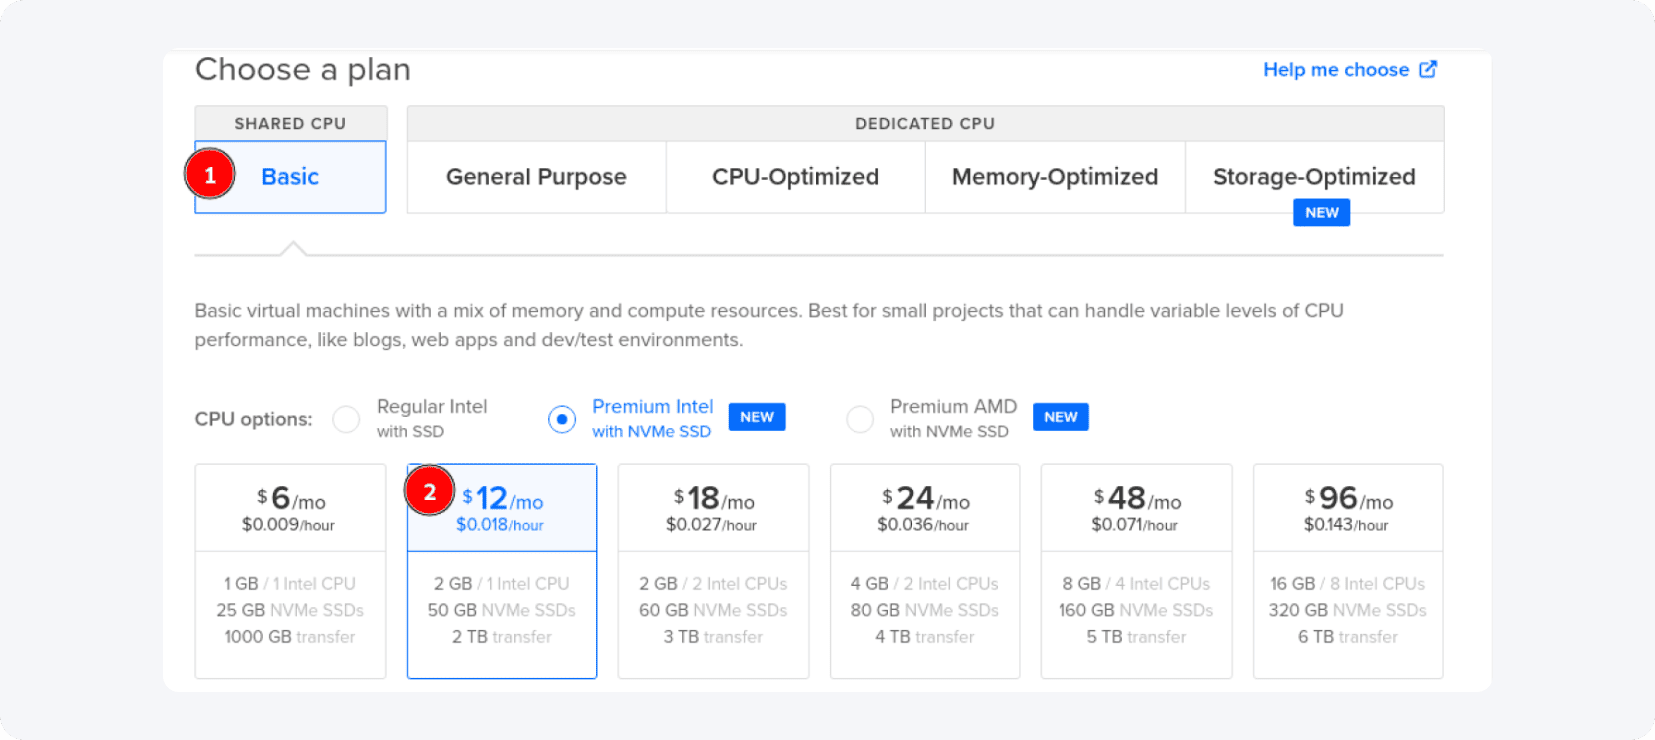
Choose your plan. For beginners, the Basic plan at $12 or $18 is plenty; you can even start at $6 if you only send a few hundred clicks per day. Pick the droplets with NVMe SSD rather than the cheaper Regular Intel SSD.
Scroll to 'Choose a datacenter region'. For European campaigns pick Frankfurt or Amsterdam; for Asia choose Singapore, and so on.
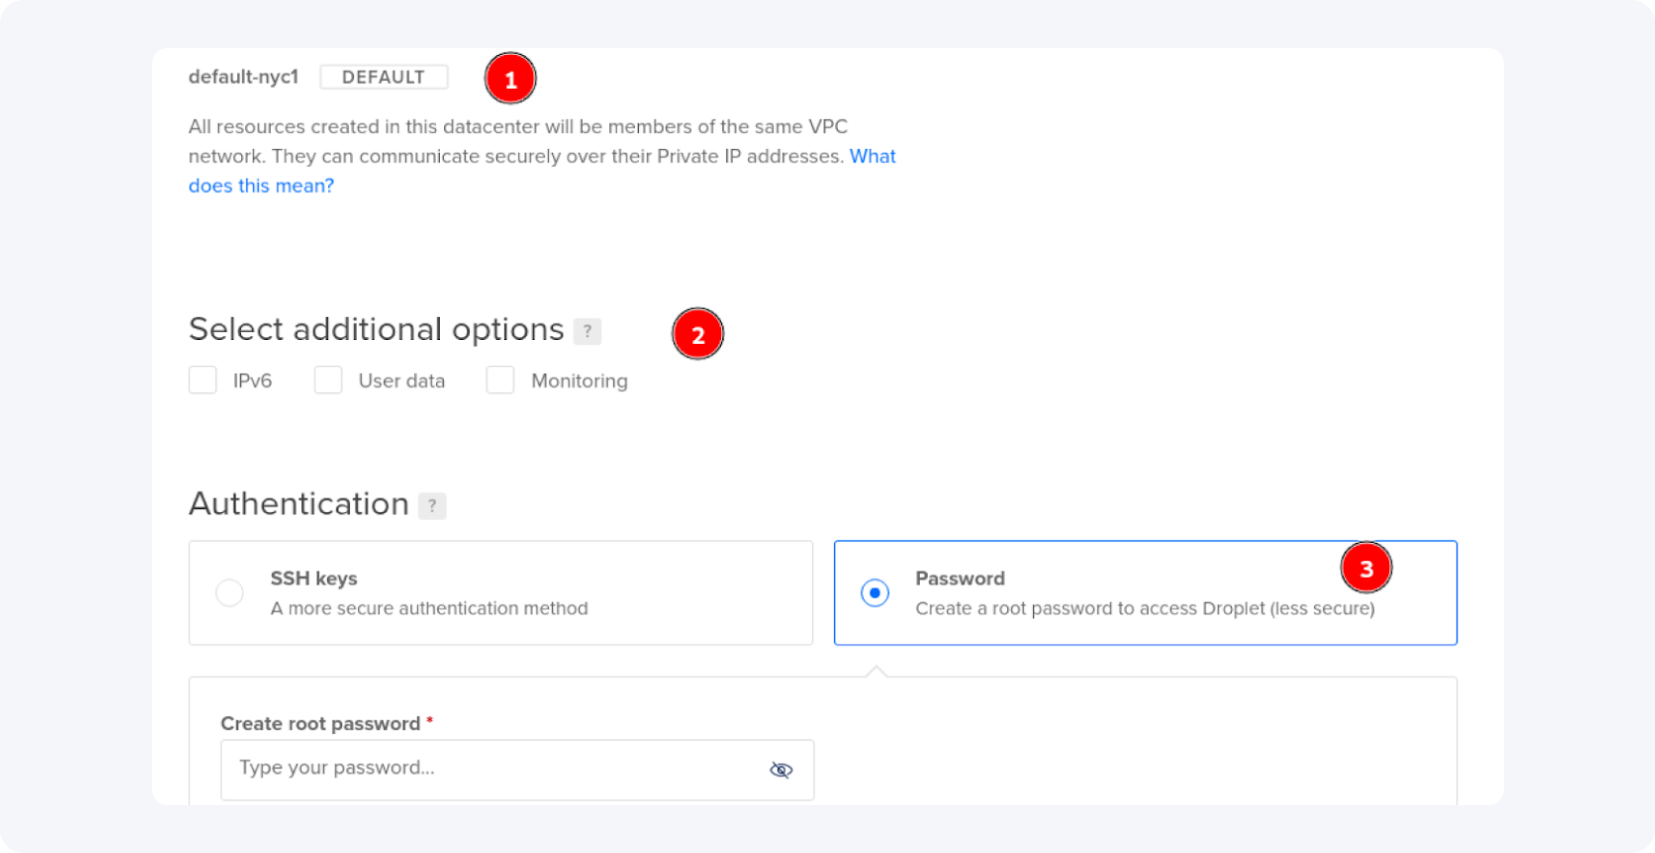
Under VPC settings, leave the options unselected (or pick what you need) and go to 'Authentication'. Choose the 'Password' tab and create a strong root password that meets DigitalOcean's requirements.
Pro tip: create a strong password and write it down somewhere safe.
Scroll back to the top to select the operating system.
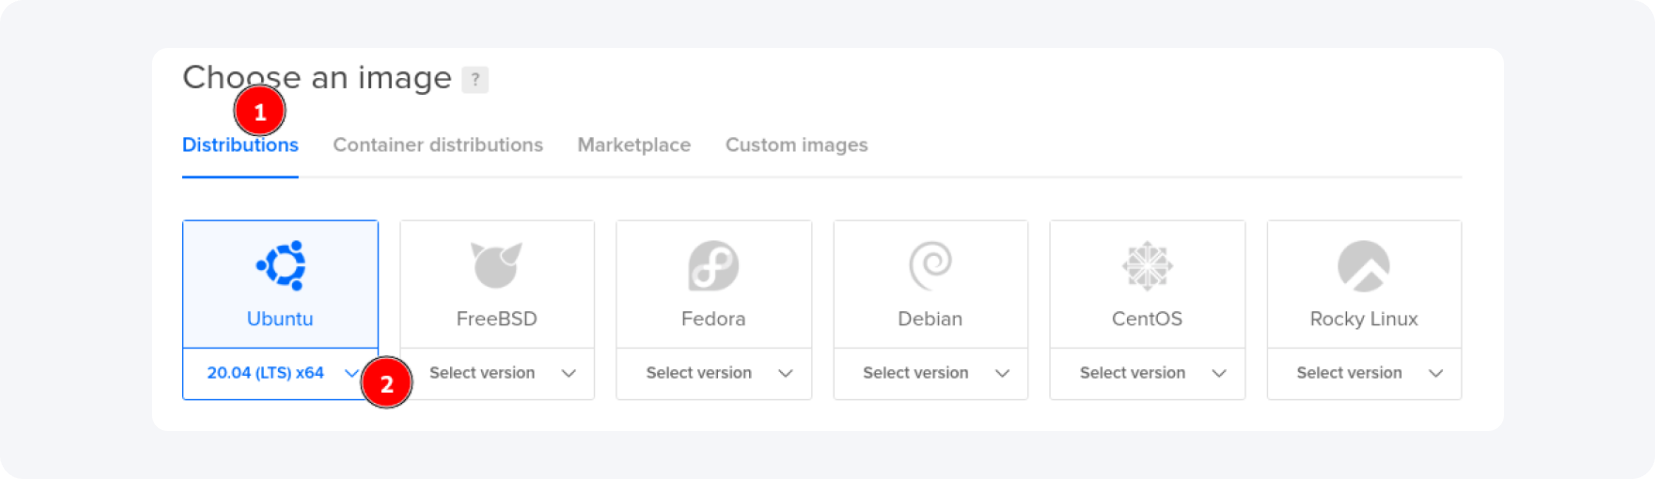
Use Ubuntu 18.10 or Debian 9.0 — Ubuntu is based on Debian, so the differences are minimal. This guide uses Ubuntu 18.10 for a reason explained in the next section.
Scroll to the bottom to the 'Finalize and create' section.
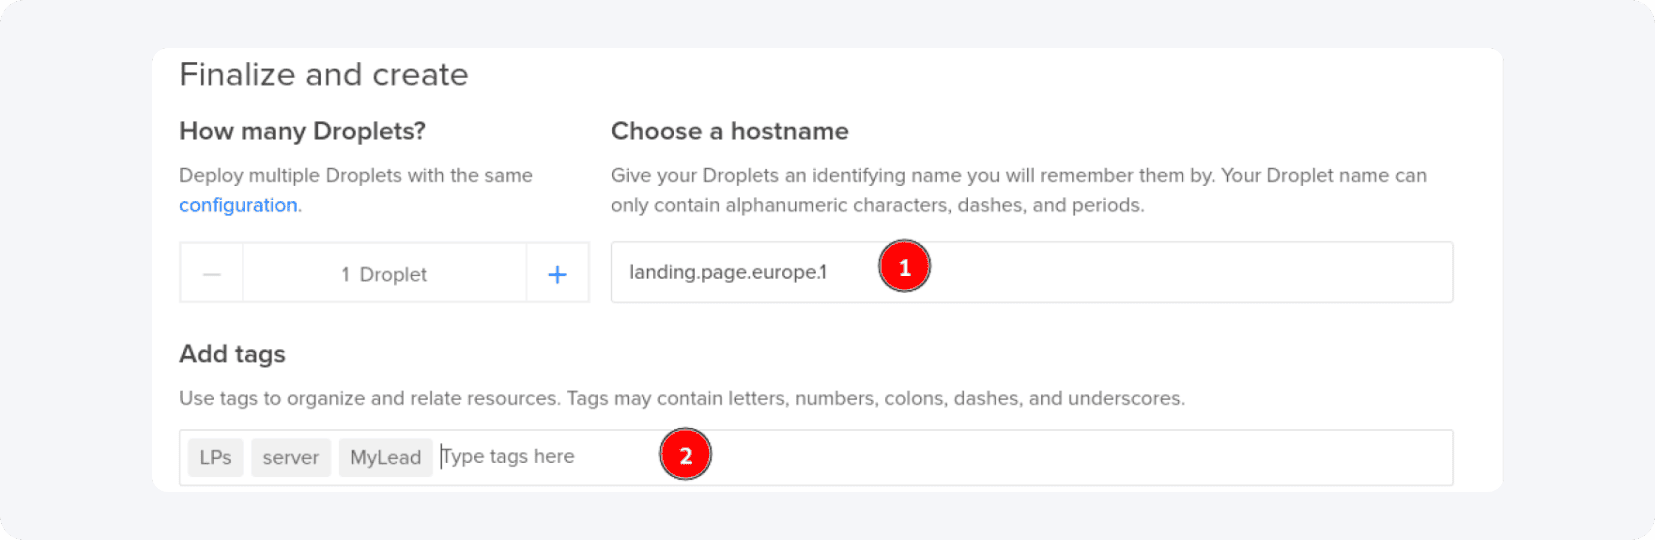
Enter a custom hostname or keep the default, and add tags if you want (optional). Next, assign the droplet to your project and decide whether to enable backups.
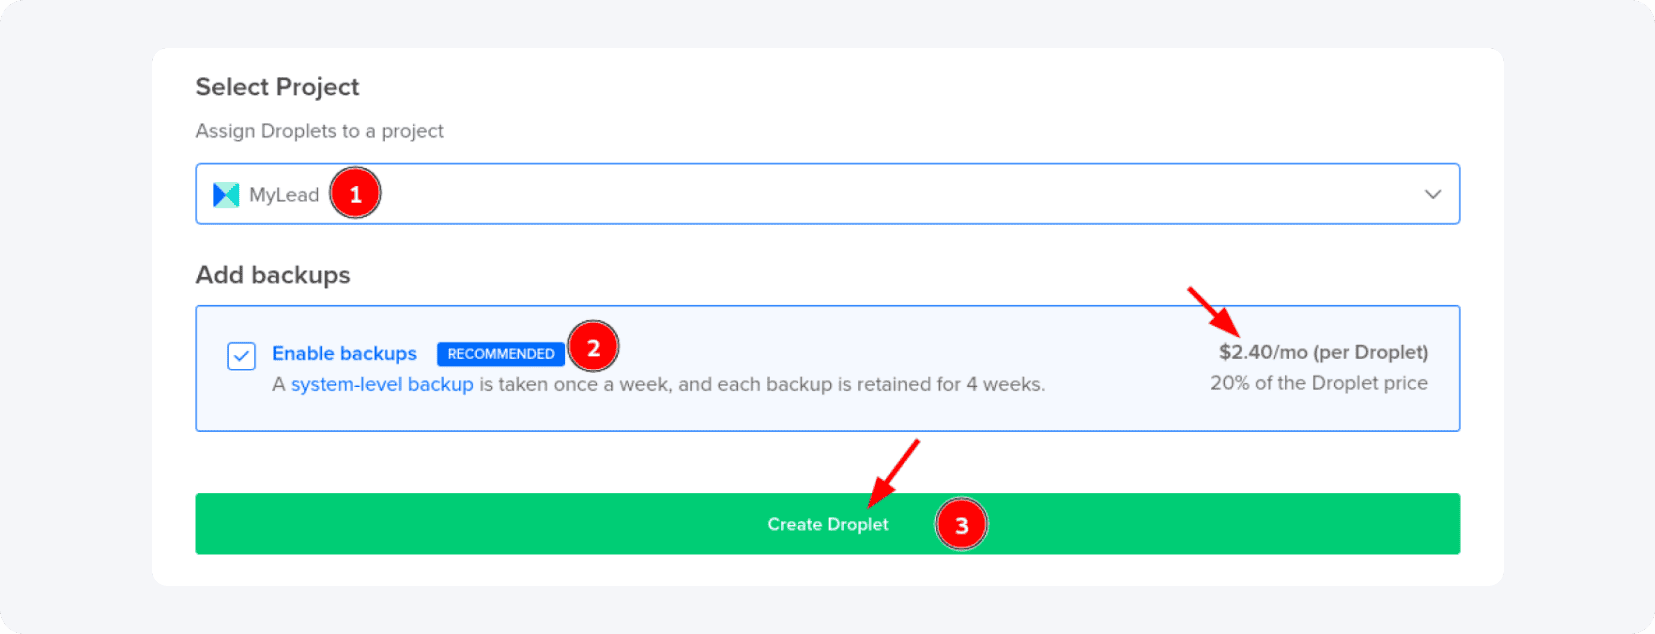
Backups add 20% to the price, so it is your call — in many cases the extra cost is worth it. When ready, click 'Create Droplet'.
Your first droplet is created. If everything went well, you will see a screen like this:

How do you connect to your server via SSH?
Connecting to a VPS uses SSH (Secure Shell). On macOS or Linux, the terminal command is ssh root@your-server-IP, followed by the root password. Windows users connect through the free PuTTY client. After logging in, the first task on a fresh server is updating the system with two commands.
Copy your droplet's IP address. On macOS or Linux, open the terminal. On Windows, download PuTTY and follow DigitalOcean's PuTTY connection guide — the process is almost identical.
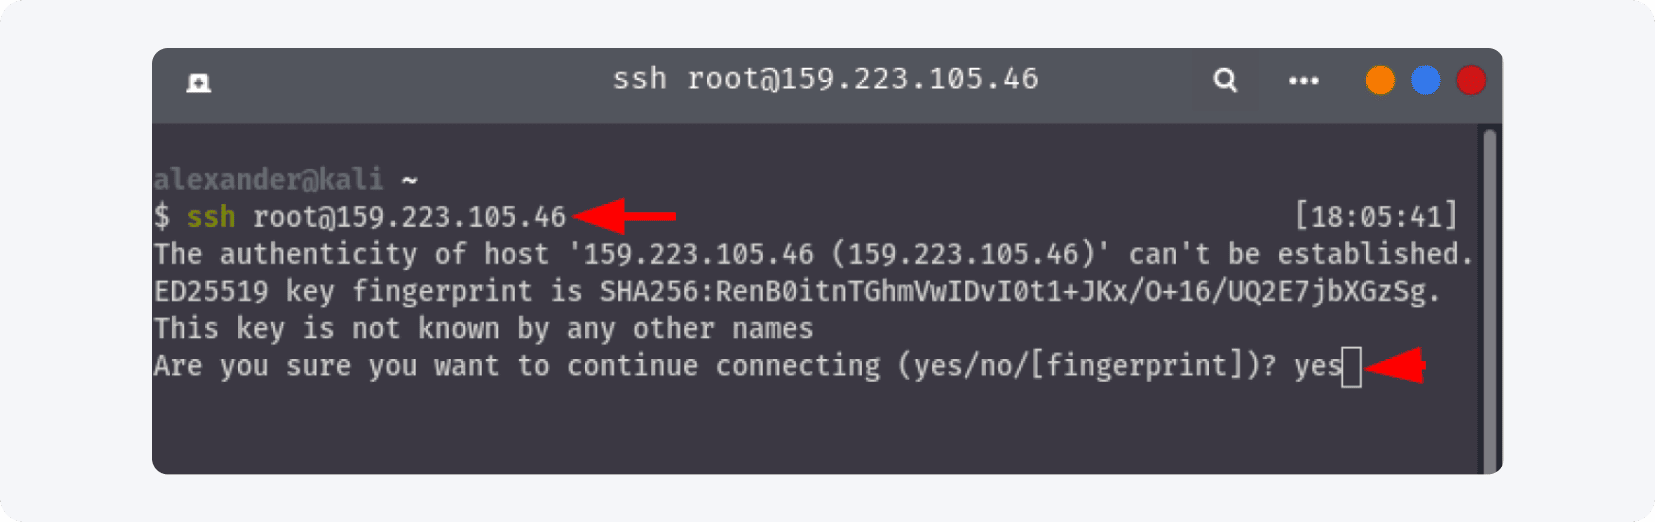
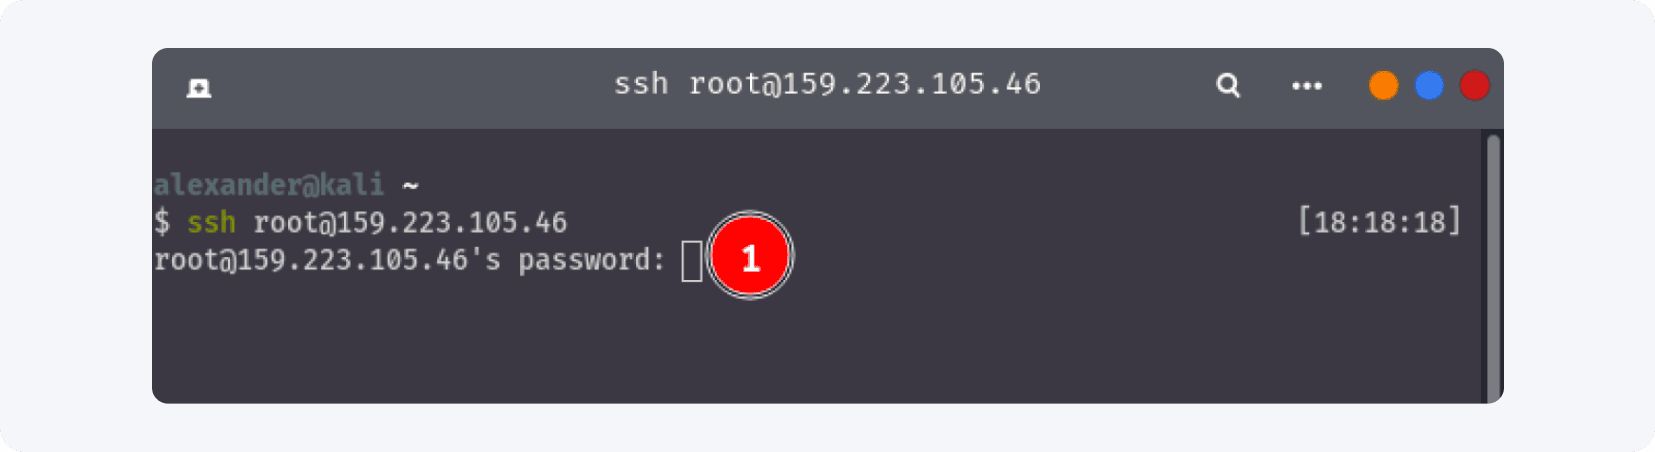
Run ssh root@your-server-IP (UNIX systems only), agree to continue the connection, and enter your server's password when prompted.
On Ubuntu 18.10 you should now see the server welcome screen:
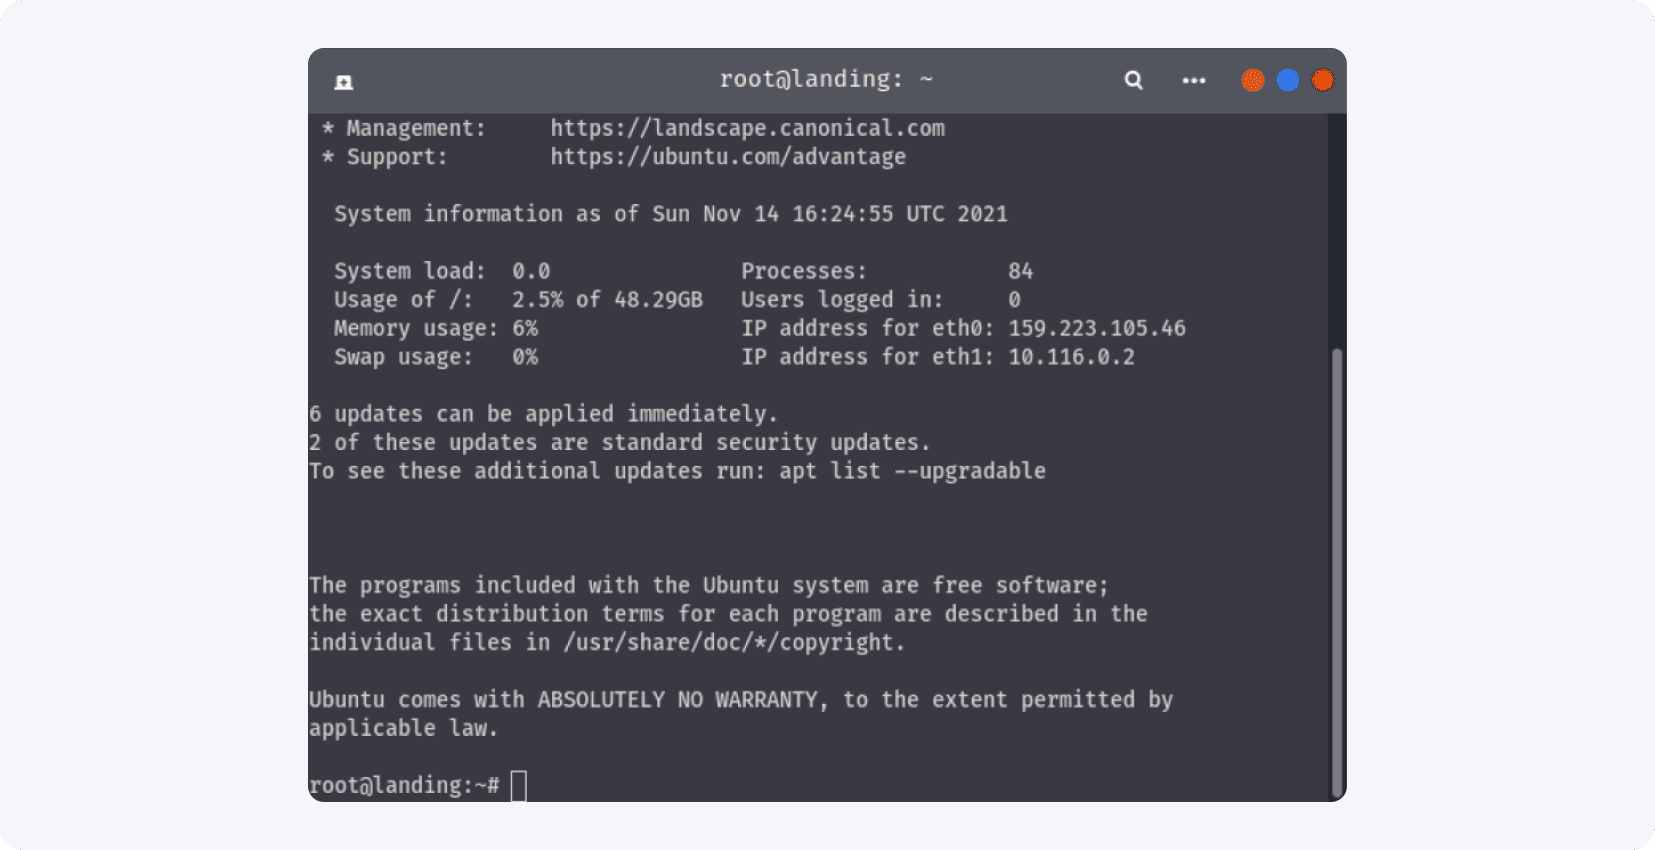
Update the fresh installation with two commands: sudo apt update followed by sudo apt upgrade. The whole process takes 2–4 minutes.

How do you install the VestaCP control panel?
A control panel manages multiple domains and auto-installs Nginx, Apache, an FTP server, and a MySQL database. This guide uses VestaCP, which runs only on Ubuntu 18.10 or earlier, Debian 9 or earlier, and CentOS 7 or earlier — the reason the guide chose Ubuntu 18.10. Installation runs through two terminal commands.
Download the installer while still connected to your server: curl -O http://vestacp.com/pub/vst-install.sh.
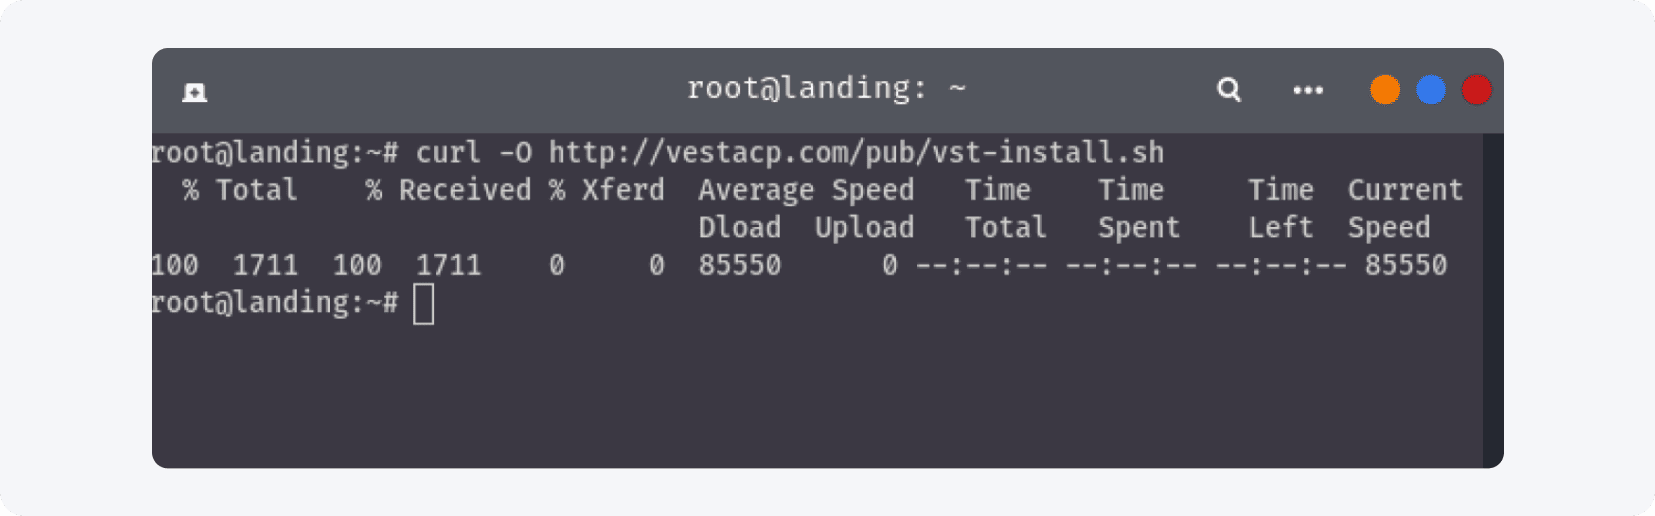
Run it with bash vst-install.sh and press Enter.
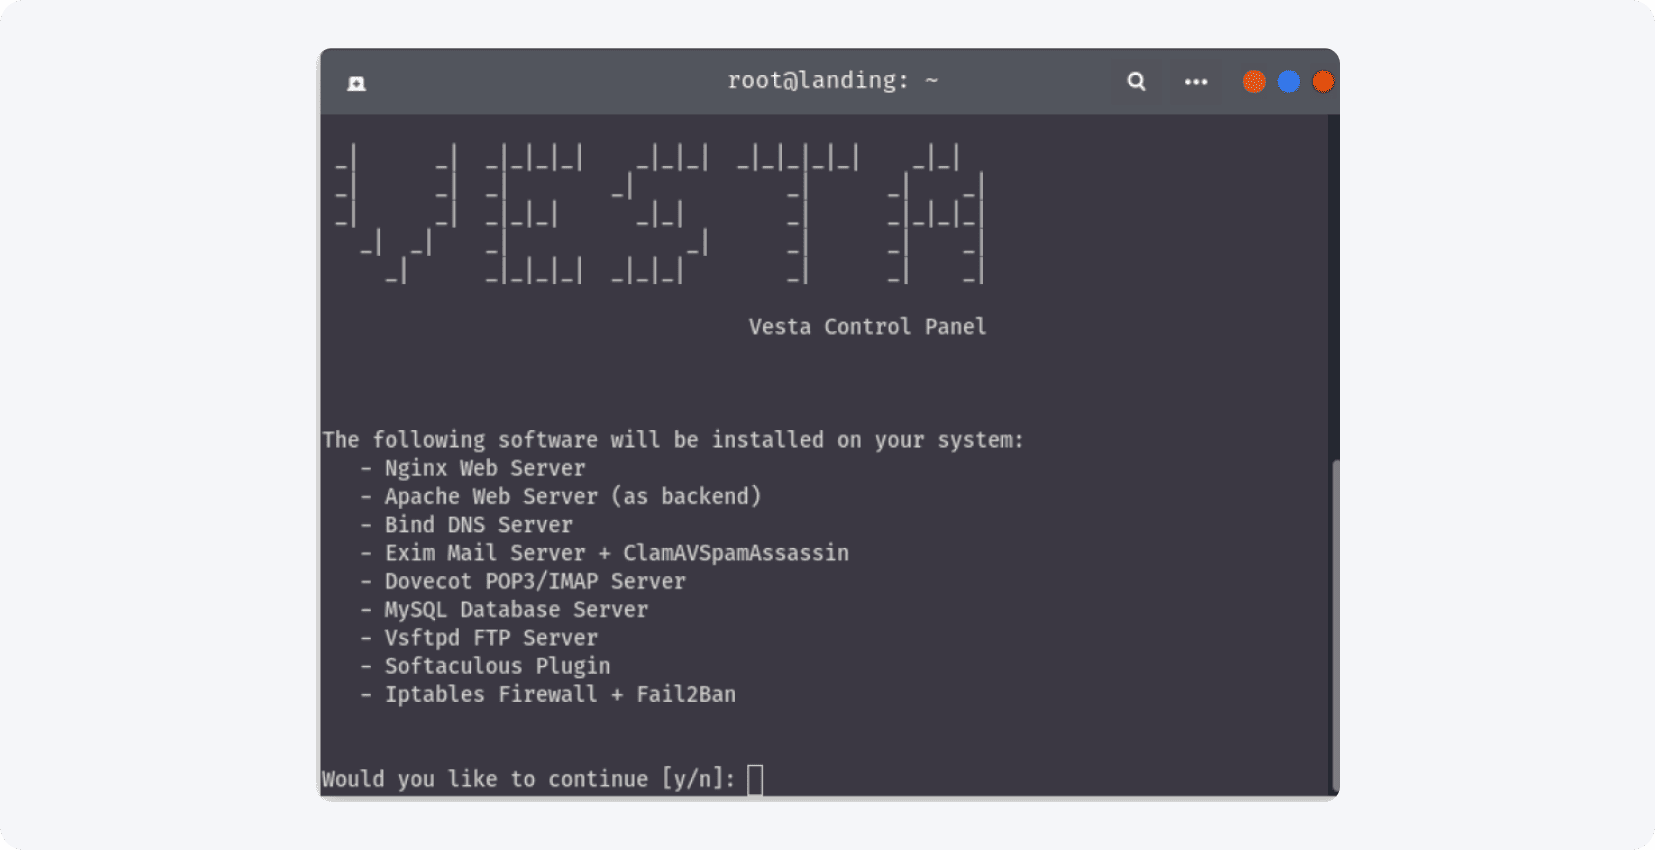
Confirm with 'y', enter your email address when asked, and skip the other questions with Enter to keep Vesta's default settings. Wait for the process to finish.

Important: write down the username and password for your Vesta login.
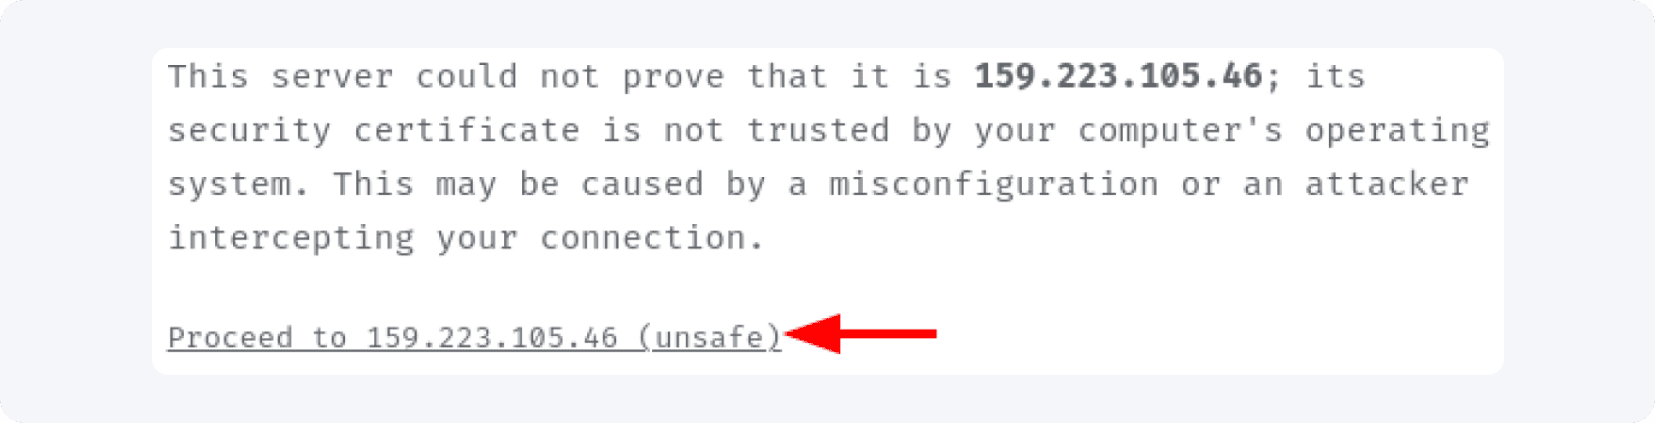
Test the panel by entering its address in your browser — in this example https://159.223.105.46:8083, but use your own IP and port 8083.
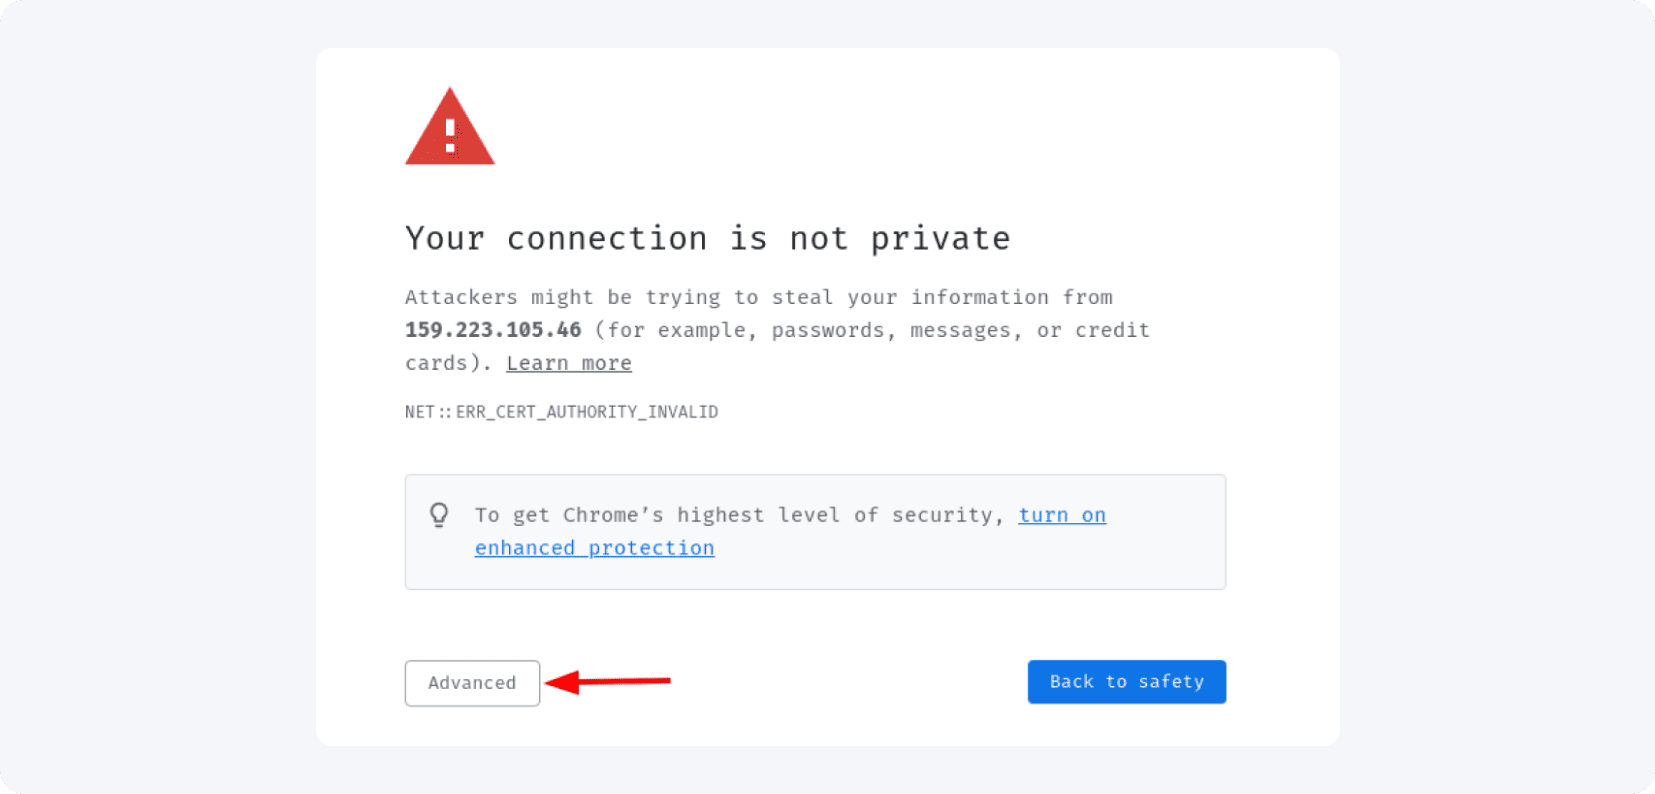
The browser security warning is normal. Click 'Advanced' and proceed.
You will be redirected to the VestaCP login screen.
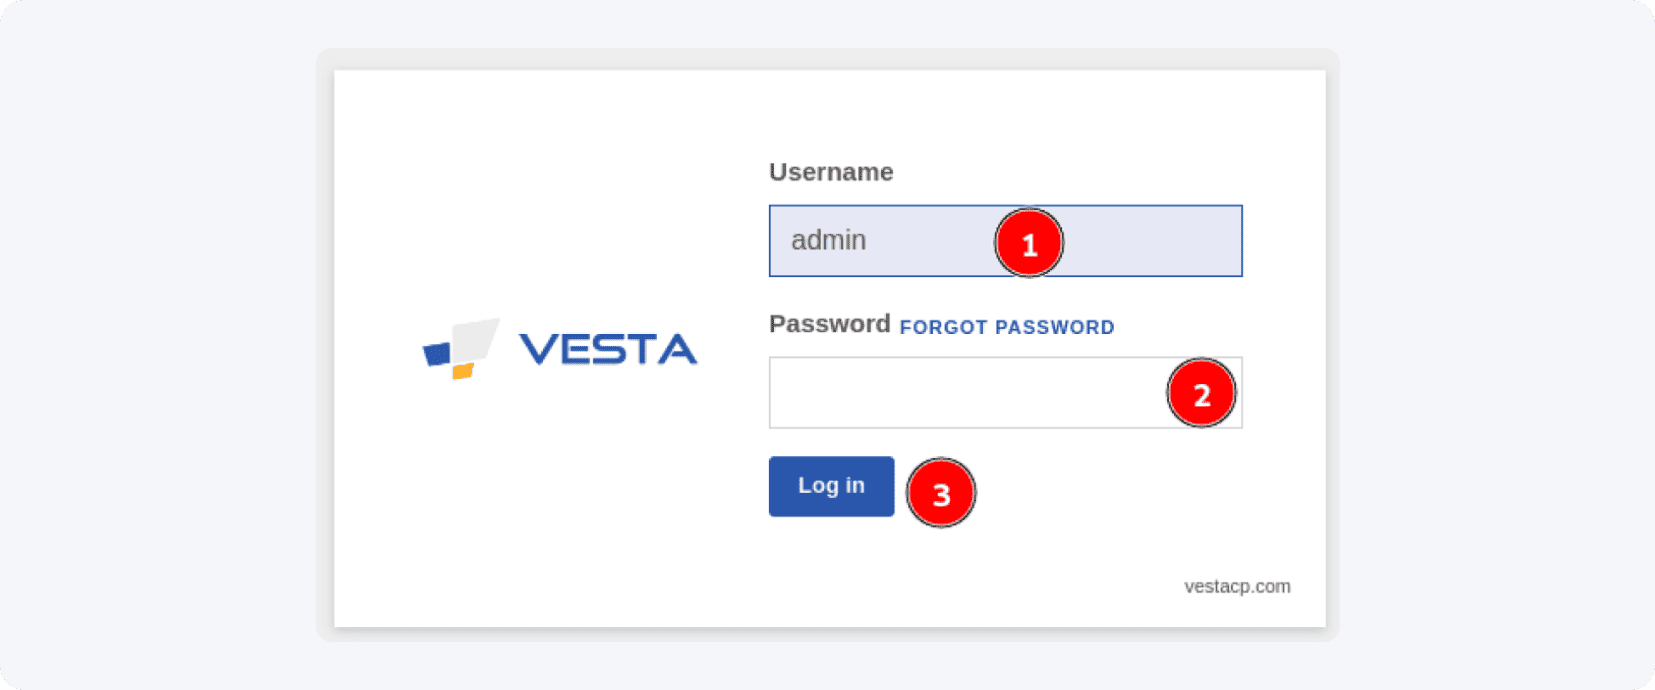
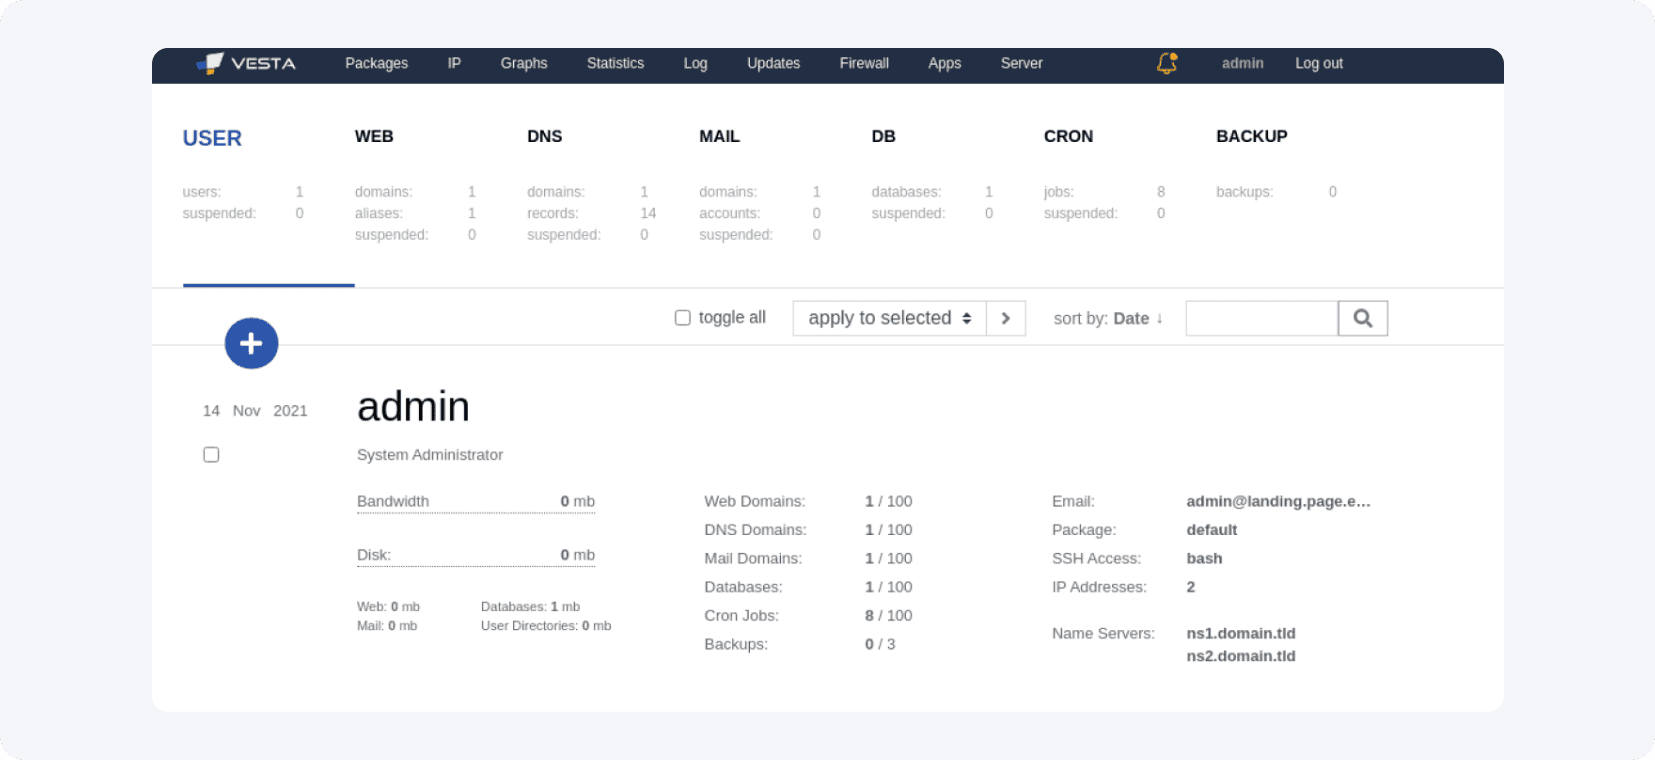
Log in with the default username 'admin' and your password. The Vesta dashboard confirms a successful install; if it fails, recheck the password or reinstall VestaCP.
How do you connect a domain with Cloudflare and Namecheap?
Connecting a domain links it to the server's IP through DNS. After buying a domain (this guide uses Namecheap), it is added to Cloudflare, two A records point '@' and 'www' to the server IP, and the registrar's nameservers are replaced with Cloudflare's. Propagation takes roughly 15–30 minutes, sometimes longer.
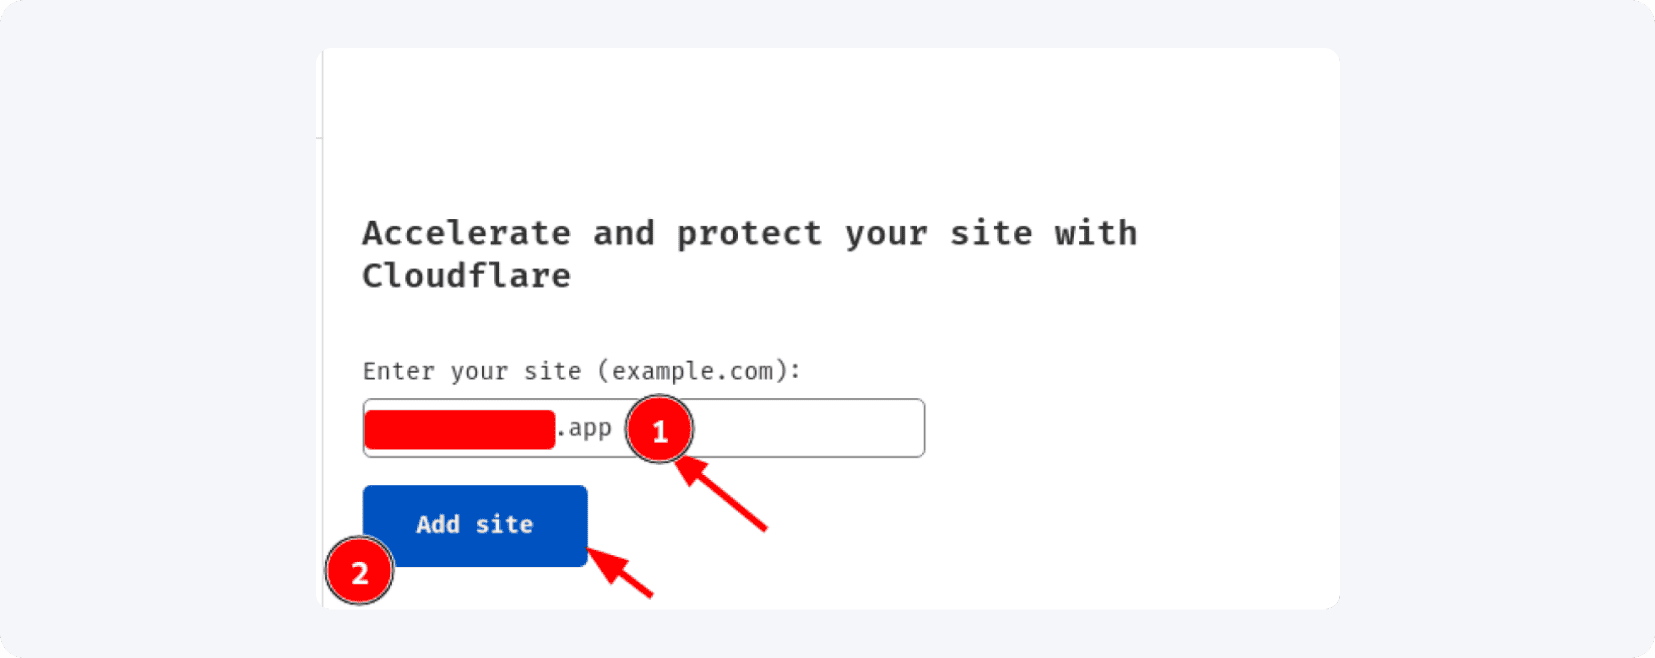
After buying your domain on Namecheap, log in to Cloudflare (create a free account if needed) and click 'Add site' at the top.

In the menu that opens, type your site name without 'www' or 'http' — just the name and extension — and click the blue 'Add site' button.
Choose your plan. The Free plan covers all basic affiliate needs.
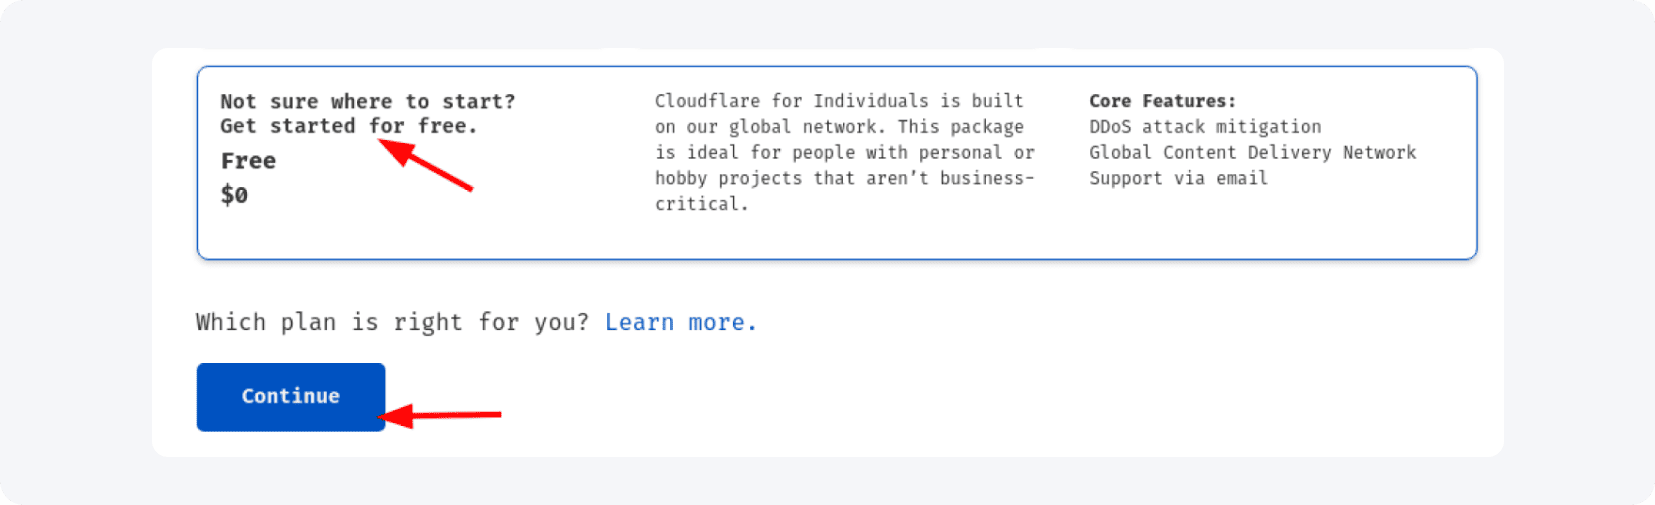
Click 'Continue' to reach the 'Review your DNS records' page.
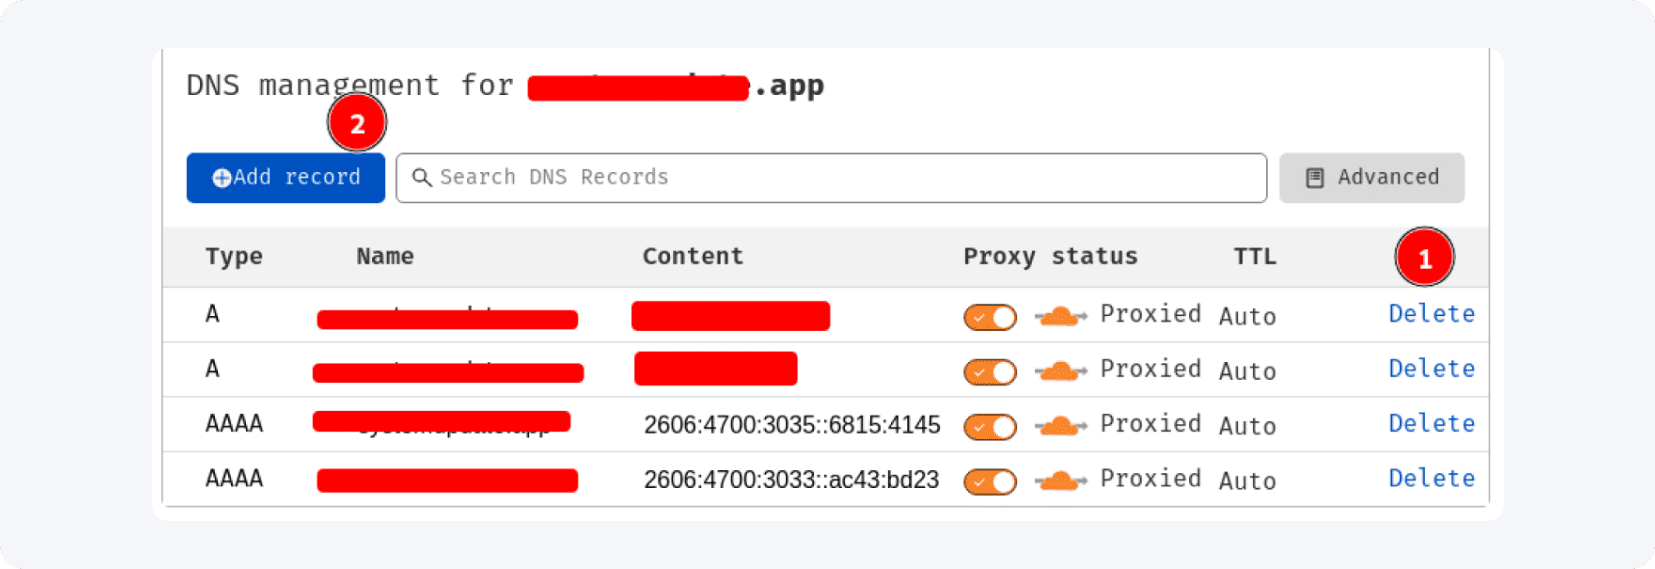
Delete the existing records if you will use the domain only to host landing pages, then click 'Add record'.
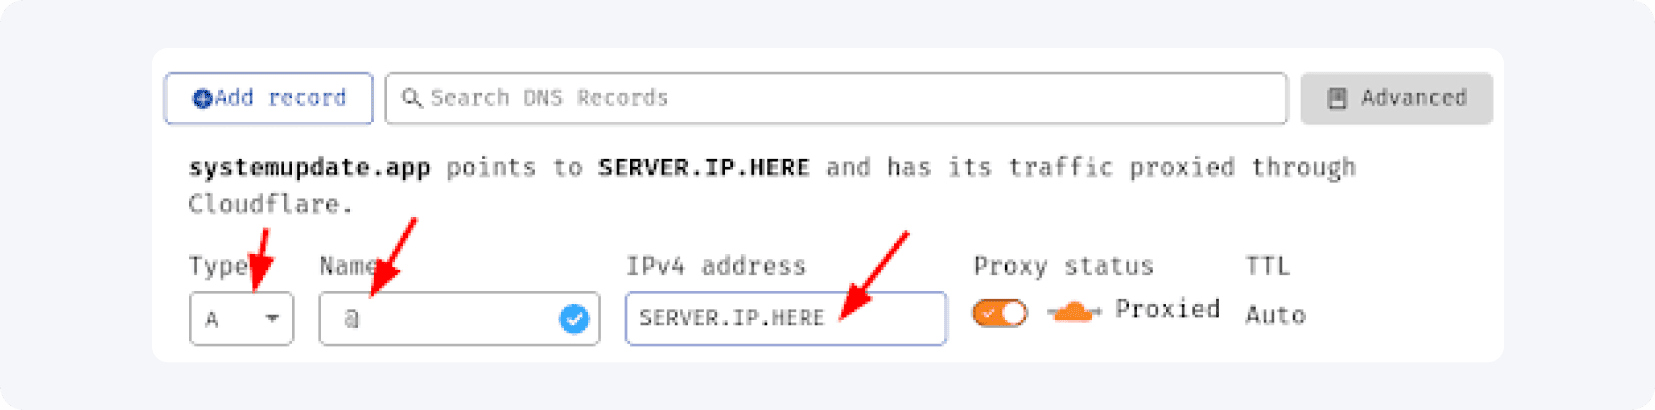
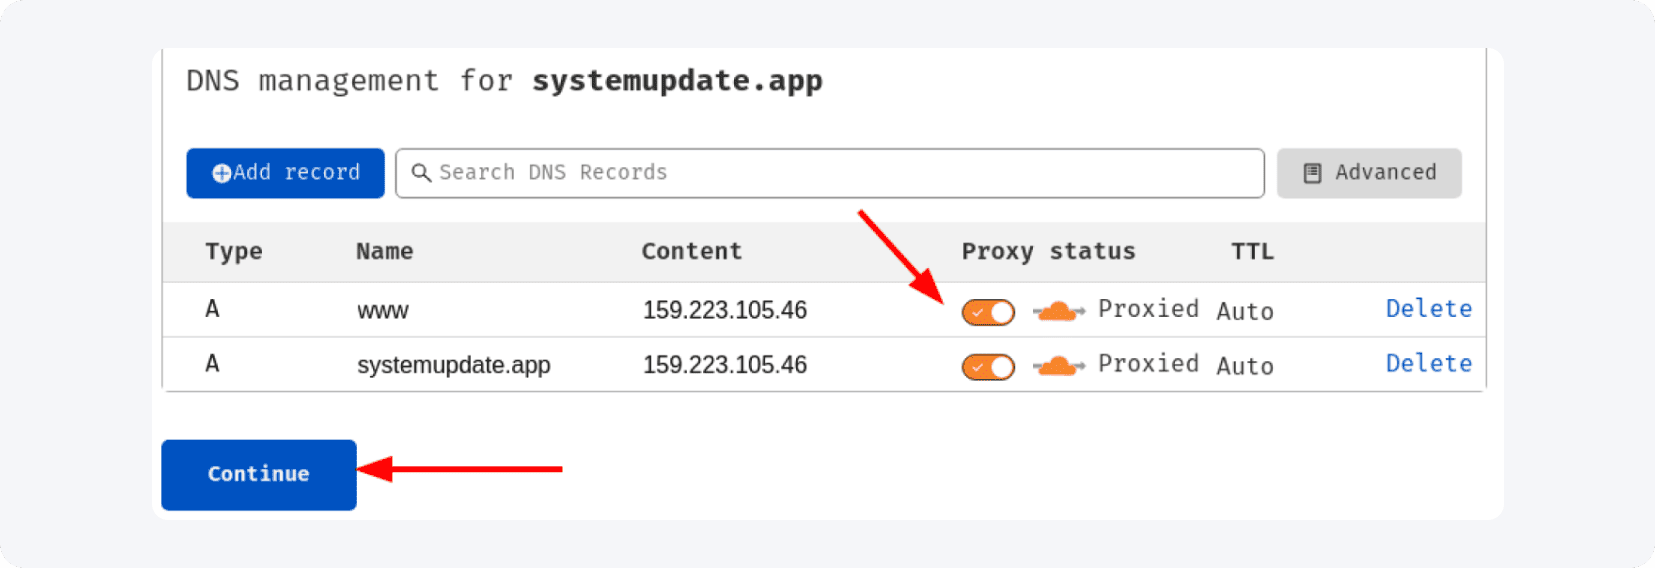
Leave 'Type' as 'A', set 'Name' to '@', enter your server's IP in the IPv4 field (xxx.xxx.xxx.xxx), and click 'Save'. Add a second record the same way, this time with 'www' as the name.

Done correctly, the records look like this:
Click 'Continue', then prepare to swap your nameservers. Log in to Namecheap, find the domain, and click 'Manage'.

On the domain settings page, scroll down to the 'Nameservers' section.
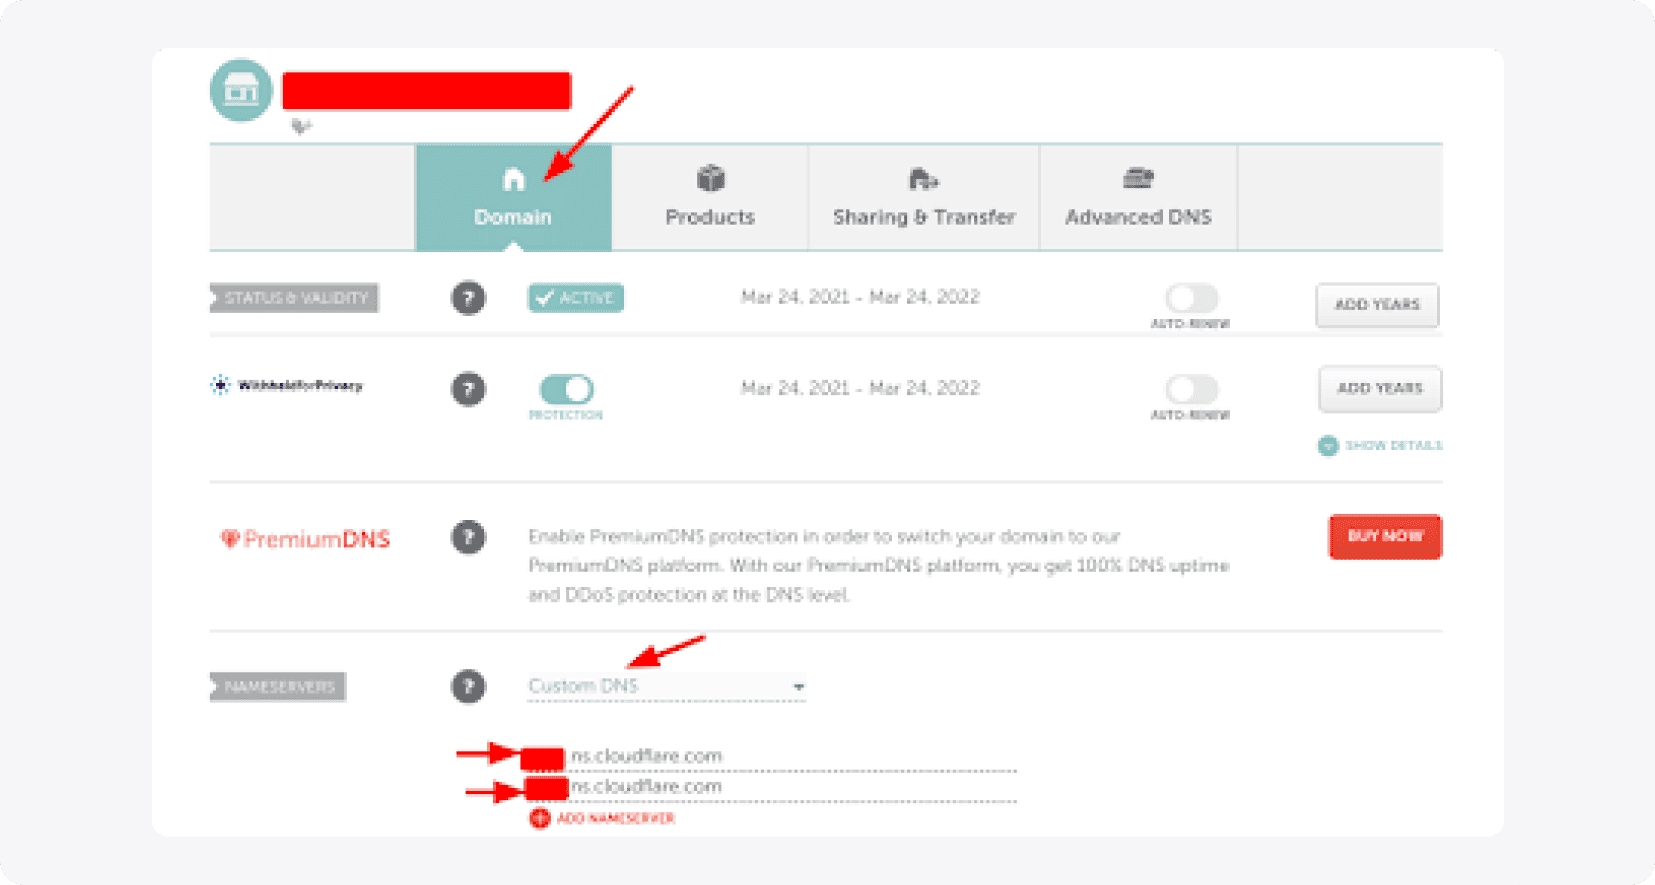
Choose 'Custom DNS' and paste the two nameservers from your Cloudflare account, then save. Return to Cloudflare and confirm the nameservers are recognized.

Cloudflare then shows configuration recommendations — it is worth reviewing them.
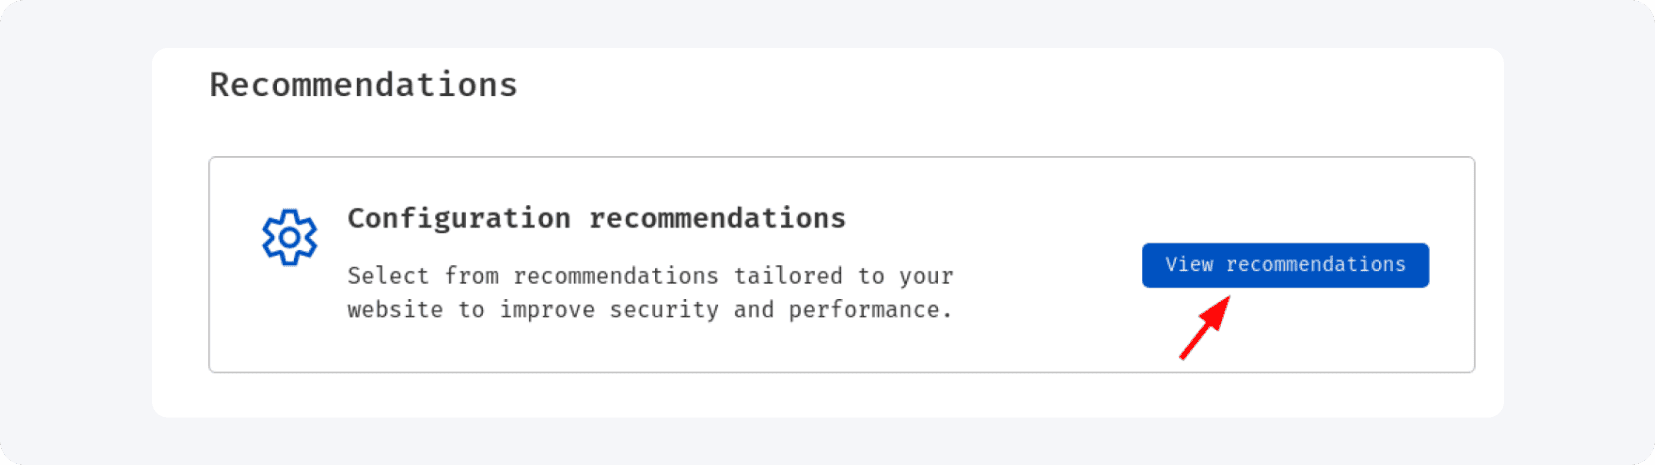
Click 'View recommendations' to see the suggested settings.
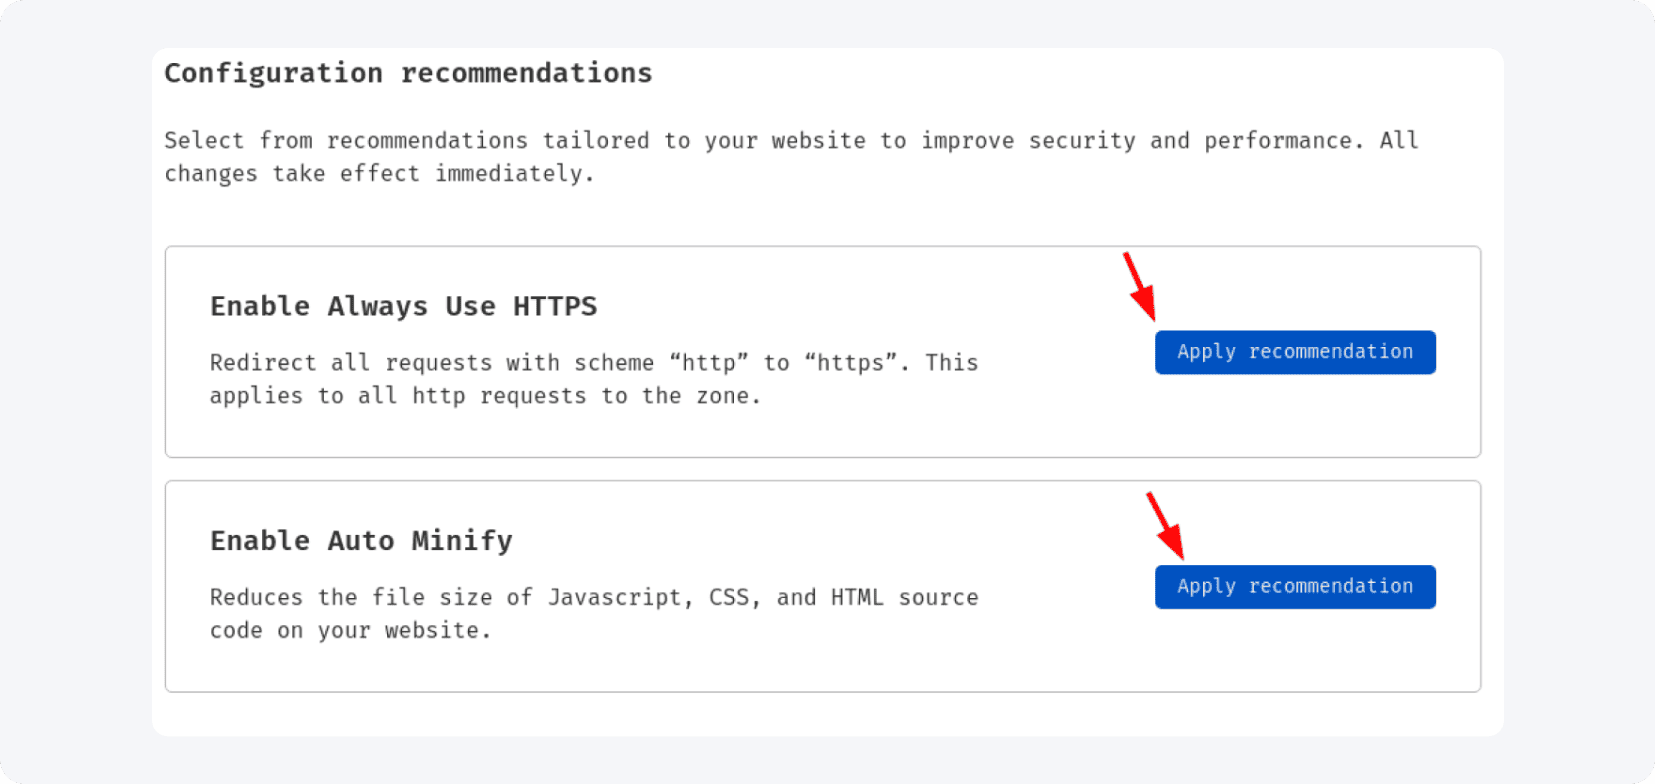
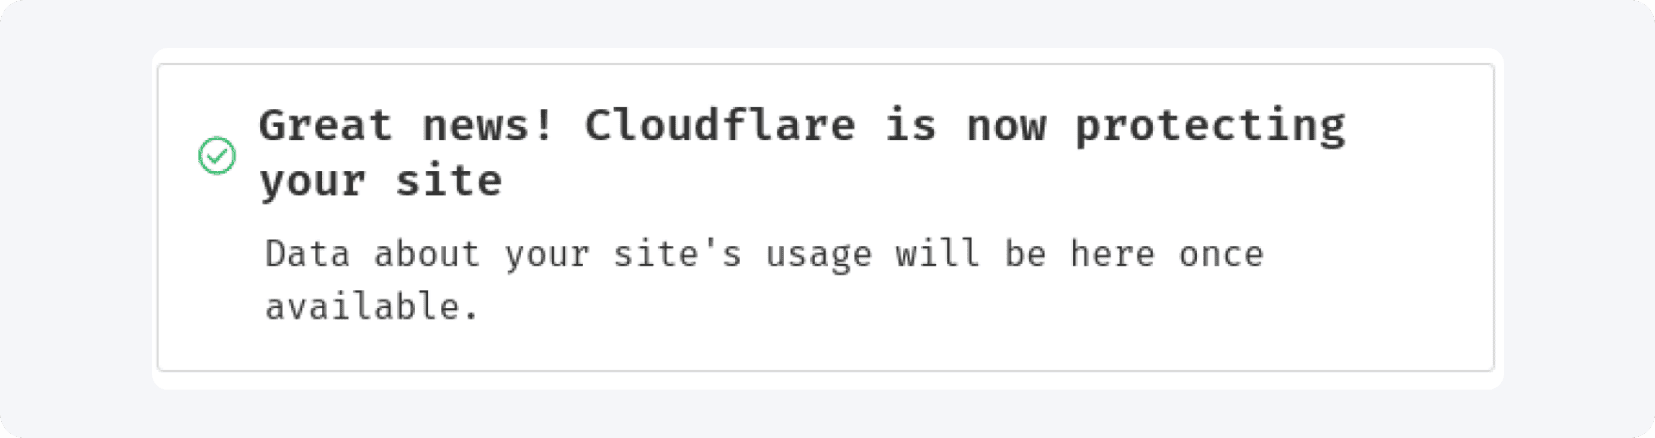
Apply both: the first enables a free SSL certificate for your domain and landing pages, the second minifies your code to speed them up. Wait 15–30 minutes, then check the domain in Cloudflare — an active message means you are done.
How do you upload a landing page to the server?
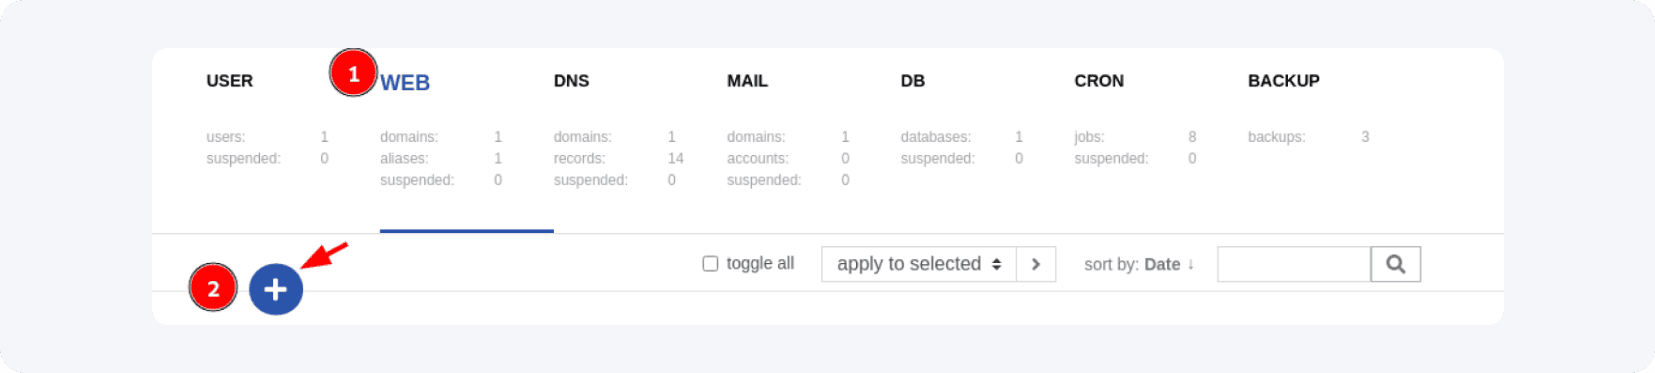
Uploading a landing page has two parts: adding the domain in VestaCP's WEB tab, then transferring files over SFTP with an FTP client like FileZilla. Files go into /home/admin/web/yourdomain/public_html, usually inside a subfolder. After the upload, the landing page is reachable at yourdomain.com/subfolder, and you can host as many pages as you want in separate folders.
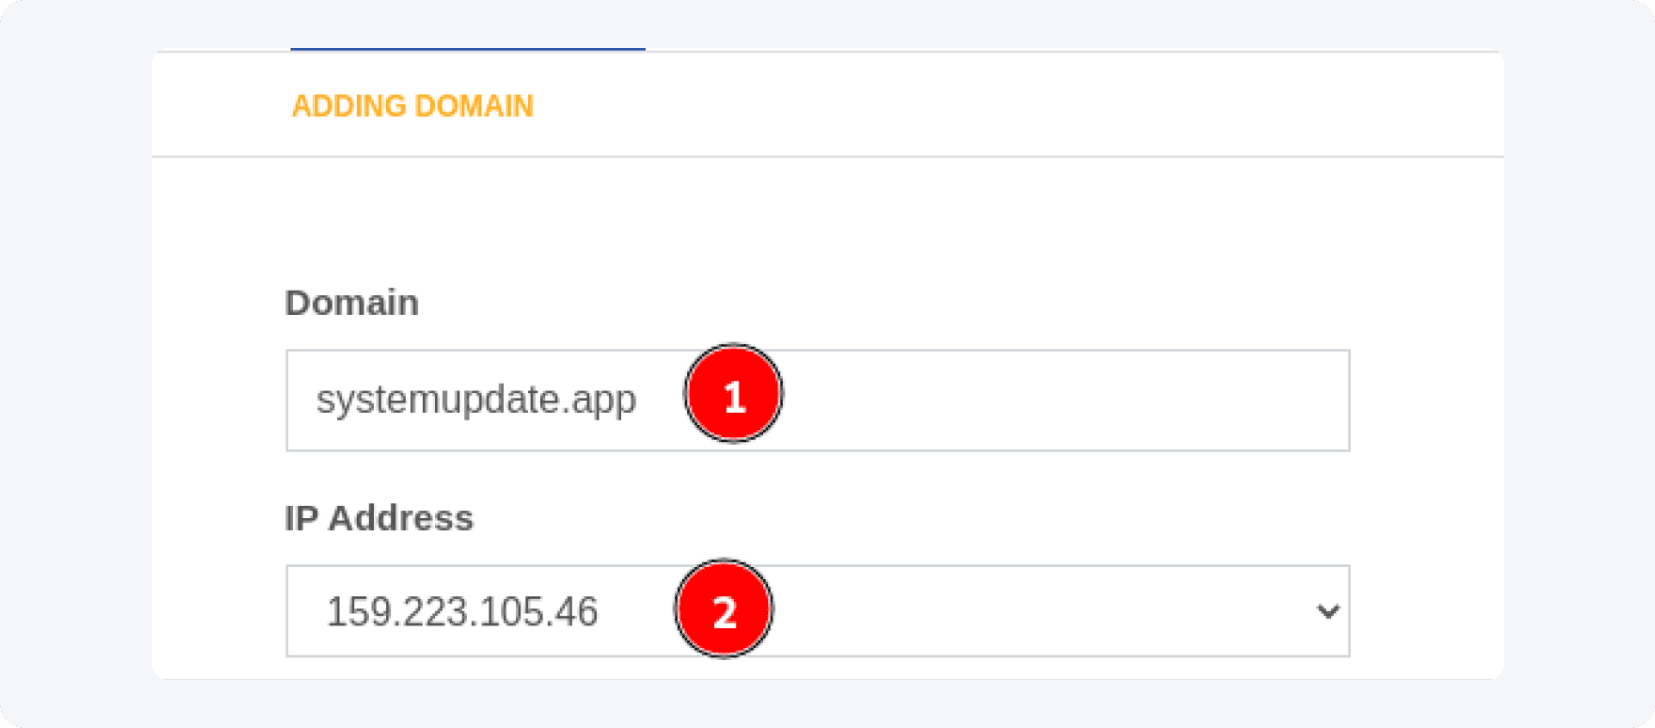
Log in to VestaCP, open the 'WEB' tab, and click the blue '+' icon.
In the 'adding domain' menu, enter the domain you added in Cloudflare, pick the server's IP in the 'IP Address' field, leave the rest as is, and click 'Add'.
Open your FTP client (this guide uses FileZilla), go to 'Site Manager', and click 'New Site'.
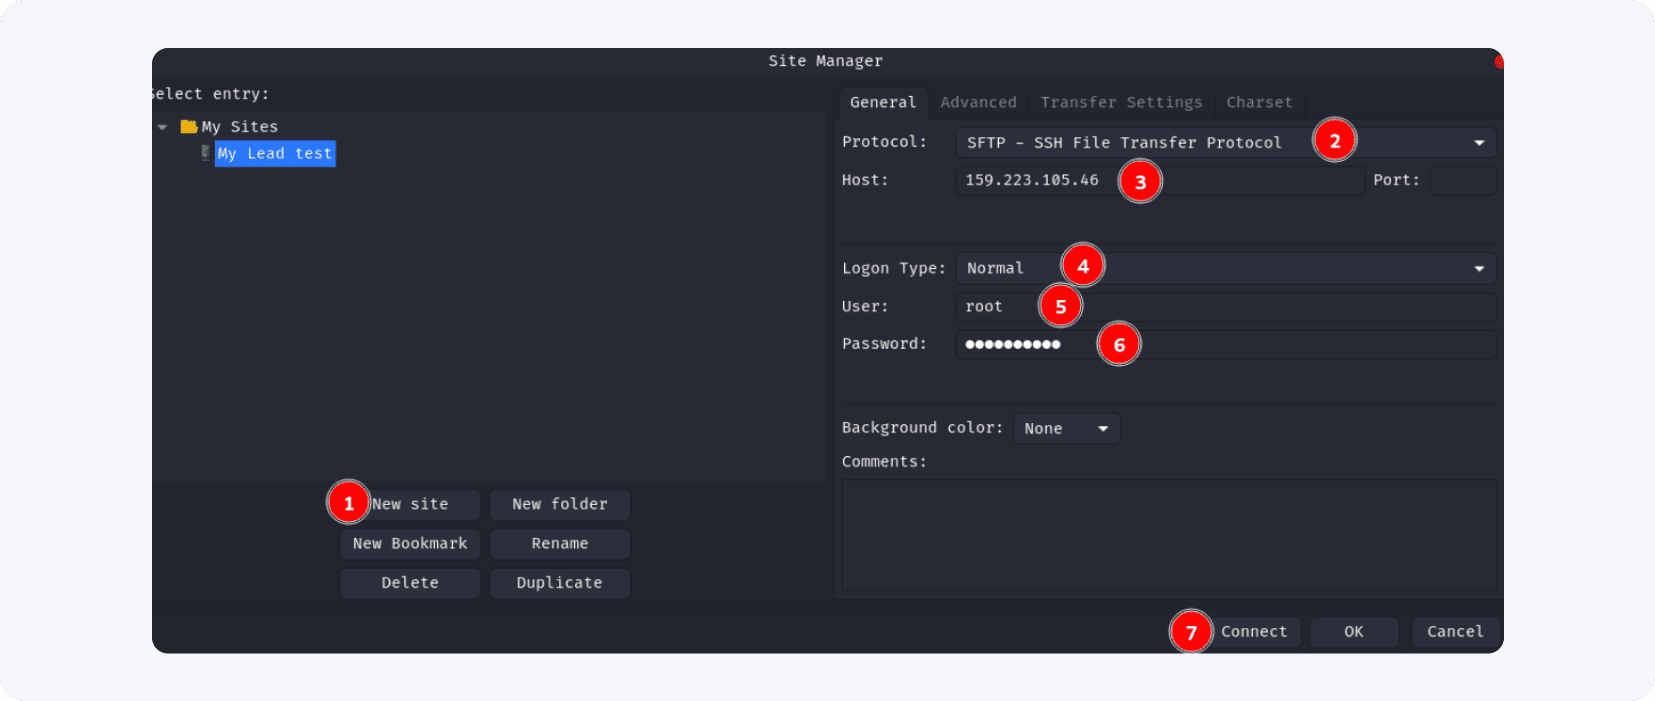
Use the SFTP protocol. Enter your server's IP as the host, leave the port empty (the default is used), set Logon type to 'Normal', user to 'root', and the password to your server's password — not the VestaCP one — then connect.
A successful connection looks like this:

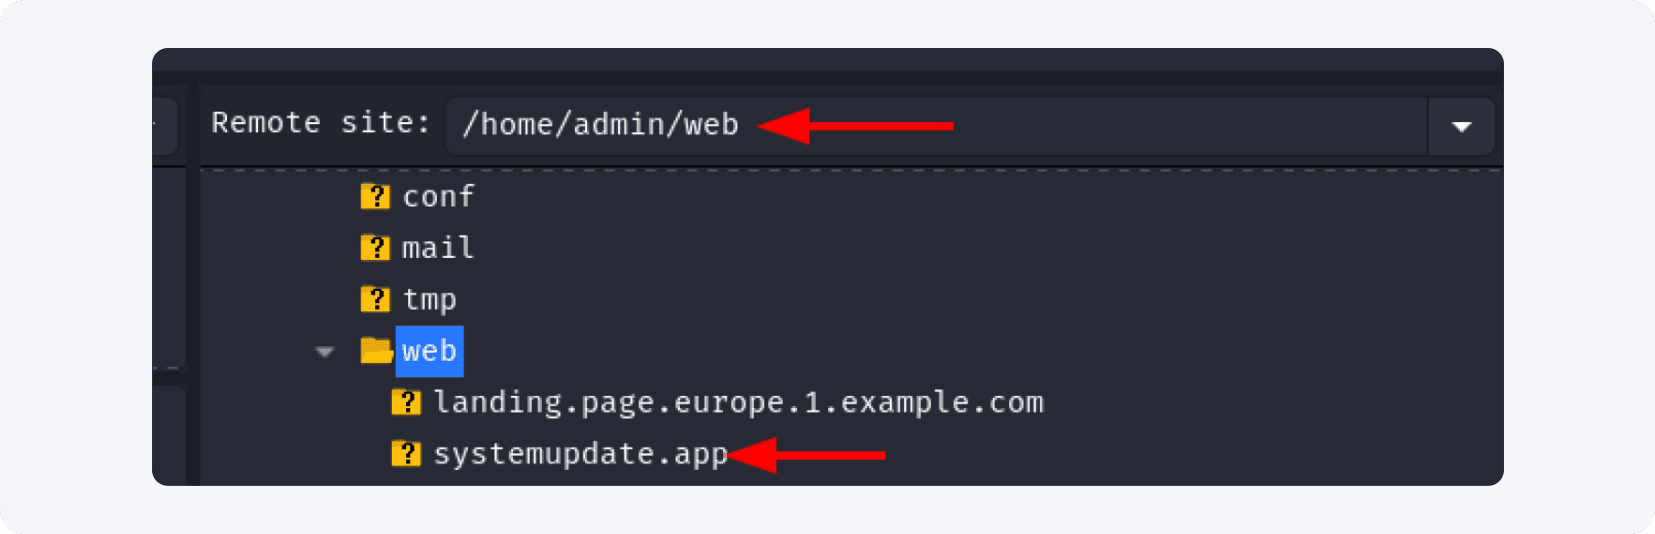
Go to /home/admin/web and open the folder named after your domain.
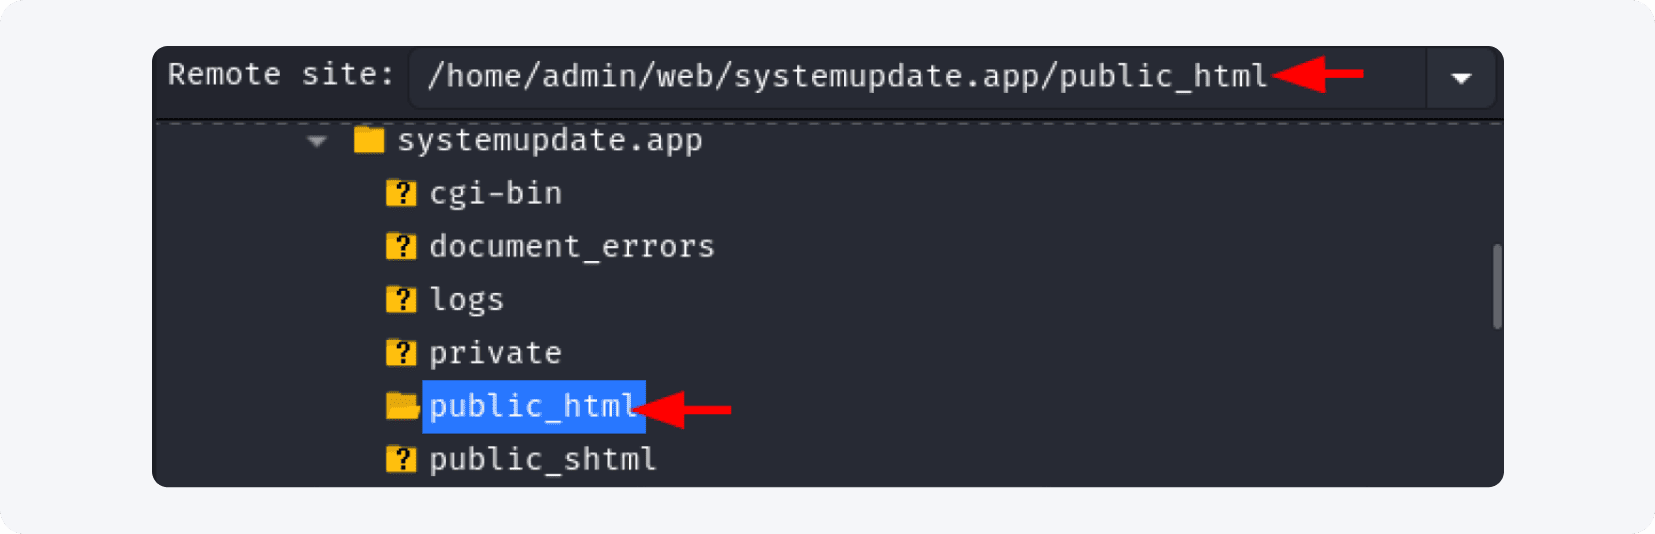
Inside, open the 'public_html' folder.
Delete the 'index.html' and 'robots.txt' files, then create a subfolder for your landing page (here it is named 'test', but any name works).
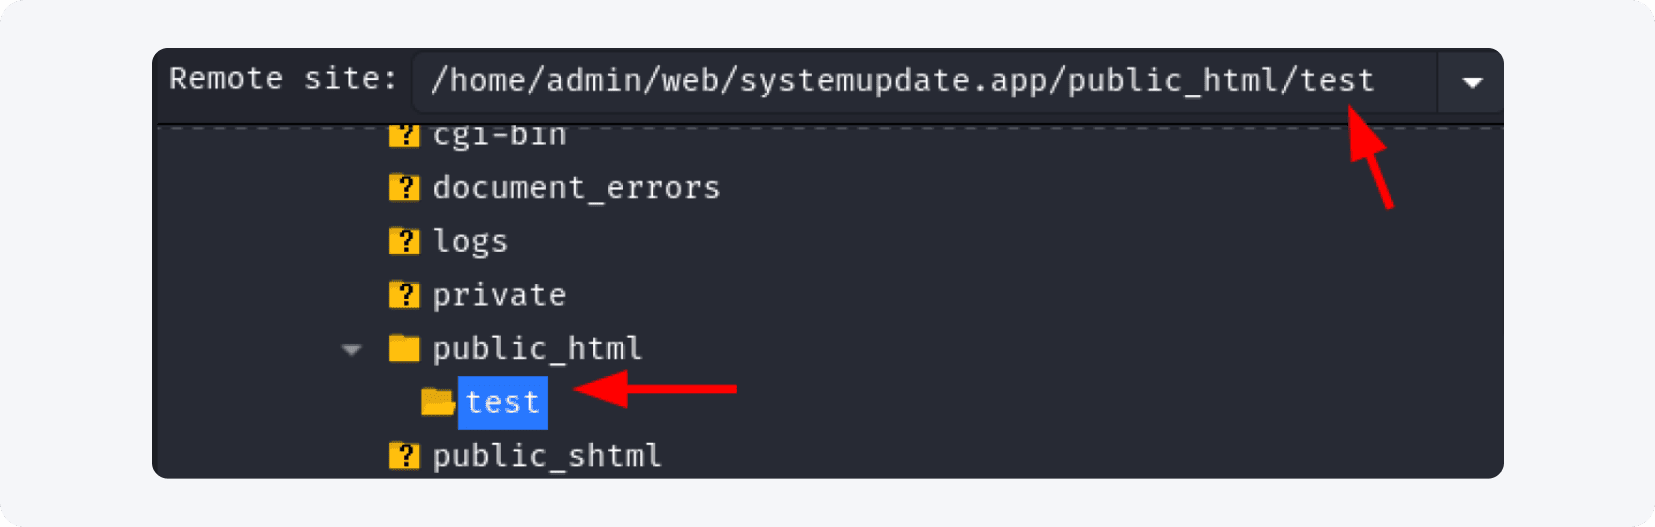
Once the upload finishes, test it: open yourdomain.com/test in a new browser window.
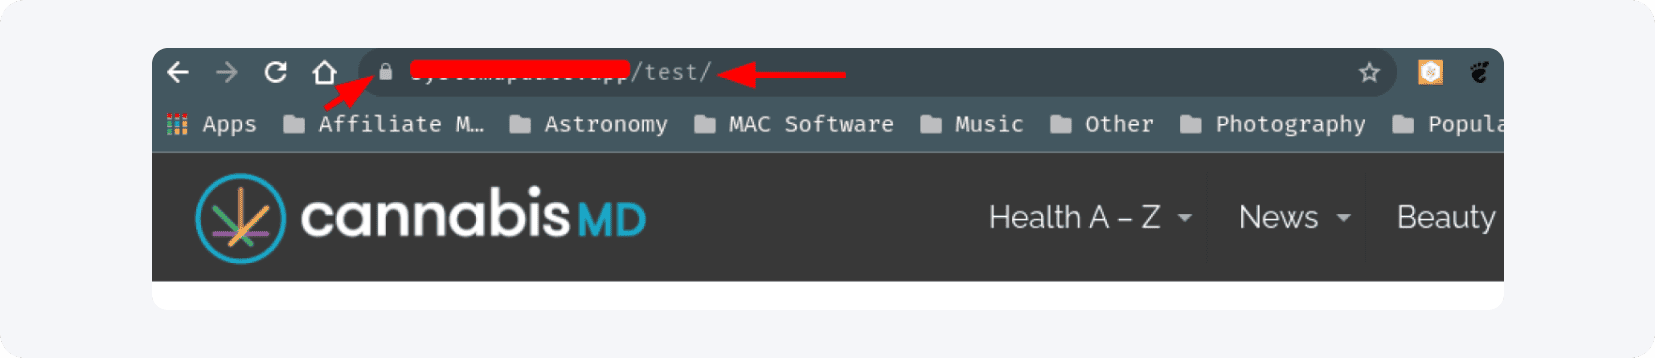
If the page loads, your landing page is live — and you can add as many as you like in separate folders. For higher conversions, study our guides on creating a landing page step by step and landing page SEO optimization.
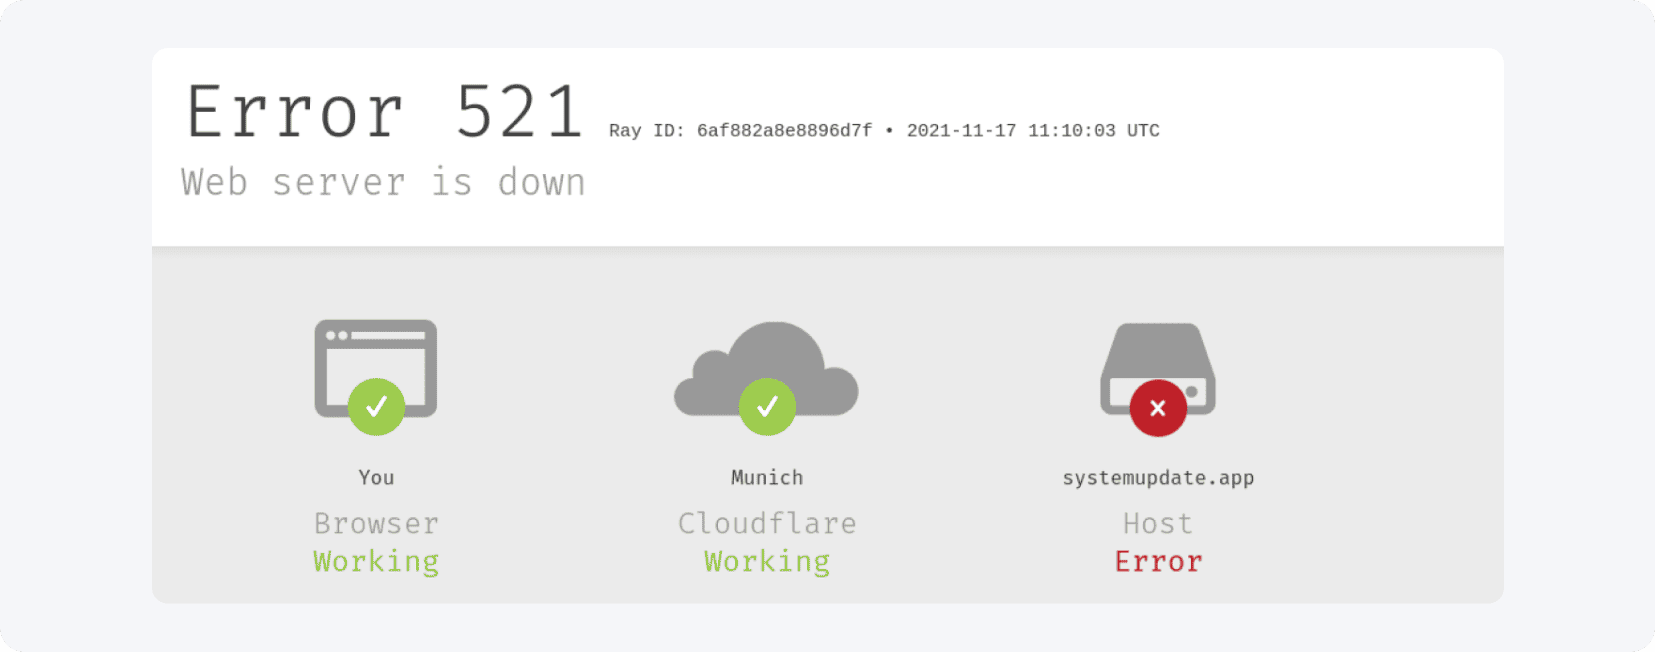
How do you fix the SSL error on your landing page?
If the browser shows an SSL error after the landing page goes live, the fix is in Cloudflare. Open the domain, go to the 'SSL/TLS' menu, and switch the mode from 'Full' to 'Flexible'. This resolves the certificate mismatch immediately, and the landing page loads correctly on the next test.
If your browser displays an error like this...
...go to your Cloudflare account, select the domain, and click 'SSL/TLS' in the left menu.
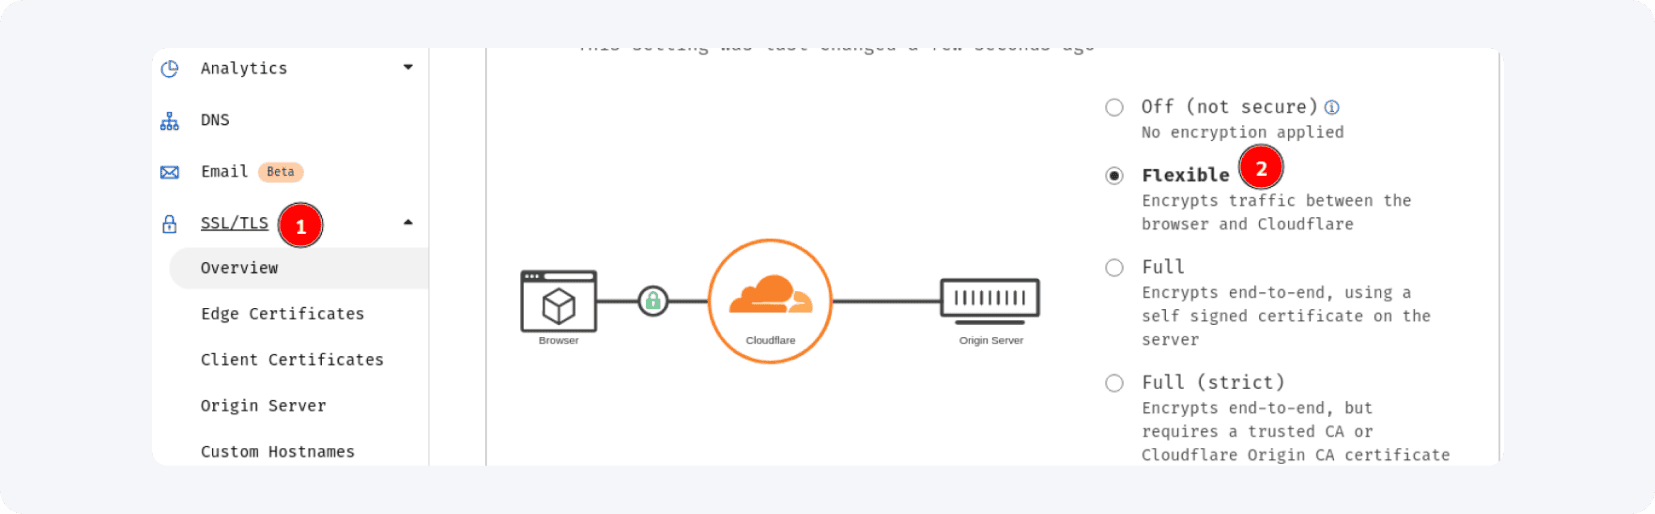
On the right, change the mode from 'Full' to 'Flexible' — this fixes the problem instantly. Test your landing page again and it should work. Your server is now ready to power your media buying campaigns.
Key takeaways
A VPS costs just $6–$12 monthly and gives you full control over hosting, with no limits on landing pages or affiliate sites.
Pick a data center near your campaign's audience — Frankfurt or Amsterdam for Europe, Singapore for Asia — to cut landing page load times.
VestaCP auto-installs Nginx, Apache, FTP, and MySQL, but only on Ubuntu 18.10, Debian 9, or CentOS 7 and earlier.
Always connect your domain through Cloudflare for free SSL and code minification; allow 15–30 minutes for DNS propagation.
Upload landing pages over SFTP into public_html, and if you hit an SSL error, switch Cloudflare's SSL mode from 'Full' to 'Flexible'.
FAQ
1. How much does a VPS for media buying cost?
A basic VPS starts at $6 per month (about $0.20 per day), with $12–$18 plans recommended for beginners. NVMe SSD droplets cost slightly more but are worth it for faster landing pages.
2. Do you really need your own server for affiliate marketing?
Not always, but a server gives you full control, unlimited landing pages, GEO flexibility, and custom domains that free hosts like sites.google.com cannot match — especially valuable for media buying.
3. Which data center location should you choose?
Pick the region closest to your traffic: Frankfurt or Amsterdam for European campaigns, Singapore for Asia. Lower latency means faster landing pages and better conversions.
4. Why does this guide use Ubuntu 18.10?
Because VestaCP runs only on Ubuntu 18.10 or earlier, Debian 9 or earlier, and CentOS 7 or earlier. The control panel sets the OS requirement, not personal preference.
5. How do you fix an SSL error on a landing page?
In Cloudflare, open the domain, go to 'SSL/TLS', and change the mode from 'Full' to 'Flexible'. The error clears immediately on the next test.
Summary
Setting up a server for media buying comes down to renting a $6–$12 VPS, connecting via SSH, installing VestaCP, pointing a domain through Cloudflare, and uploading landing pages over SFTP. The whole process takes under an hour and gives you full control over your affiliate campaigns. Create a free MyLead publisher account and pair your new server with the network's best-converting campaigns.
Have any questions? Feel free to reach us through our channels.