Blog / Guides
How Do You Configure Content Lockers on MyLead? Step-by-Step Guide
This article is updated regularly
Last update:
09 March 2026
Content lockers are MyLead monetization tools that hide premium content, files, or downloads behind a required user action, such as completing an offer or a verification task. MyLead provides three types — CPA Locker, Captcha Locker, and File Locker — each configured in the publisher panel under Tools, and each paying you a commission for every completed conversion.
This guide walks you through configuring all three content lockers on MyLead step by step — from the basic settings to desktop, mobile, and theme customization.
What you'll learn from this article:
what content lockers are and how each of the three types monetizes your traffic,
how to configure a CPA Locker for both desktop and mobile users,
how to set up a Captcha Locker as a monetized human-verification step,
how to use a File Locker to gate downloads behind profitable tasks,
how to customize themes, access times, and redirect URLs for every locker.
What are content lockers and how do they work on MyLead?
A content locker is a tool that blocks access to selected content until a visitor completes an action you define. On MyLead, you configure lockers in the publisher panel under Tools → Content Lockers, choosing between three formats: CPA Locker, Captcha Locker, and File Locker. Each tracks conversions automatically and pays a commission per completed action.
The three formats differ in how they engage your audience: a CPA Locker requires a completed offer, a Captcha Locker monetizes human verification, and a File Locker gates downloads. For the full picture of how this tool fits the platform, read the complete MyLead guide to Content Lockers.
How do you configure a CPA Locker step by step?
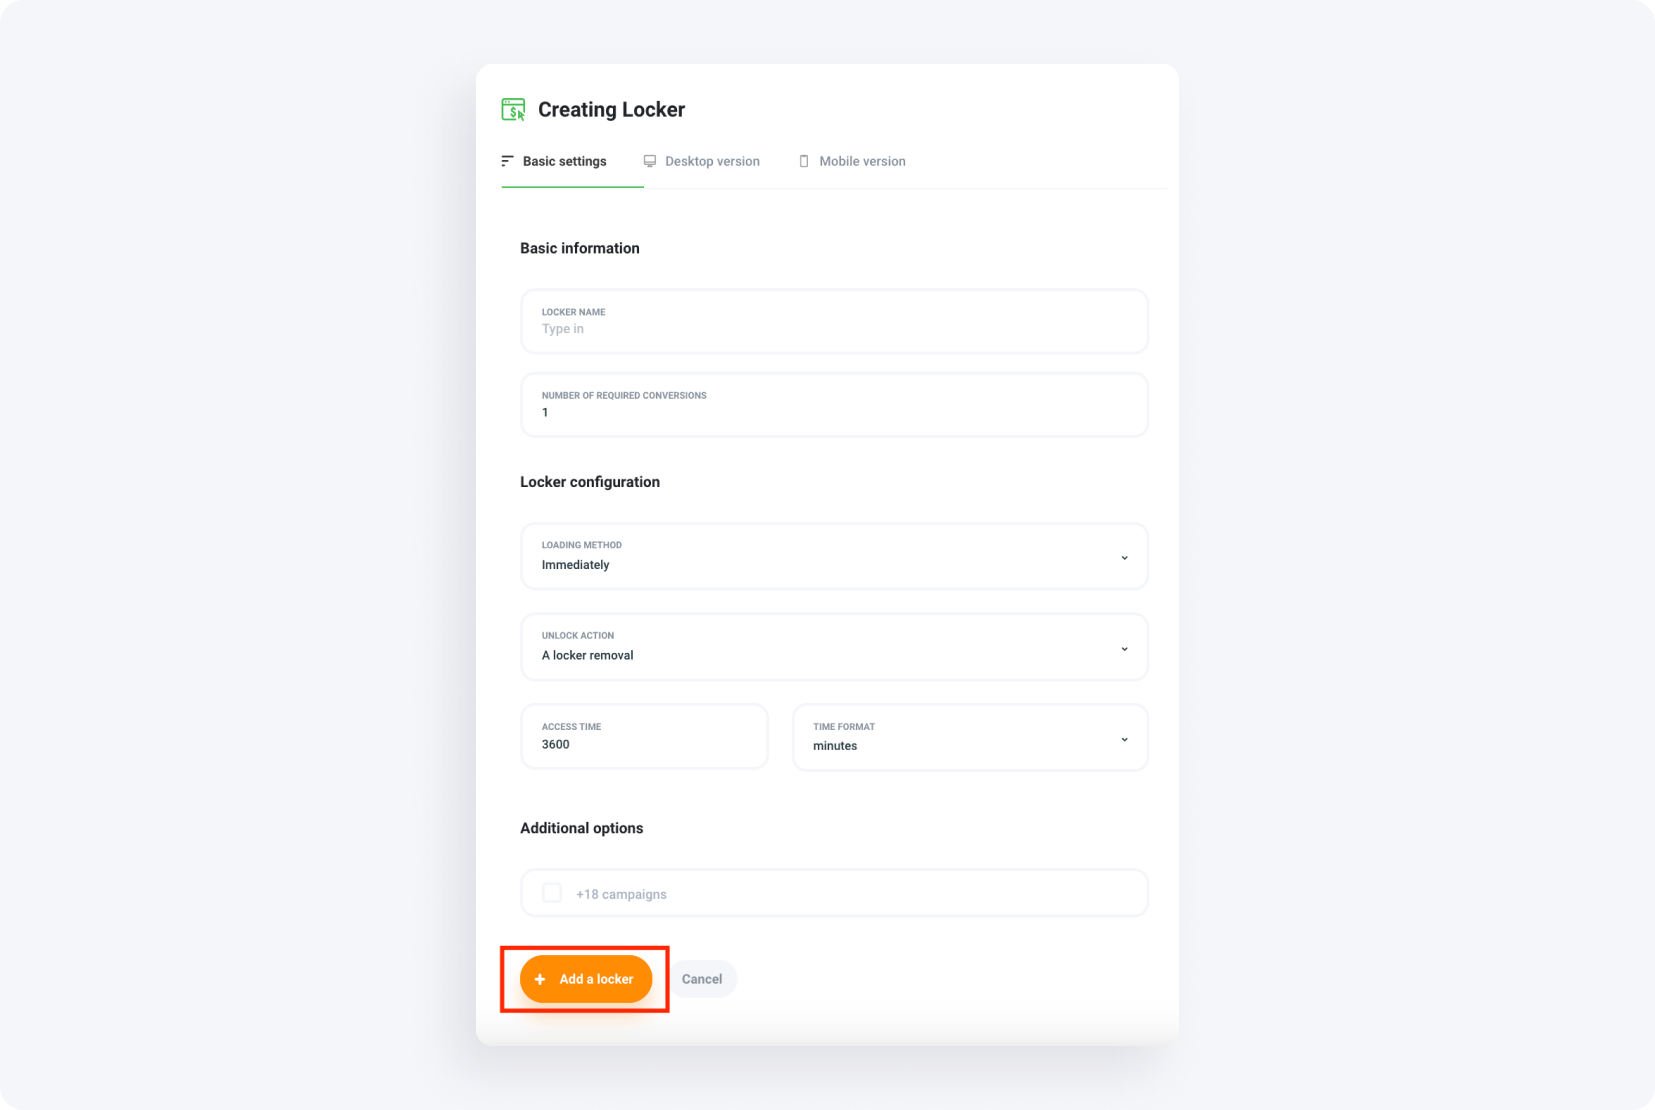
A CPA (Cost Per Action) Locker hides your premium content until the user completes a chosen action, such as filling out a form or signing up for a service. You create it in the publisher panel under Tools → Content Lockers → CPA Locker, then adjust the basic, desktop, and mobile settings before publishing.
Log in to your publisher panel, open Tools → Content Lockers → CPA Locker, and click the orange Create CPA Locker button. If you also need to embed the locker code on your site, follow the step-by-step guide to installing Content Lockers.
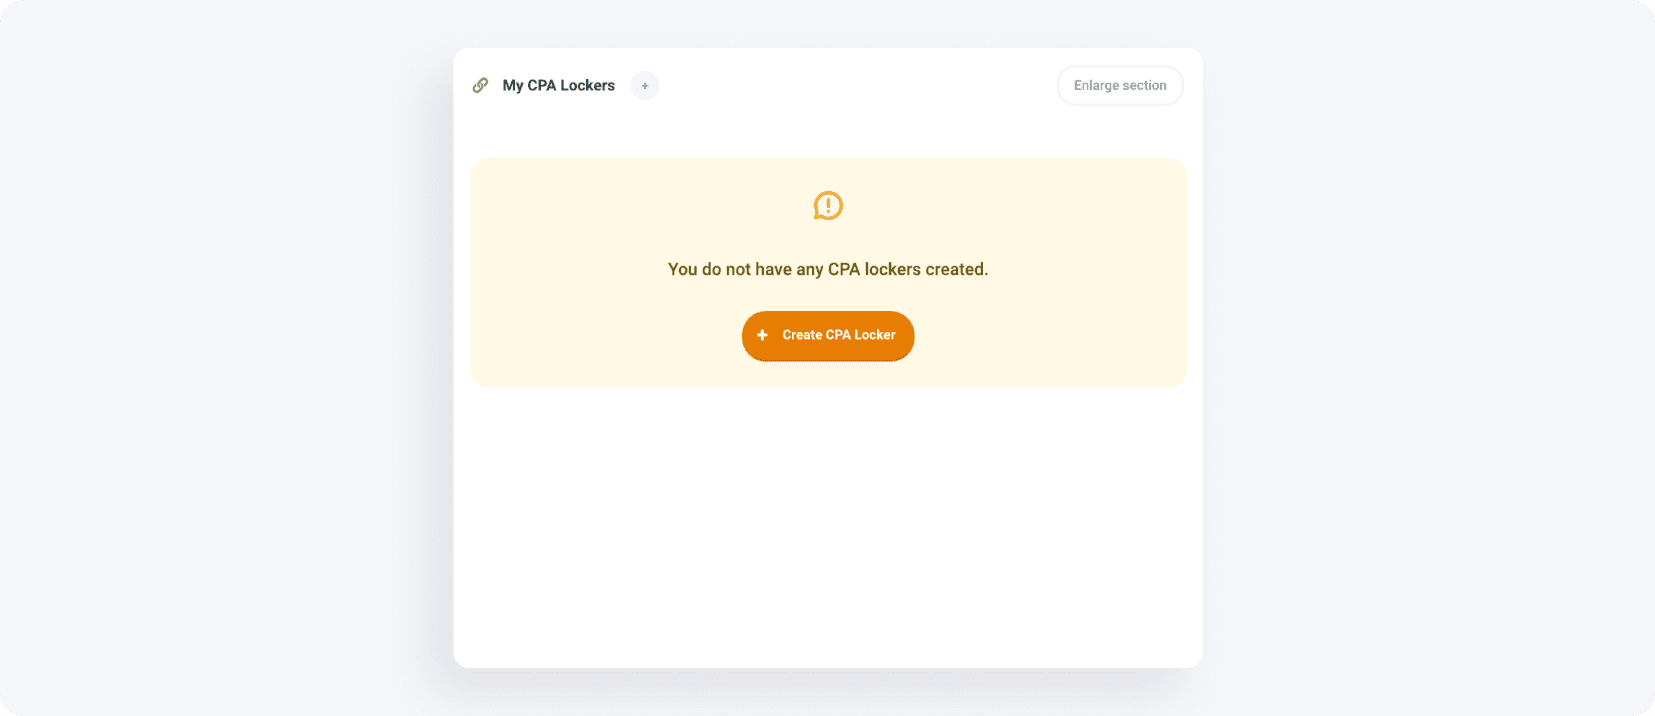
You can also jump straight to the CPA Locker configuration screen:

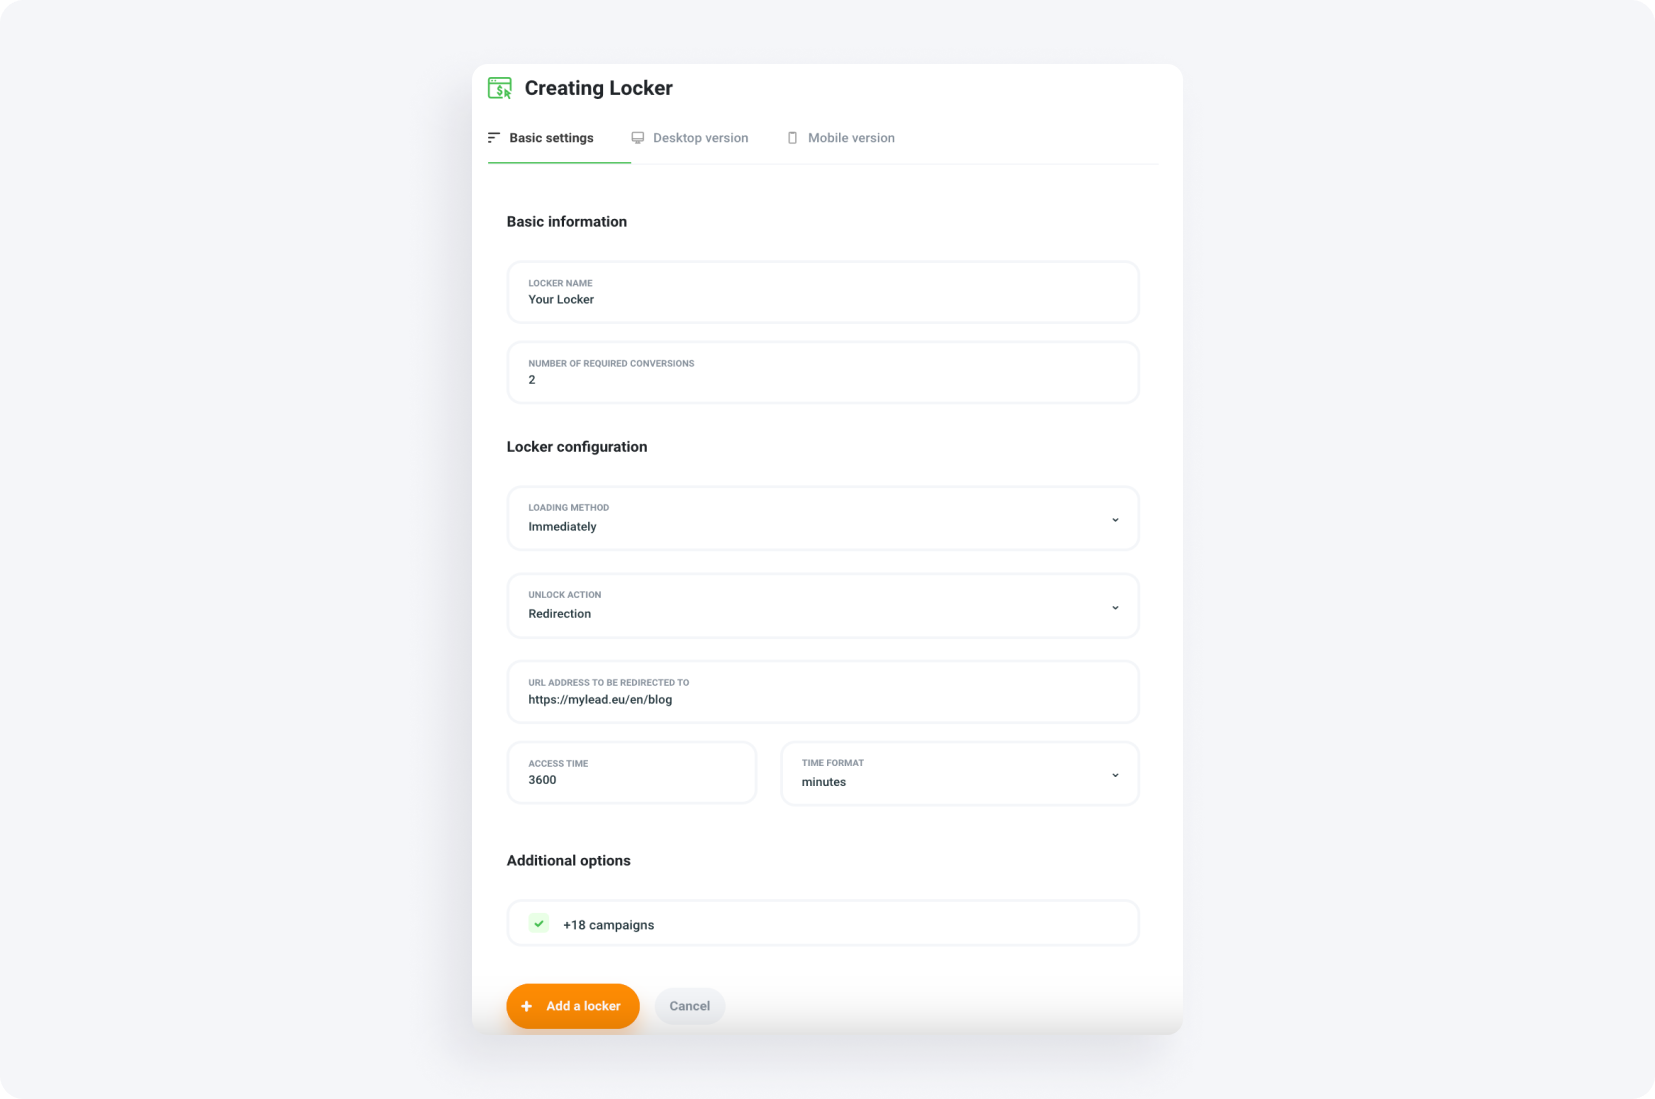
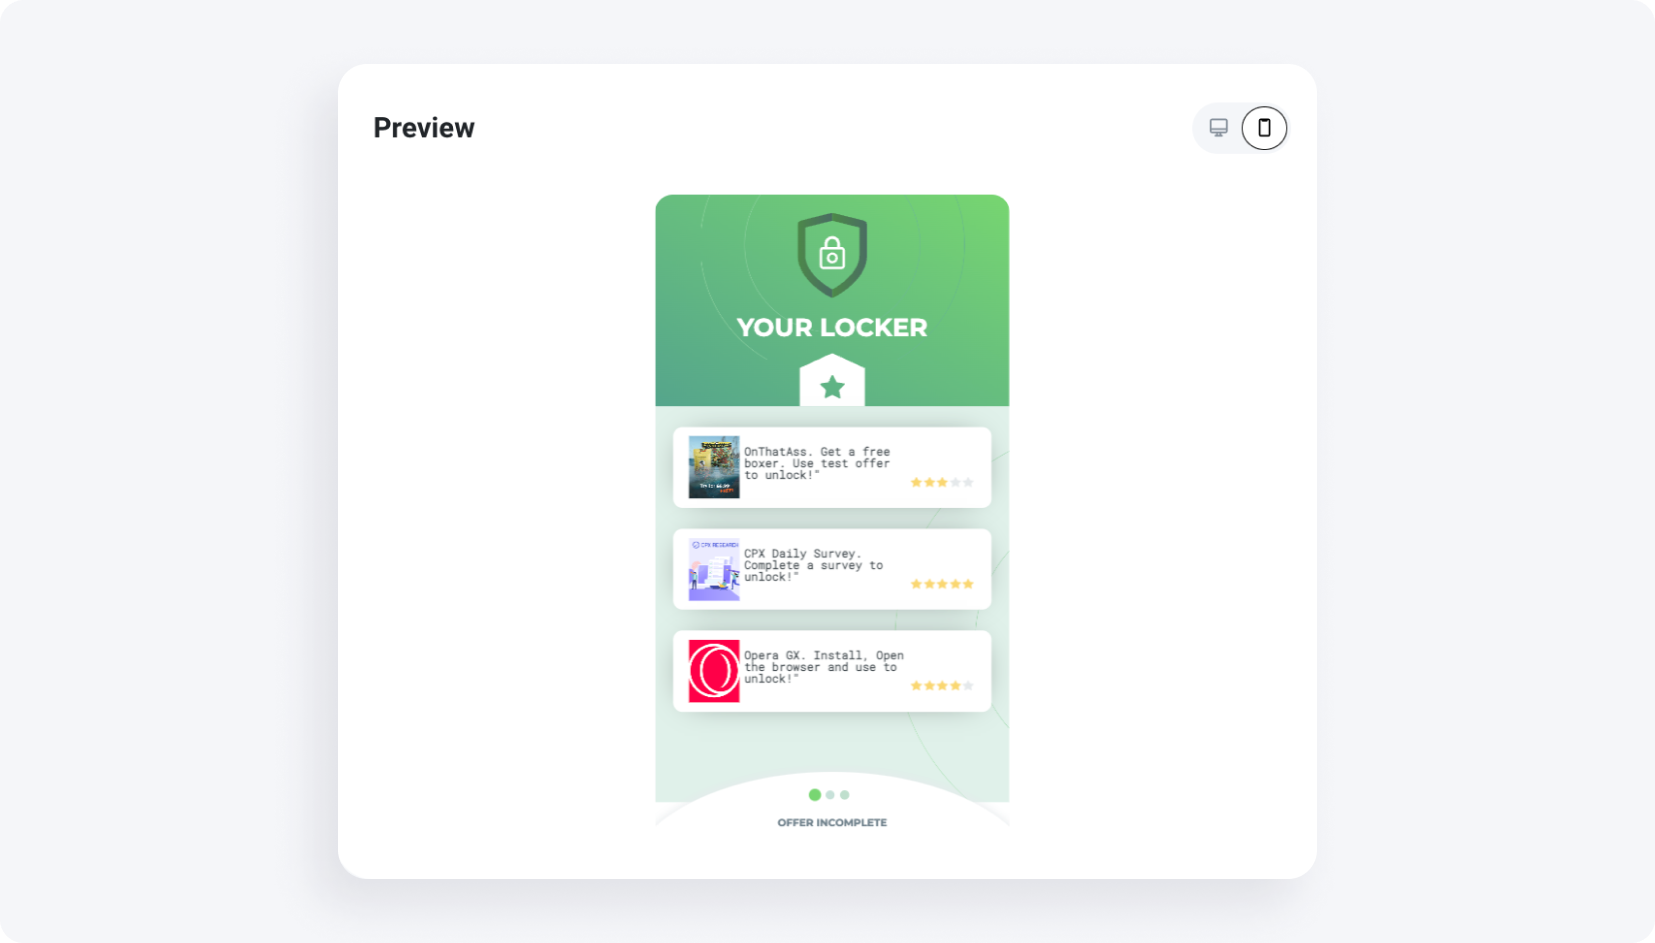
CPA Locker — basic settings
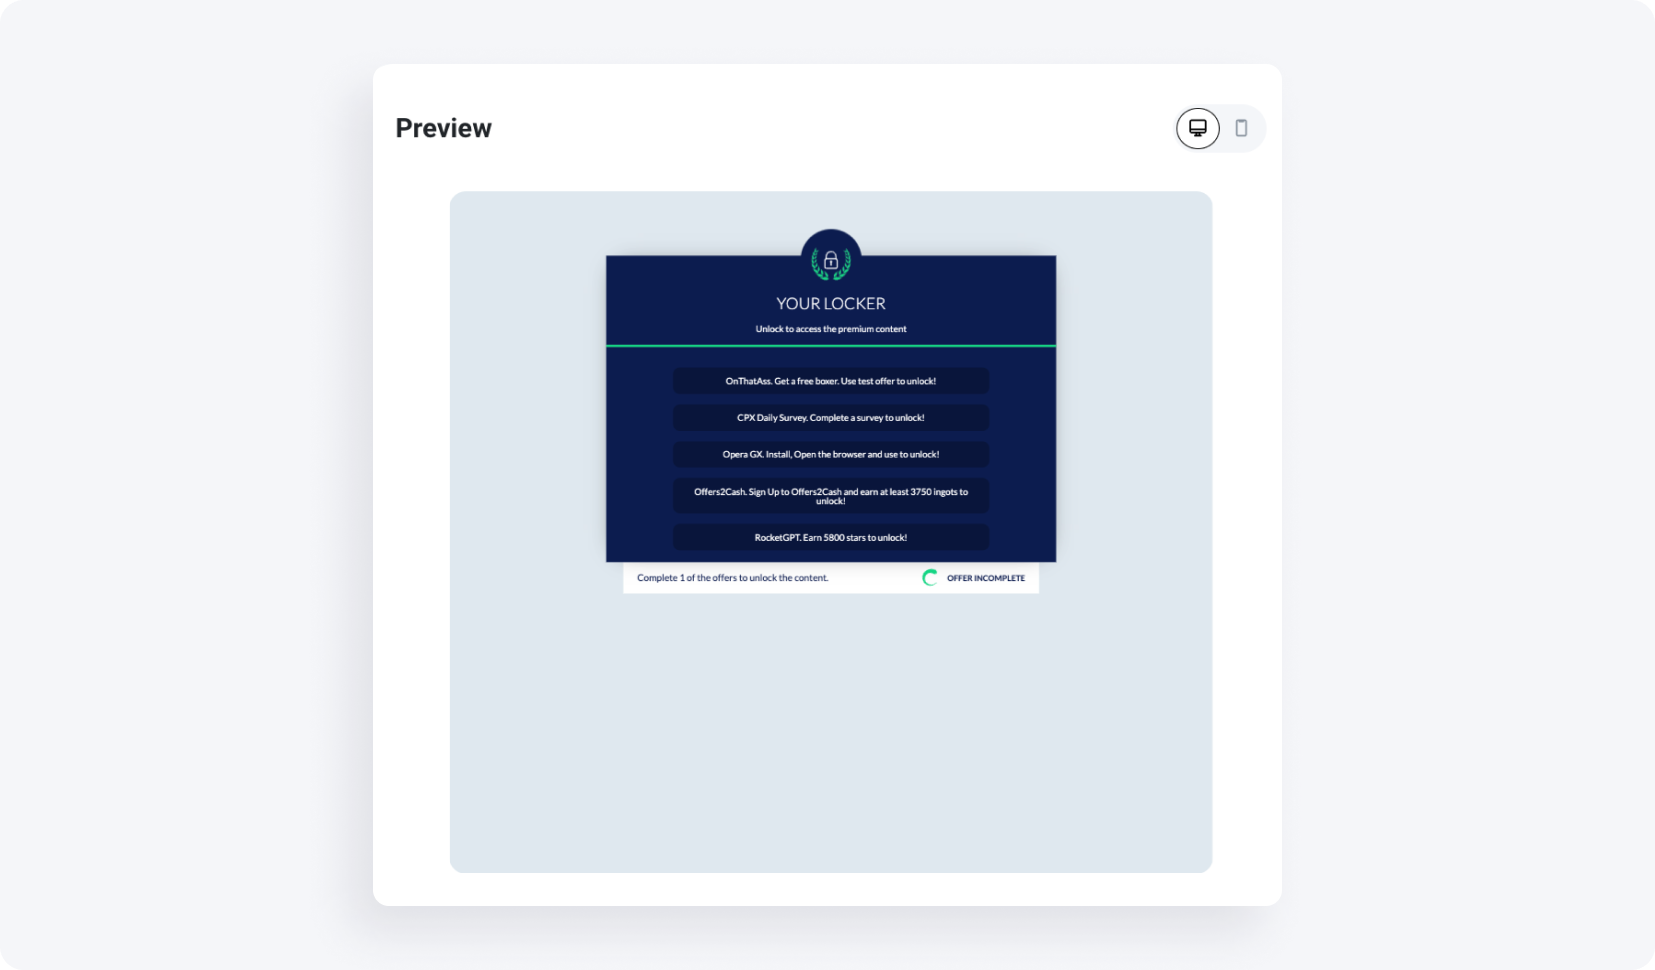
At the top of the screen you switch between the basic, desktop, and mobile tabs, while the live preview stays visible on the left.

Name your locker — for example, 'Your Locker'.
Set the number of required conversions; one conversion means the user completes one task to unlock the content.
Choose the loading method: immediately, after a set time, or after a click.
Pick the unlock action — remove the locker or redirect the user to a URL you enter.
Set the access time; the default is 3600 minutes, but you can switch the format to days, such as two days.
In additional options, decide whether the locker can display tasks not appropriate for minors.
You don't have to click Save when you move from one tab to another within the same locker.
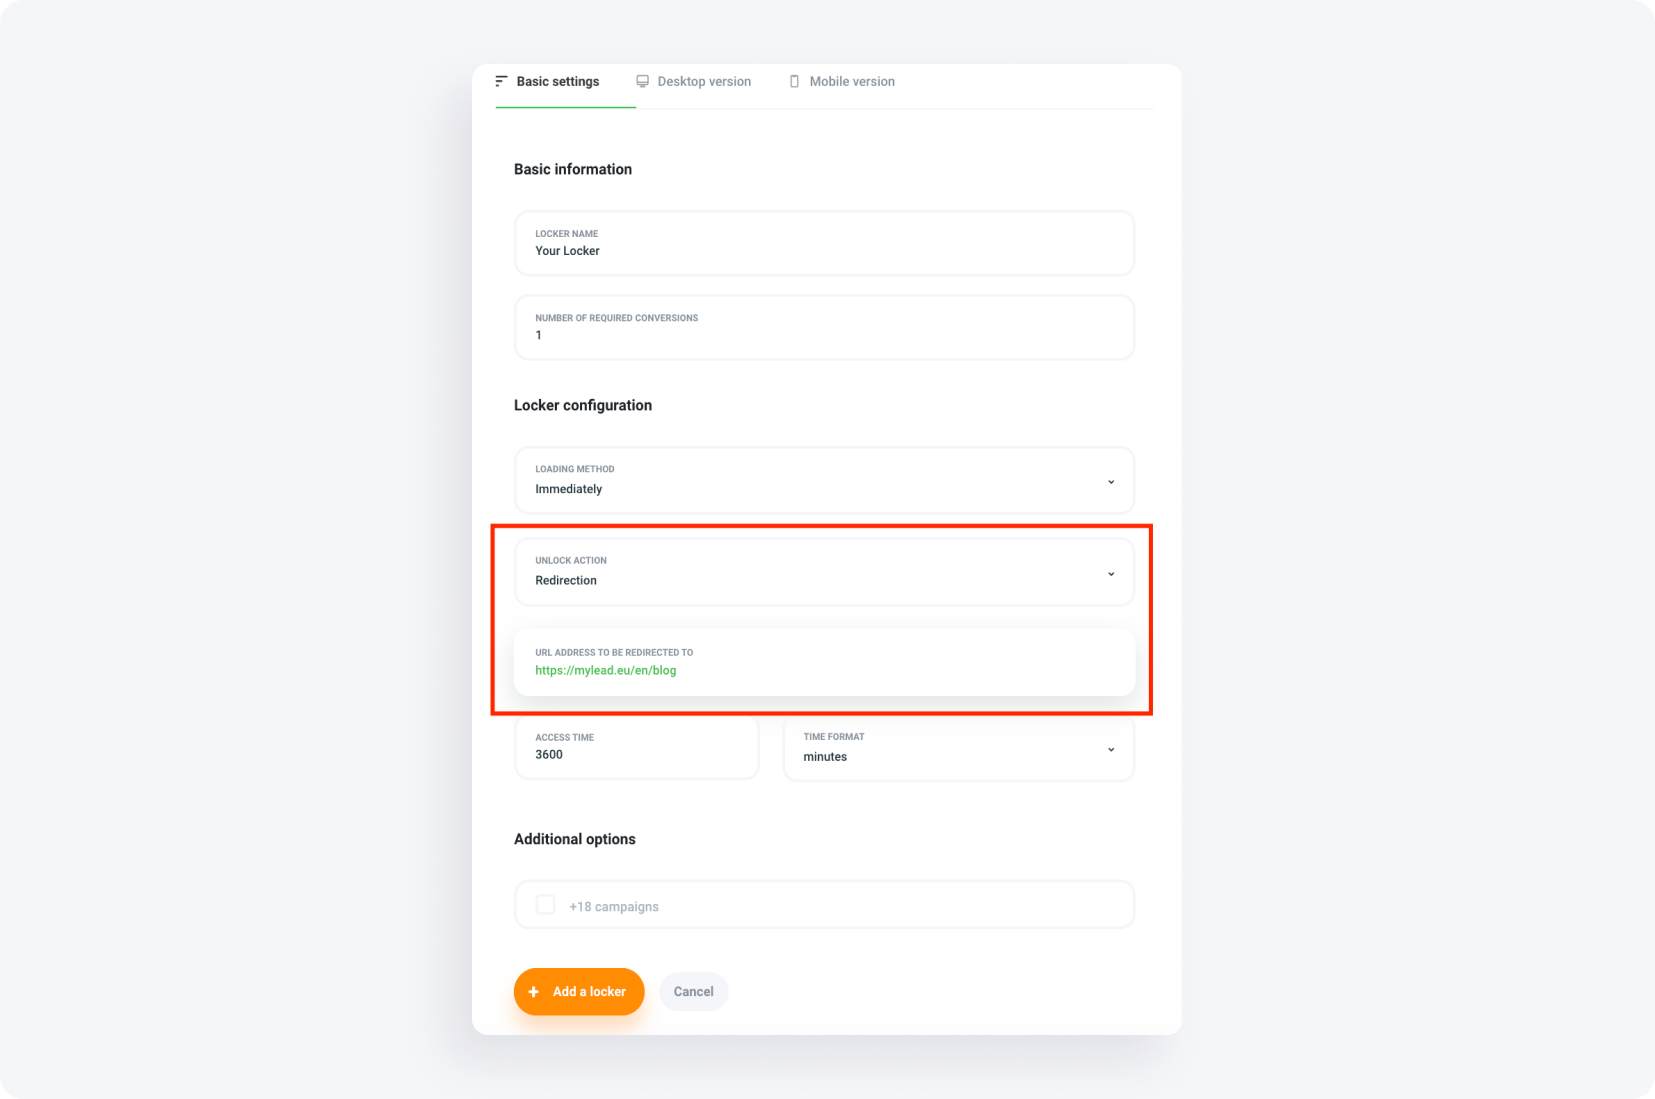
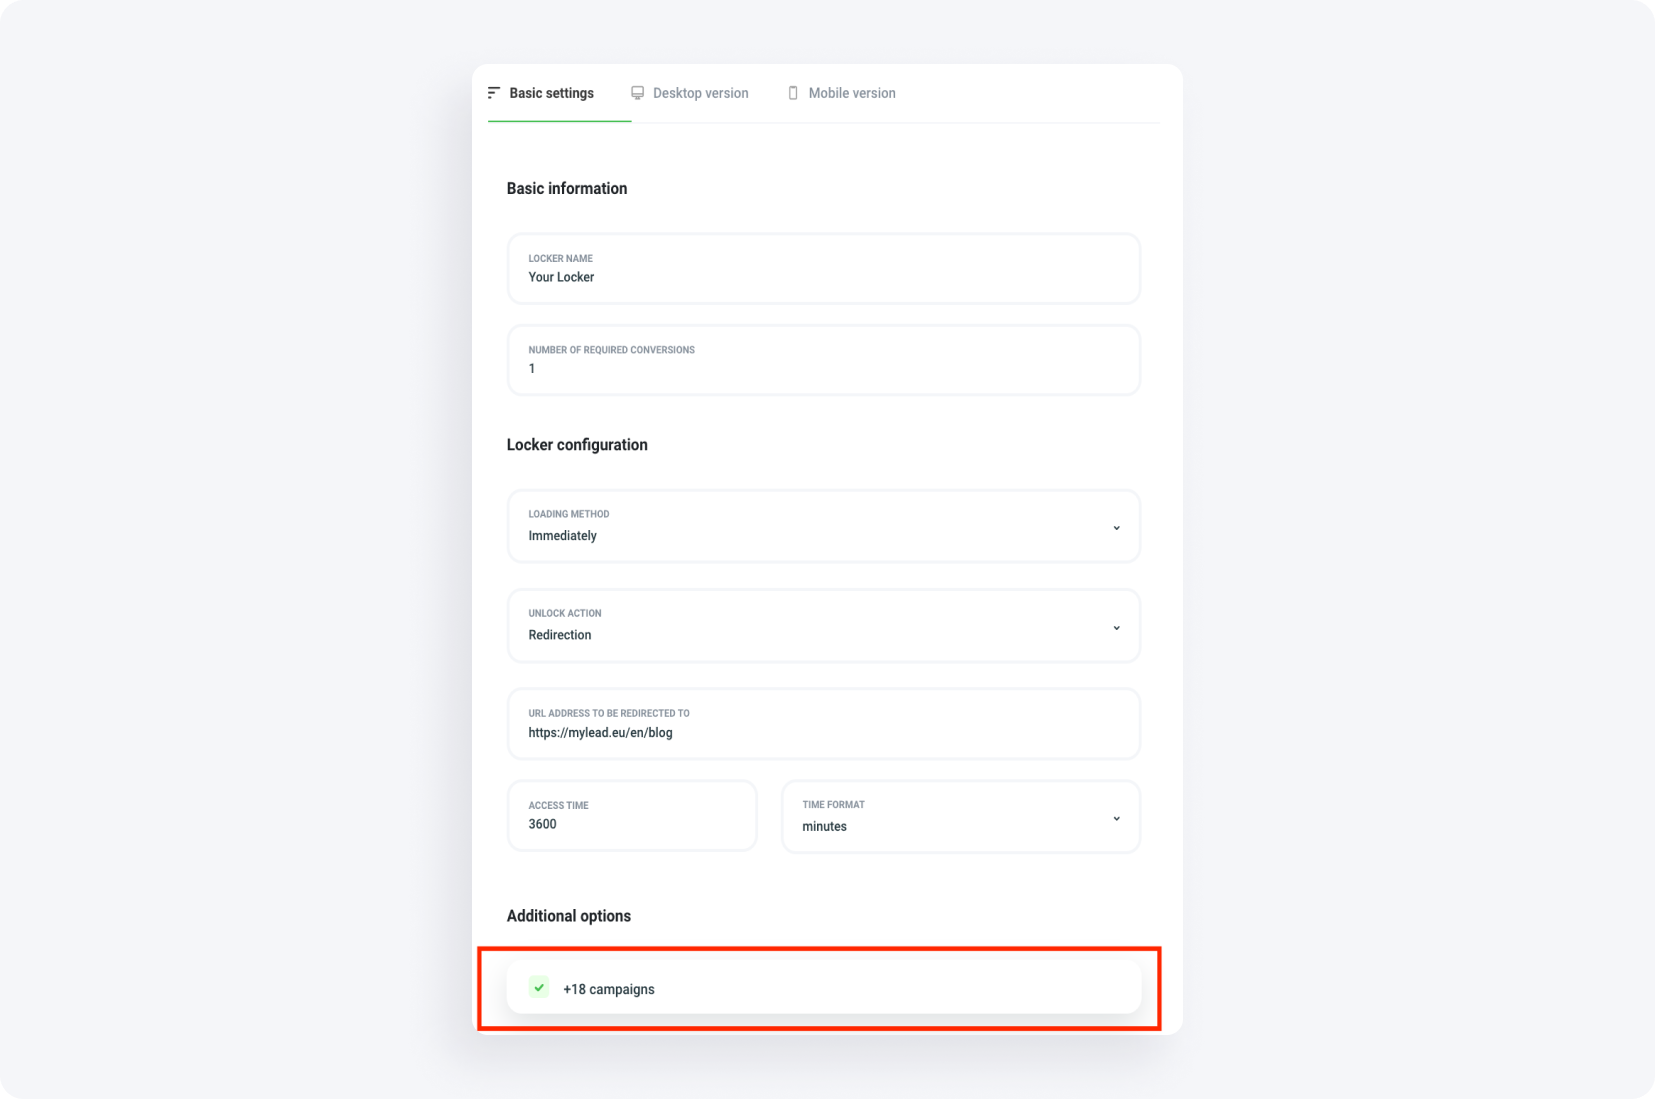
Basic settings summary:
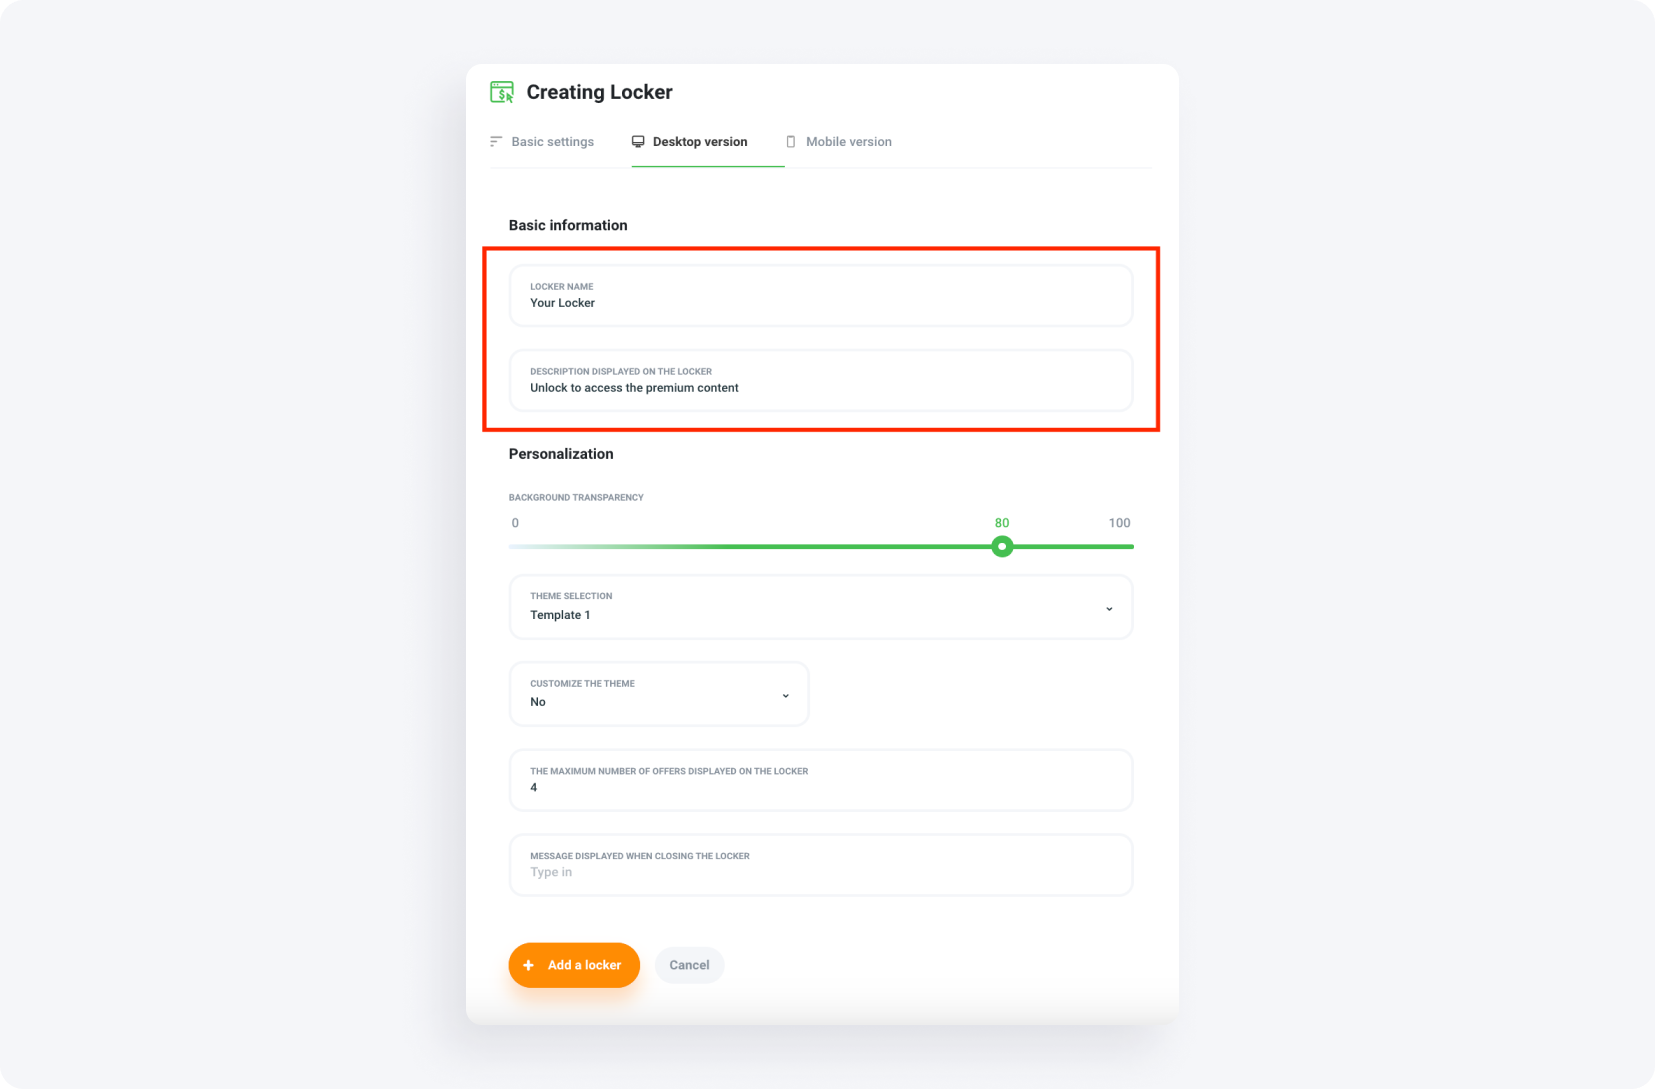
CPA Locker — desktop version settings
Now decide how the CPA Locker appears on PCs and laptops.
Name and description — add a title and a line such as 'Unlock to access the premium content'.
Theme selection — pick one of six templates, including an Instagram-adapted layout, and adjust the background transparency; the preview updates live.
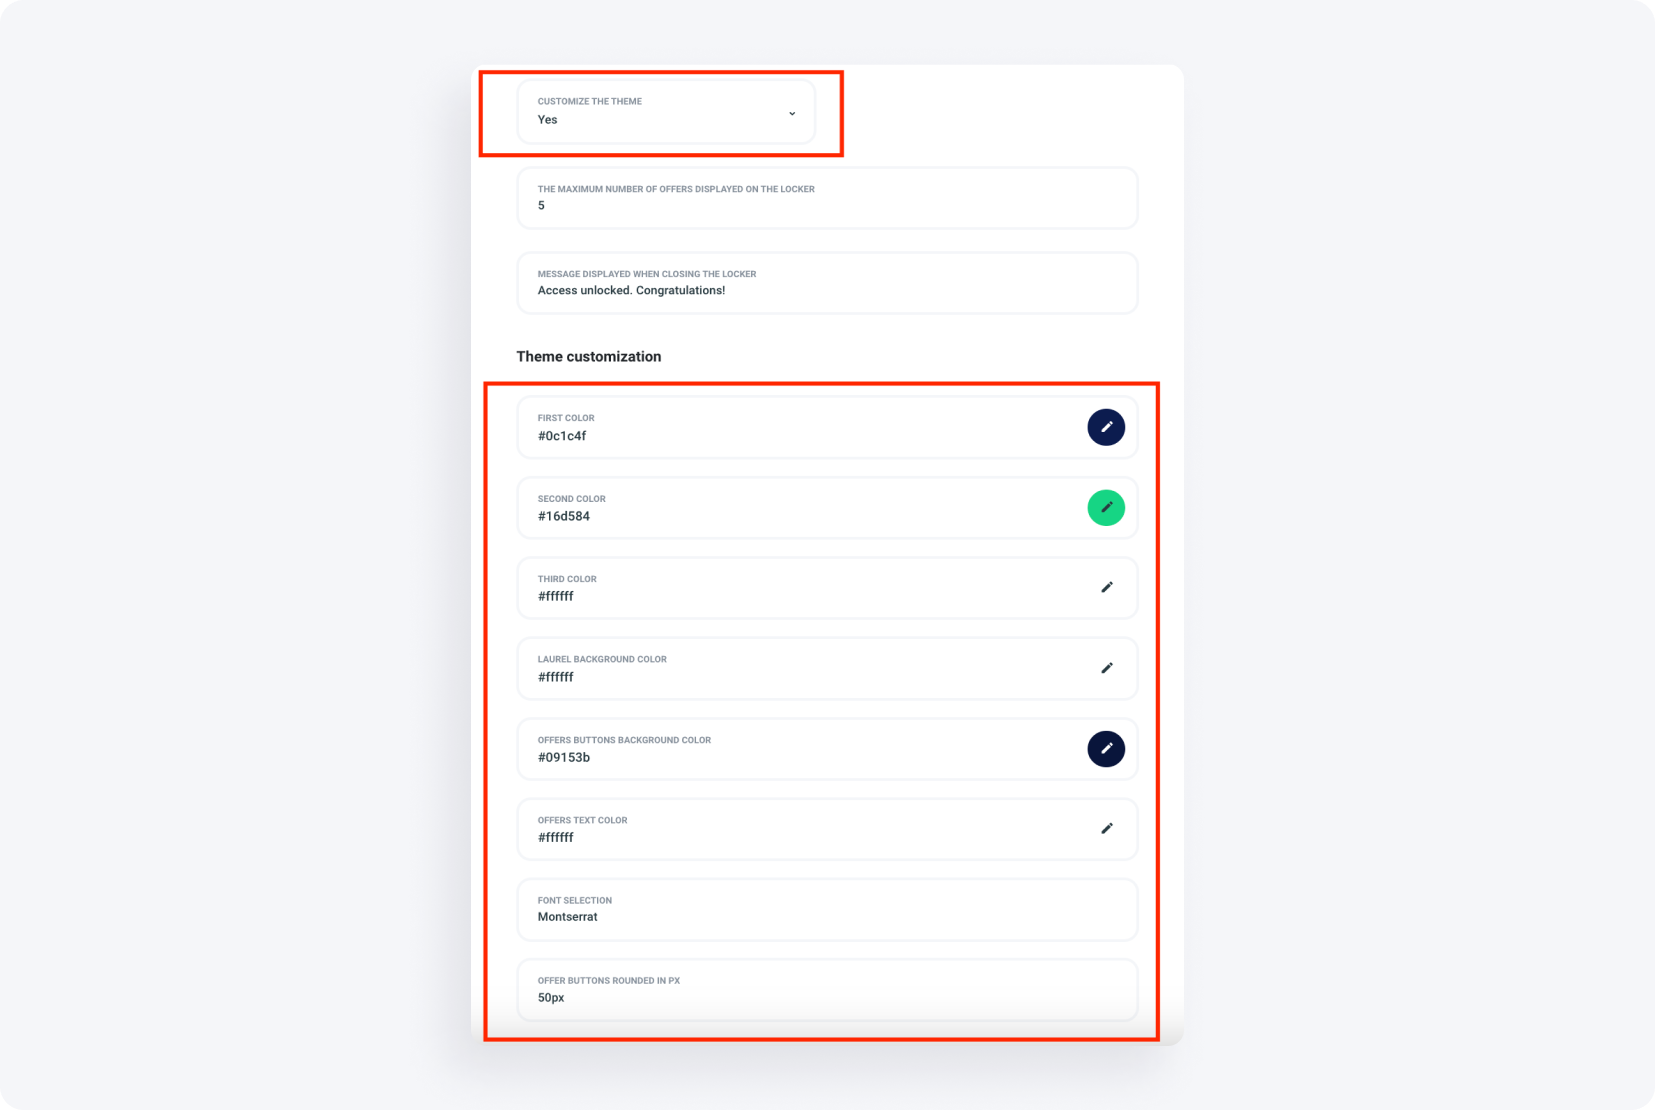
Customize the theme — choose 'Yes' to change colors, fonts, and whether the offer buttons are rounded.
Offer settings — set how many offers appear (up to five) and add a completion message such as 'Access unlocked. Congratulations!'; pick the offers from MyLead's catalog using the best affiliate programs for Content Lockers.
Instagram theme:

Our choice — Template 3:

CPA Locker — mobile version settings
The mobile setup for smartphones and tablets mirrors the desktop tab.
Name and description — set them as on desktop.
Theme appearance — choose and customize the theme; in this example, Template 2 with the Roboto Mono font.
Offer settings — the default is three offers; set their priority and check the preview.
Finalize — confirm the preview, then click Add a locker to save.
What is a Captcha Locker and how do you set it up?
A Captcha Locker works like a reCAPTCHA or bot-security check: visitors confirm they are human by performing an action, such as clicking a field, before they reach your content. It monetizes that verification step. You configure it under Tools → Content Lockers → Captcha Locker across basic, advanced, and device-specific tabs.
A Captcha Locker is one of the lightest content-locker formats and works well as a quick lead magnet — see how lockers act as lead magnets. To start, log in, open Content Lockers → Captcha Locker, and click Create Captcha Locker, or use the shortcut below.

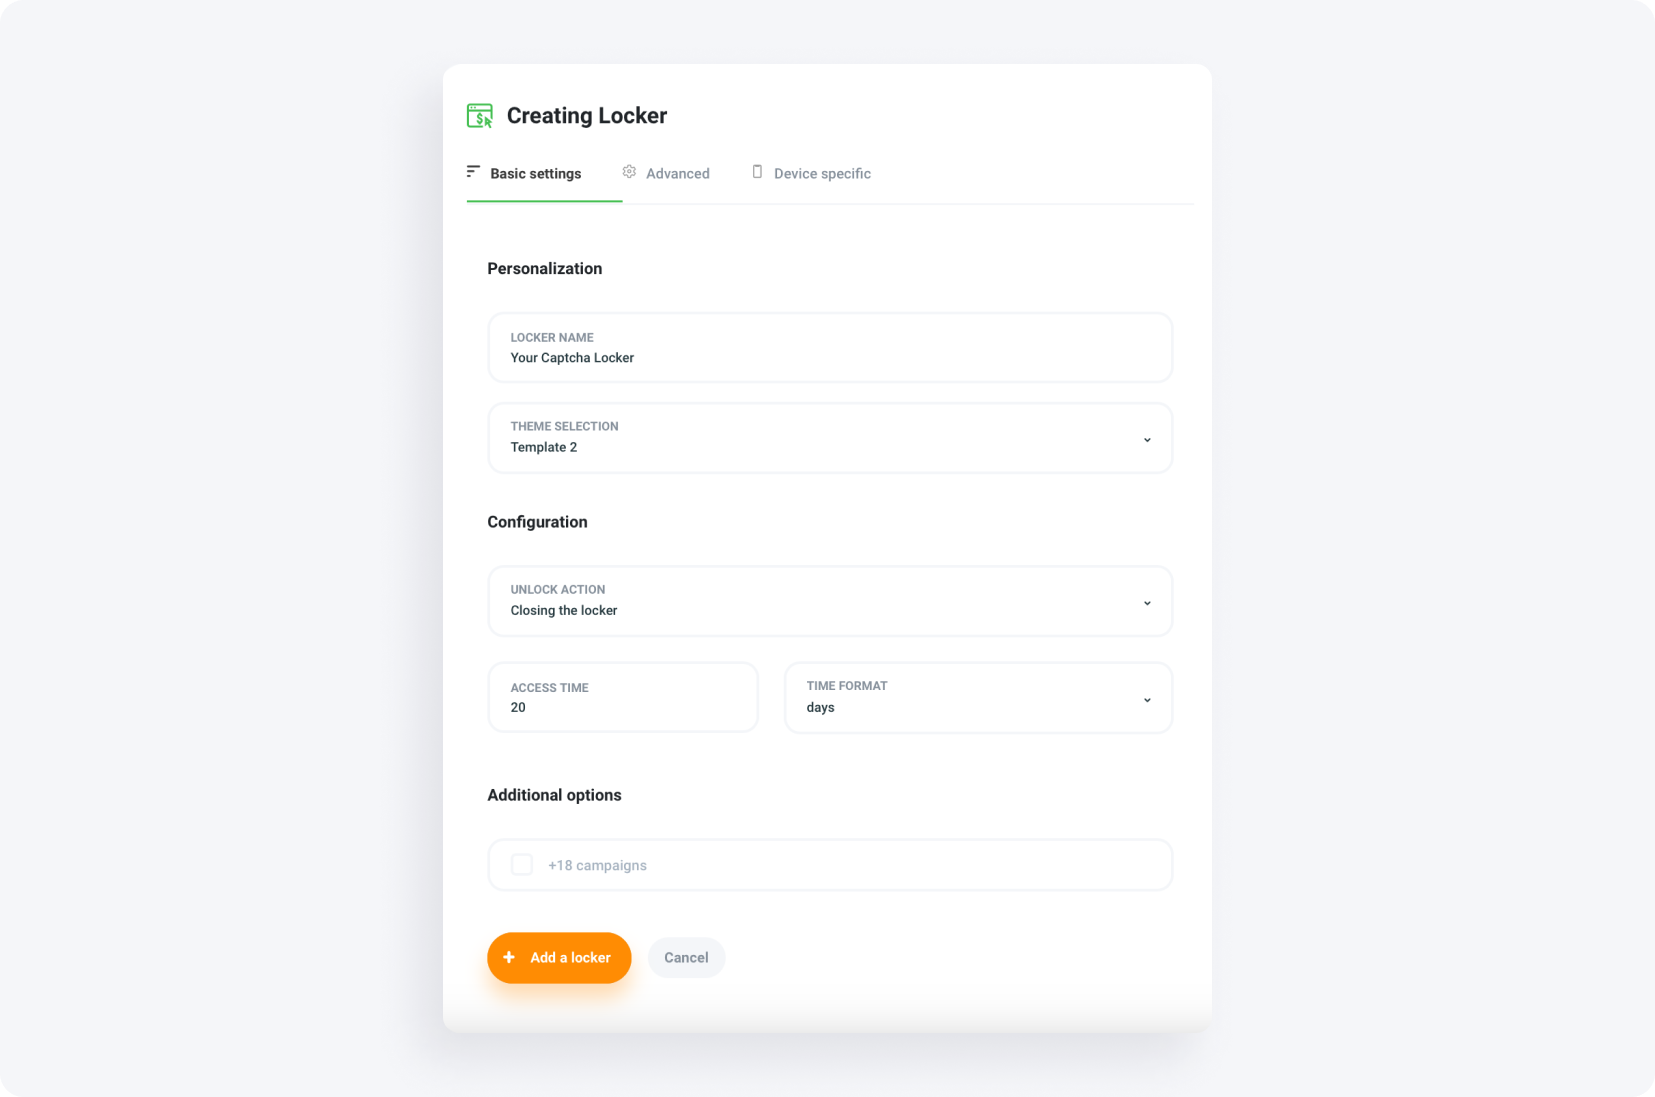
Captcha Locker — basic settings
Name your locker — for example, 'Your Captcha Locker'.
Select a theme from the drop-down — Template 1 or Template 2.
Choose the unlock action: close the locker or redirect the user to a URL you enter.
Set the access time; in this example, 20 days.
Decide whether the locker can display tasks not appropriate for minors.
Basic settings summary:
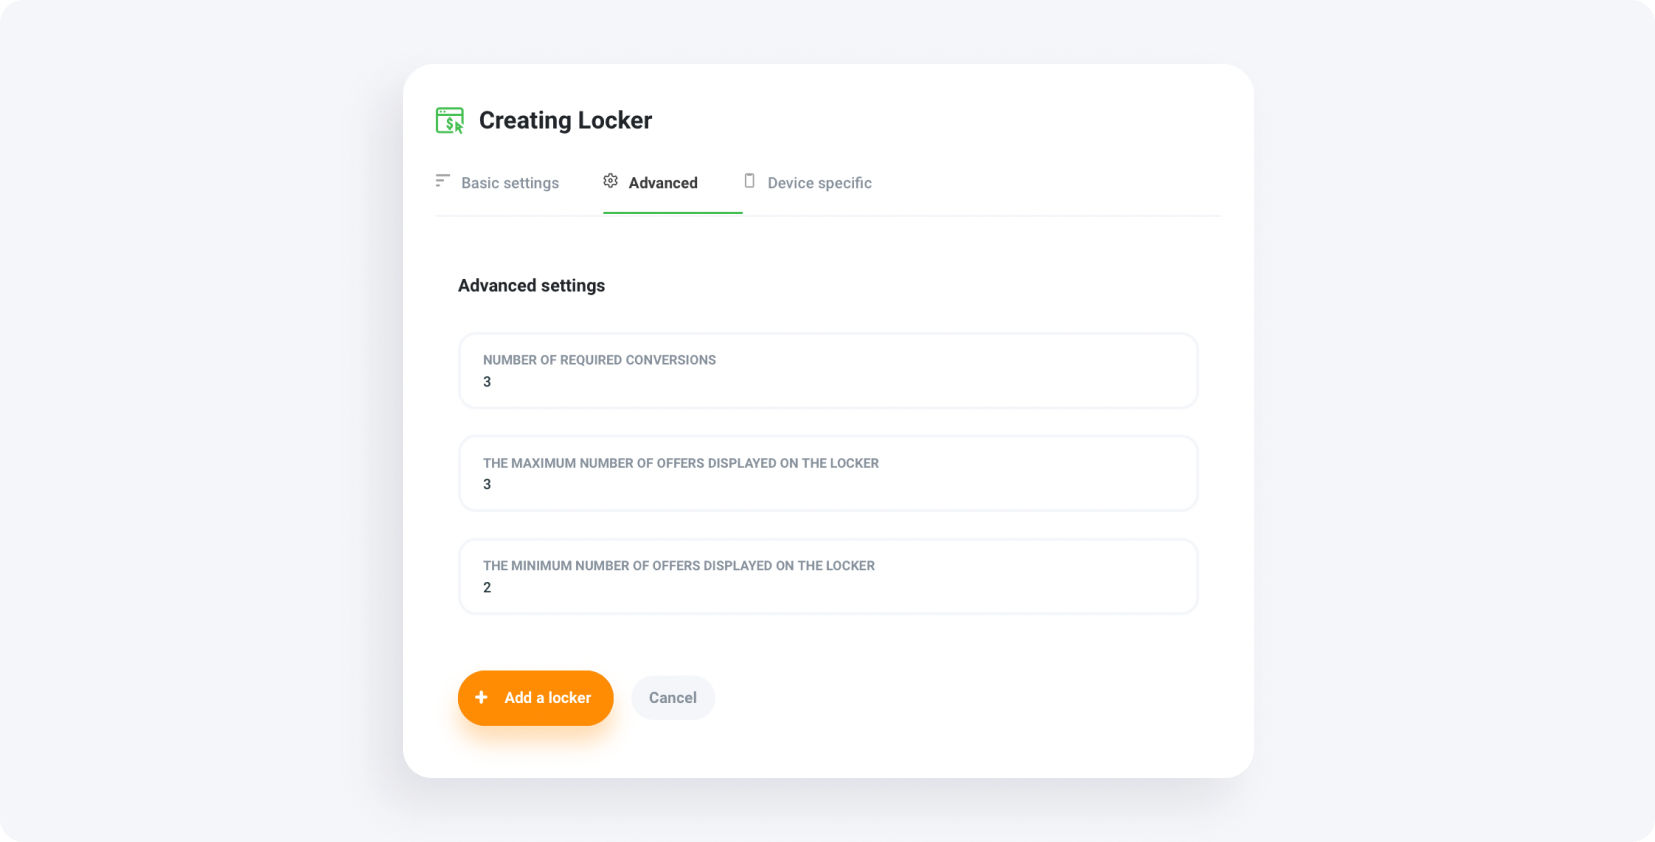
Captcha Locker — advanced settings
You don't need to save when moving between tabs within one locker.
Required conversions — set the number; in this example, three.
Offer display — set the minimum and maximum number of offers shown on the locker.
Advanced settings summary:
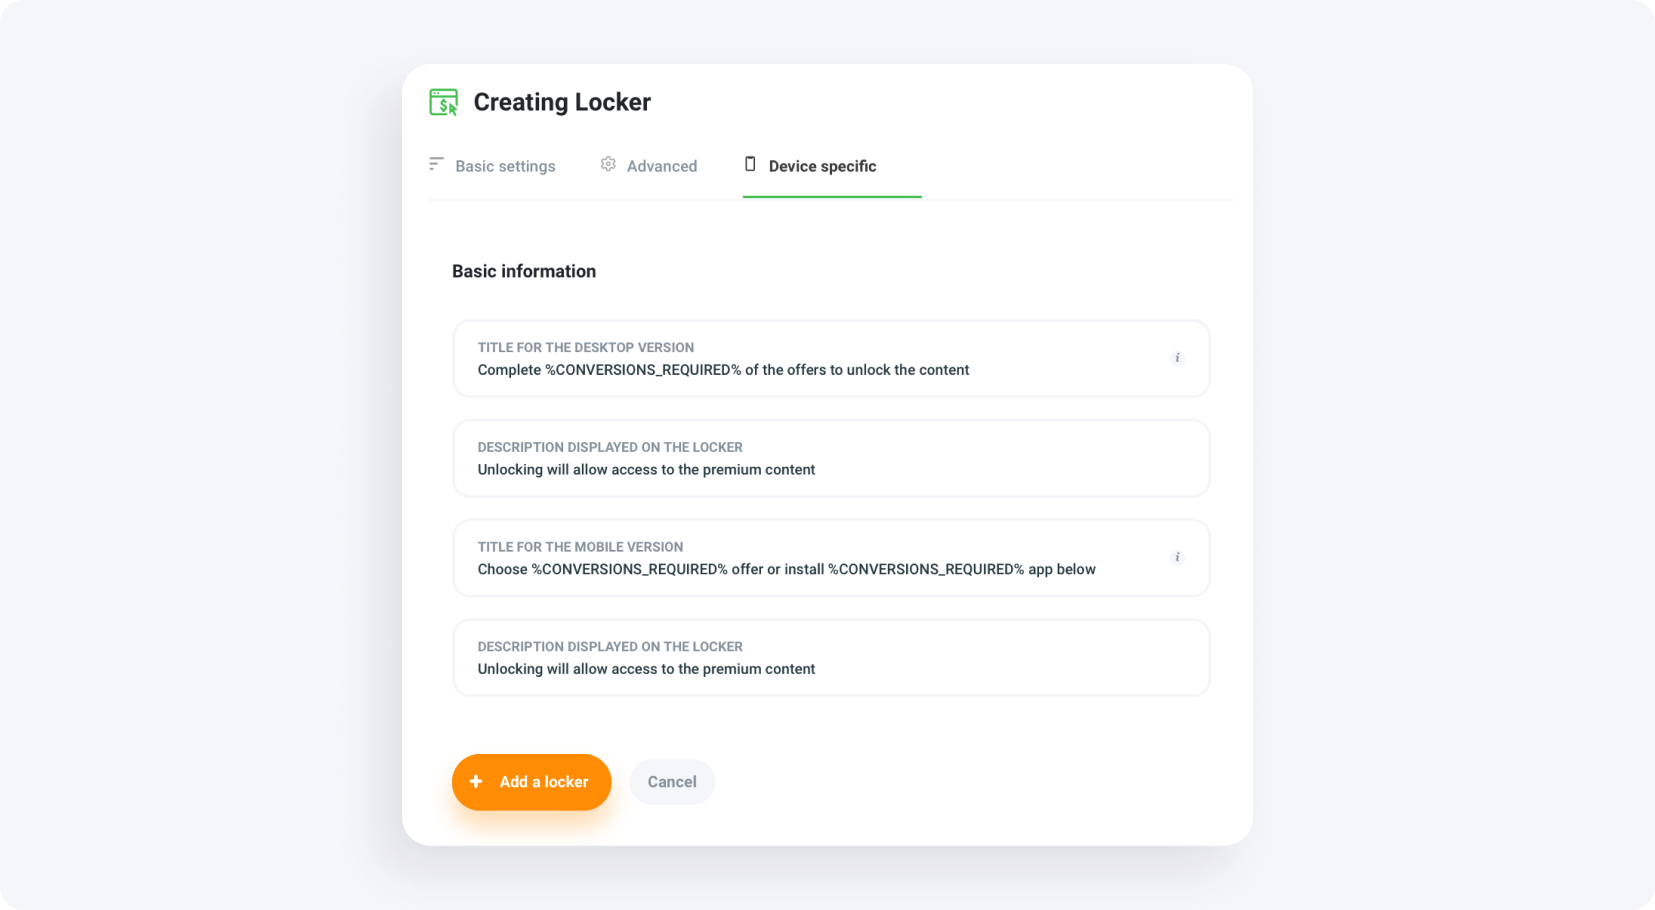
Captcha Locker — options for specific devices
Provide titles and descriptions for both the desktop and mobile versions as needed.
How do you configure a File Locker on MyLead?
A File Locker monetizes downloads: before a visitor can download your file, they complete a verification task that confirms they are human and triggers your commission. Once the task is done, the file becomes available. You set it up under Tools → Content Lockers → File Locker across the basic, advanced, and theme tabs.
A File Locker turns any download into a paid action — exactly how publishers monetize blocked articles and files. To begin, log in, open Content Lockers → File Locker under the Tools tab, and click the orange Create File Locker button, or use the shortcut below.
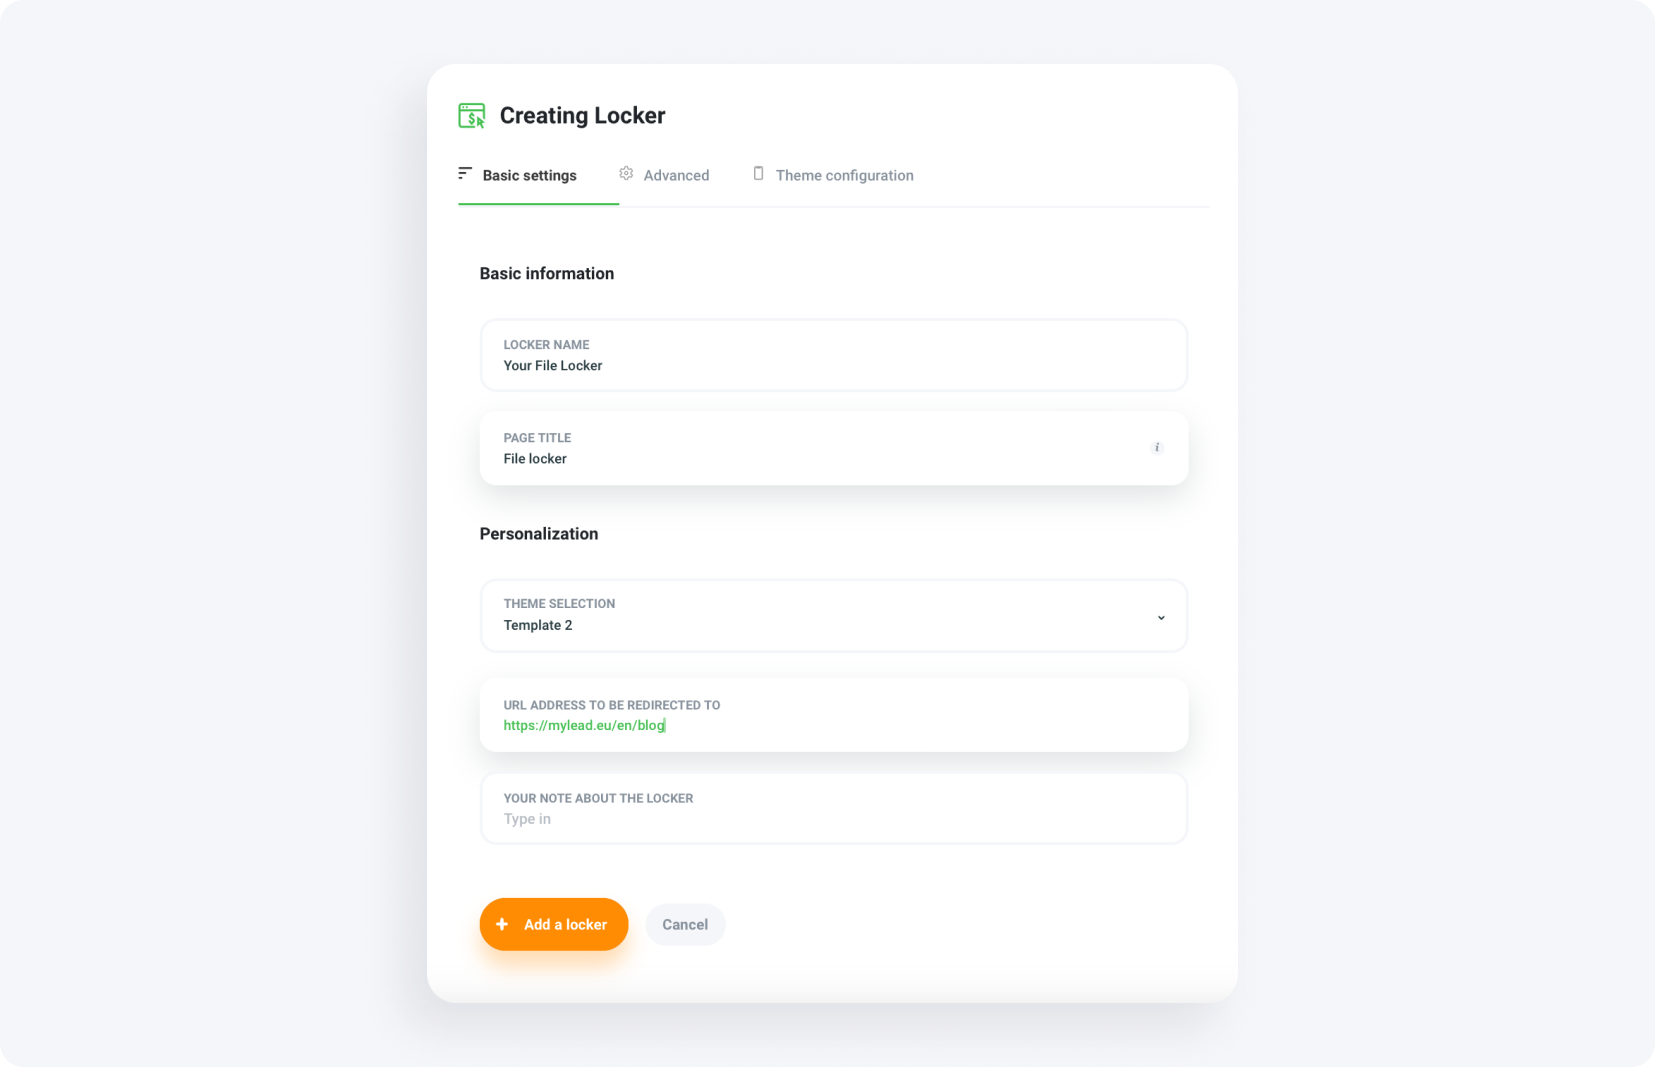
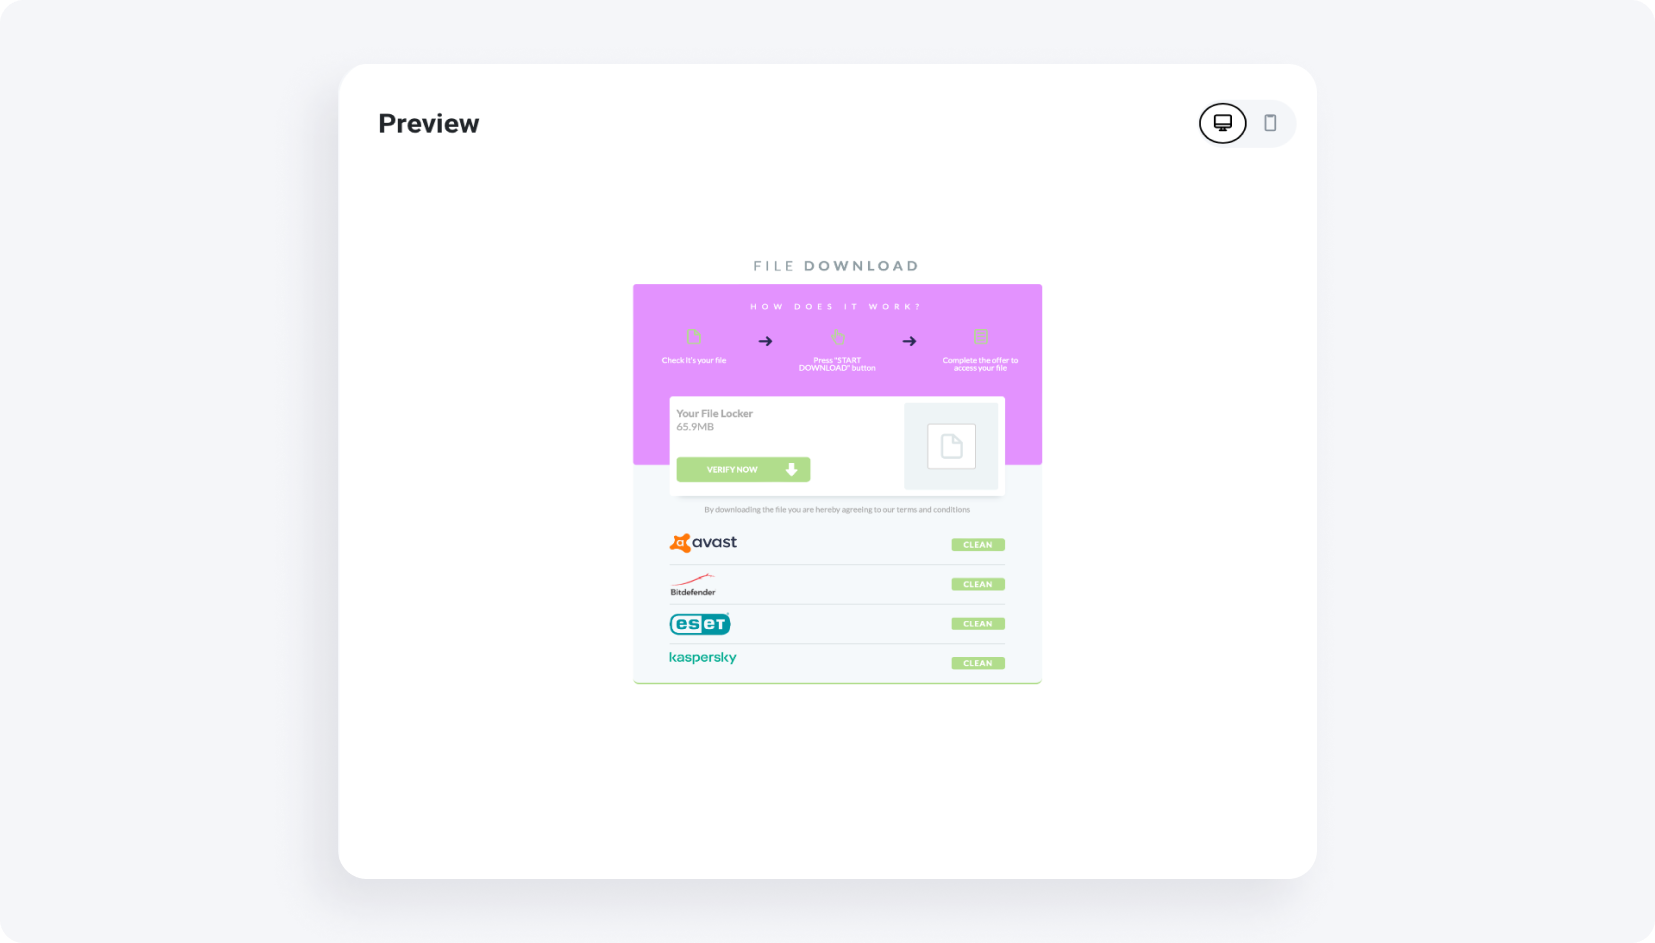
File Locker — basic settings
Name your locker — for example, 'Your File Locker'.
Select a theme from the drop-down; in this example, Template 2.
Enter the redirect URL the user reaches after unlocking the file — for instance, your blog address.
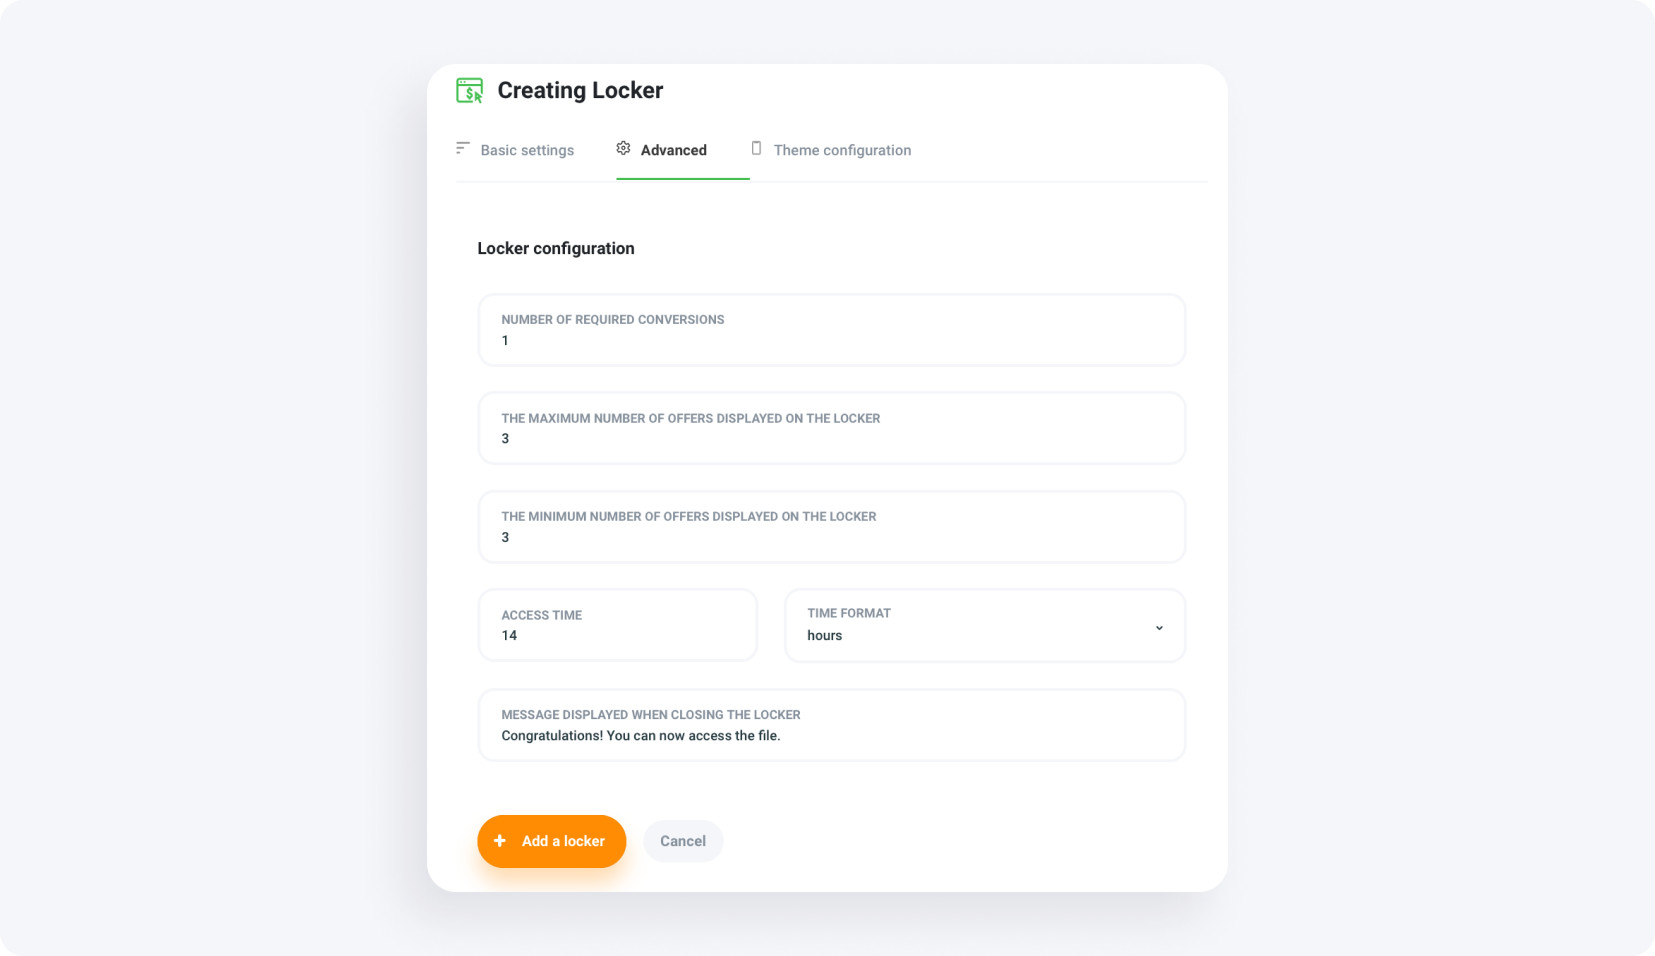
File Locker — advanced settings
Set the number of required conversions; for example, one task to receive access.
Set the minimum and maximum number of offers displayed.
Specify the access time for the unlocked file; for example, 14 hours.
Write the completion message, such as 'Congratulations! You can now access the file'.
Advanced settings summary:
File Locker — theme configuration
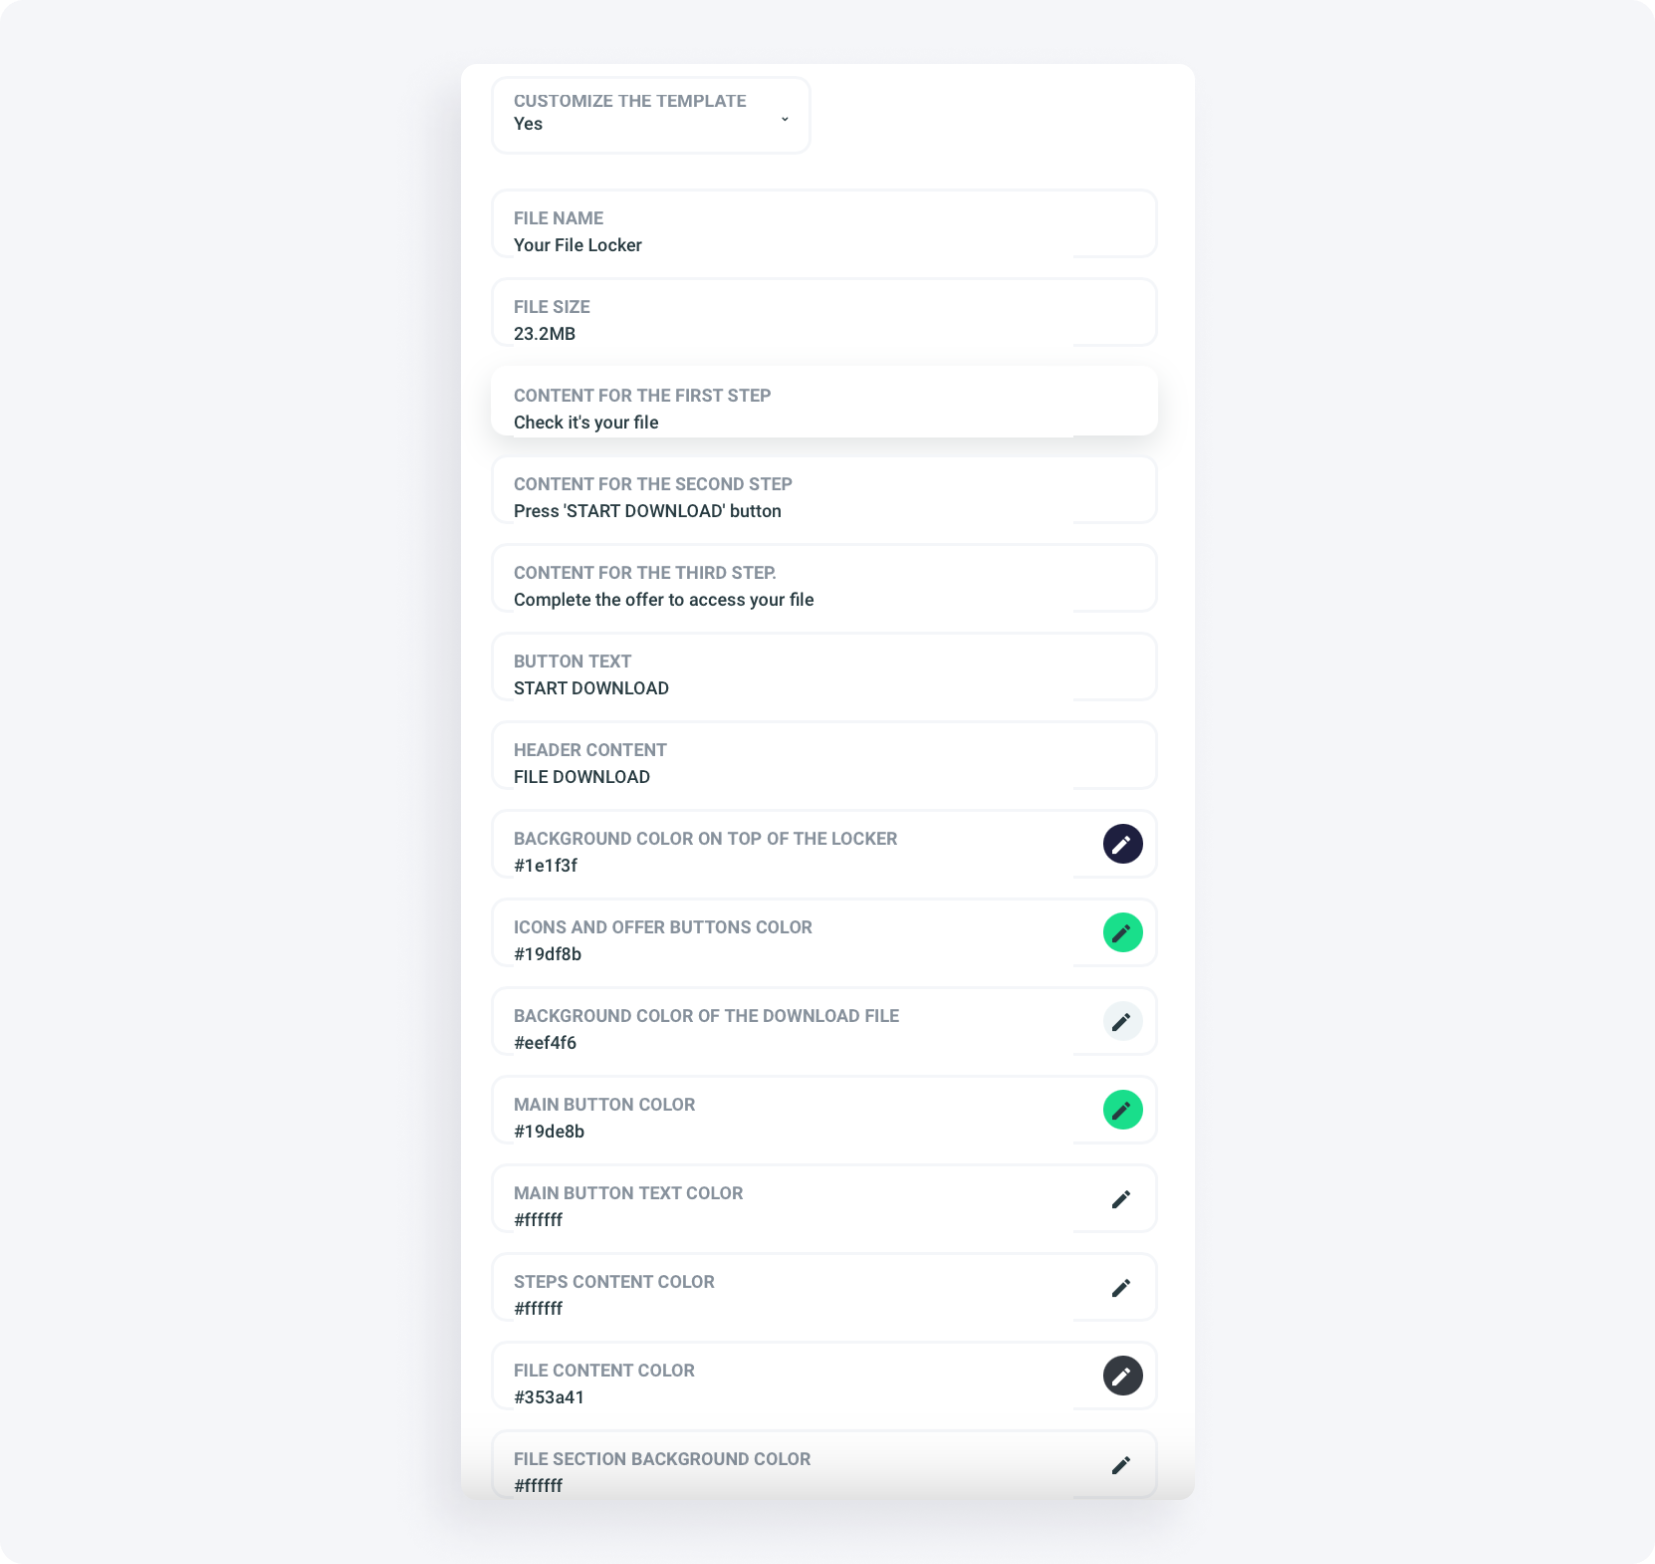
In the last tab, decide whether to customize the locker's appearance.
Yes — change the file name, button content, and color scheme.
No — keep the default, standard appearance.
After the changes, the locker looks like this:
Which content locker should you choose?
Choose the locker that matches your content. A CPA Locker suits premium articles and gated pages where users complete a full offer; a Captcha Locker fits short content that only needs a quick human-verification step; a File Locker is built for downloads such as software, e-books, or media files. All three pay per completed conversion.
| Locker type | Best for | User action | Highlight setting |
|---|---|---|---|
| CPA Locker | Premium articles, gated pages | Complete an offer | Up to 5 offers, 6 themes |
| Captcha Locker | Short content, quick gating | Human-verification click | Min/max offers, device tabs |
| File Locker | Downloads (software, e-books, media) | Verification task | Redirect URL, antivirus badges |
Don't have a publisher account yet? Create your free MyLead account and build your first content locker in minutes.
If you run into any issues while configuring a locker, MyLead's support team is ready to help at every step.

Key takeaways
MyLead offers three content lockers — CPA, Captcha, and File — all free to create and paid per completed conversion.
A CPA Locker can show up to five offers and six themes, including an Instagram-style template.
You don't need to save between tabs — settings persist while you stay within one locker.
Access time is fully adjustable, from 3600 minutes to days, and you can redirect users to any URL after unlocking.
A File Locker is the right choice for monetizing downloads and shows antivirus 'clean' badges that build user trust.
Always check the live preview before clicking Add a locker to confirm the final look.
FAQ
1. What is the main difference between CPA, Captcha, and File Lockers?
A CPA Locker requires users to complete an action like a form or sign-up; a Captcha Locker asks for a quick human-verification step; a File Locker gates a downloadable file behind a task.
2. Can I customize how the locker looks on my website?
Yes. MyLead provides several pre-made templates, including an Instagram-friendly theme, and you can manually change background transparency, colors, fonts, and button styles to match your brand.
3. How long does a user keep access after unlocking content?
You set this yourself in the basic settings. The access time can be 3600 minutes, 14 hours, 20 days, or any value that fits your audience.
4. Do I need to save my progress while configuring a locker?
No. You don't need to click Save when switching between tabs — such as moving from basic settings to the desktop or mobile tab — within the same locker.
5. What happens right after a user completes the required task?
It depends on the unlock action you chose. The locker either closes to reveal the hidden content or redirects the user to a specific URL you defined.
Summary
Configuring content lockers on MyLead is straightforward: choose the format that matches your content, set the conversions, access time, and theme, then check the preview before saving. Whether you monetize articles, verifications, or downloads, a well-configured CPA, Captcha, or File Locker turns ordinary traffic into recurring affiliate commissions.
Have any questions? Feel free to reach us through our channels.